最近项目中使用到了渐变效果的圆形进度条,网上找了很多渐变效果不够圆滑,两个渐变颜色之间有明显的过渡,或者有些代码画出来的效果过渡不美观,于是自己参照写了一个,喜欢的朋友可以参考或者直接使用。
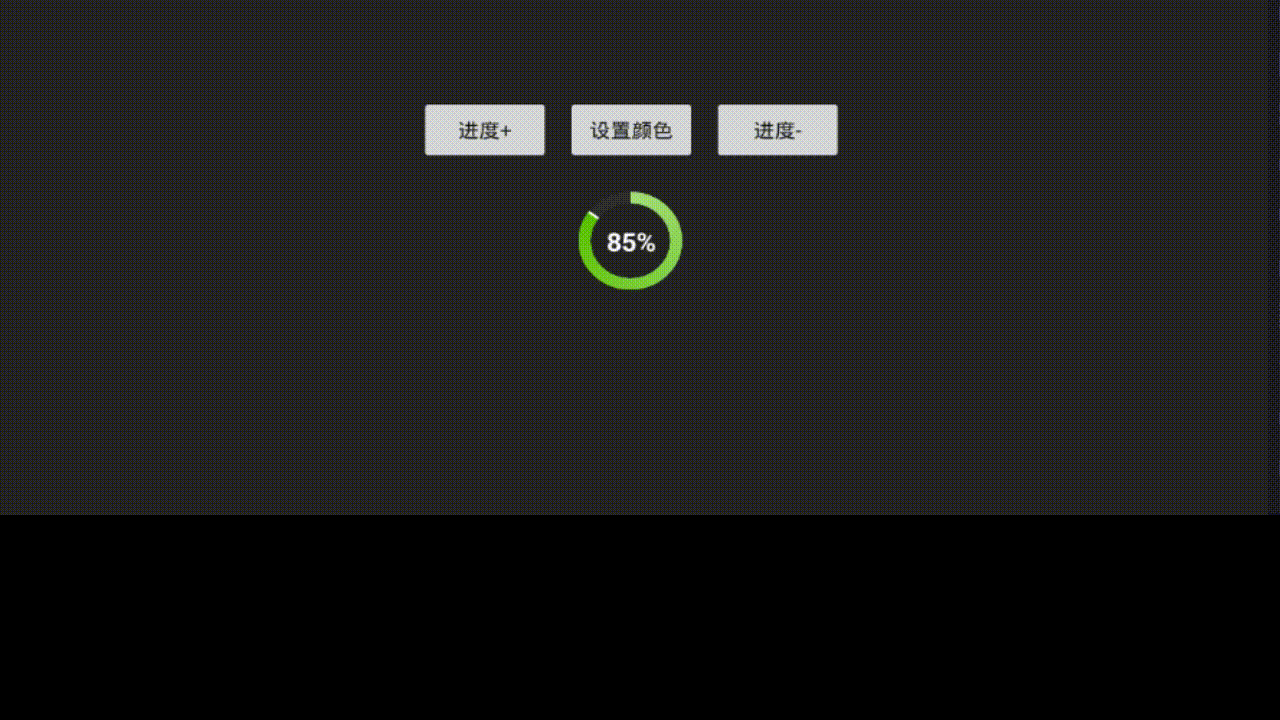
先上一张效果图,视频录制不太好,不过不影响效果
下面开始介绍实现代码,比较简单,直接贴代码吧
1、声明自定义属性
在项目的valuse文件夹下新建attrs.xml,在里面定义自定义控件需要的属性
<declare-styleable name="RoundProgress">
    <attr name="bgColor" format="color" />
    <attr name="roundWidth" format="dimension" />
    <attr name="textColor" format="color" />
    <attr name="textSize" format="dimension" />
    <attr name="maxProgress" format="integer" />
    <attr name="textIsDisplayable" format="boolean" />
    <attr name="lineColor" format="color" />
</declare-styleable>
2、自定义一个进度条RoundProgres继承view类
package com.blankj.progressring;

import android.animation.ValueAnimator;
import android.content.Context;
import android.content.res.TypedArray;
import android.graphics.Canvas;
import android.graphics.Color;
import android.graphics.Matrix;
import android.graphics.Paint;
import android.graphics.Rect;
import android.graphics.RectF;
import android.graphics.SweepGradient;
import android.graphics.Typeface;
import android.util.AttributeSet;
import android.util.Log;
import android.view.View;
import android.view.animation.LinearInterpolator;

import org.jetbrains.annotations.Nullable;

/**
 * 类描述:渐变的圆形进度条
 *
 * @author:lusy
 * @date :2018/10/17
 */
public class RoundProgress extends View {
  private static final String TAG = "roundProgress";
  /**
   * 背景圆环画笔
   */
  private Paint bgPaint;
  /**
   * 白色标记画笔
   */
  private Paint iconPaint;
  /**
   * 进度画笔
   */
  private Paint progressPaint;
  /**
   * 进度文本画笔
   */
  private Paint textPaint;
  /**
   * 背景圆环的颜色
   */
  private int bgColor;
  /**
   * 线条进度的颜色
   */
  private int iconColor;

  private int[] progressColor;
  /**
   * 中间进度百分比的字符串的颜色
   */
  private int textColor;
  /**
   * 中间进度百分比的字符串的字体大小
   */
  private float textSize;
  /**
   * 圆环的宽度
   */
  private float roundWidth;
  /**
   * 最大进度
   */
  private int max;
  /**
   * 当前进度
   */
  private float progress;
  /**
   * 是否显示中间的进度
   */
  private boolean textIsDisplayable;
  /**
   * 圆环半径
   */
  private int mRadius;
  private int center;

  private float startAngle = -90;
  private float currentAngle;
  private float currentProgress;

  public RoundProgress(Context context) {
    this(context, null);
  }

  public RoundProgress(Context context, @Nullable AttributeSet attrs) {
    super(context, attrs);
    TypedArray mTypedArray = context.obtainStyledAttributes(attrs, R.styleable.RoundProgress);

    //获取自定义属性和默认值
    bgColor = mTypedArray.getColor(R.styleable.RoundProgress_bgColor, Color.parseColor("#2d2d2d"));
    iconColor = mTypedArray.getColor(R.styleable.RoundProgress_lineColor, Color.parseColor("#ffffff"));
    textColor = mTypedArray.getColor(R.styleable.RoundProgress_textColor, Color.parseColor("#ffffff"));
    textSize = mTypedArray.getDimension(R.styleable.RoundProgress_textSize, 15);
    roundWidth = mTypedArray.getDimension(R.styleable.RoundProgress_roundWidth, 5);
    max = mTypedArray.getInteger(R.styleable.RoundProgress_maxProgress, 100);
    textIsDisplayable = mTypedArray.getBoolean(R.styleable.RoundProgress_textIsDisplayable, true);
    progressColor = new int[]{Color.parseColor("#747eff"), Color.parseColor("#0018ff"), Color.TRANSPARENT};
    mTypedArray.recycle();
    initPaint();
  }

  public RoundProgress(Context context, @Nullable AttributeSet attrs, int defStyleAttr) {
    super(context, attrs, defStyleAttr);
  }


  @Override
  protected void onMeasure(int widthMeasureSpec, int heightMeasureSpec) {
    //测量控件应占的宽高大小,此处非必需,只是为了确保布局中设置的宽高不一致时仍显示完整的圆
    int measureWidth = MeasureSpec.getSize(widthMeasureSpec);
    int measureHeight = MeasureSpec.getSize(heightMeasureSpec);
    setMeasuredDimension(Math.min(measureWidth, measureHeight), Math.min(measureWidth, measureHeight));
  }

  private void initPaint() {

    bgPaint = new Paint();
    bgPaint.setStyle(Paint.Style.STROKE);
    bgPaint.setAntiAlias(true);
    bgPaint.setColor(bgColor);
    bgPaint.setStrokeWidth(roundWidth);

    iconPaint = new Paint();
    iconPaint.setStyle(Paint.Style.STROKE);
    iconPaint.setAntiAlias(true);
    iconPaint.setColor(iconColor);
    iconPaint.setStrokeWidth(roundWidth);

    progressPaint = new Paint();
    progressPaint.setStyle(Paint.Style.STROKE);
    progressPaint.setAntiAlias(true);
    progressPaint.setStrokeWidth(roundWidth);

    textPaint = new Paint();
    textPaint.setStyle(Paint.Style.STROKE);
    textPaint.setTypeface(Typeface.DEFAULT_BOLD);
    textPaint.setAntiAlias(true);
    textPaint.setColor(textColor);
    textPaint.setTextSize(textSize);
    textPaint.setStrokeWidth(0);


  }

  @Override
  protected void onDraw(Canvas canvas) {
    /**
     * 画最外层的大圆环
     */
    //获取圆心的x坐标
    center = Math.min(getWidth(), getHeight()) / 2;
    // 圆环的半径
    mRadius = (int) (center - roundWidth / 2);

    RectF oval = new RectF(center - mRadius, center - mRadius, center   mRadius, center   mRadius);
    //画背景圆环
    canvas.drawArc(oval, startAngle, 360, false, bgPaint);
    //画进度圆环
    drawProgress(canvas, oval);

    canvas.drawArc(oval, startAngle, currentAngle, false, progressPaint);
    //画白色圆环
    float start = startAngle   currentAngle - 1;
    canvas.drawArc(oval, start, 3, false, iconPaint);

    //百分比文字
    int percent = (int) (((float) progress / (float) max) * 100);
    //测量字体宽度,我们需要根据字体的宽度设置在圆环中间
    String text = String.valueOf(percent) "%";
    Rect textRect = new Rect();
    textPaint.getTextBounds(text, 0, text.length(), textRect);
    if (textIsDisplayable && percent >= 0) {
      //画出进度百分比文字
      float x = (getWidth() - textRect.width()) / 2;
      float y = (getHeight()   textRect.height()) / 2;
      canvas.drawText(text, x, y, textPaint);
    }
    if (currentProgress < progress) {
      currentProgress  ;
      postInvalidate();
    }

  }

  /**
   * 画进度圆环
   *
   * @param canvas
   * @param oval
   */
  private void drawProgress(Canvas canvas, RectF oval) {
    float section = progress / 100;
    currentAngle = section * 360;
    //把需要绘制的角度分成100等分
    float unitAngle = (float) (currentAngle / 100.0);
    for (float i = 0, end = currentProgress * unitAngle; i <= end; i  ) {
      SweepGradient shader = new SweepGradient(center, center, progressColor, new float[]{0.0f, section, 1.0f});
      Matrix matrix = new Matrix();
      matrix.setRotate(startAngle, center, center);
      shader.setLocalMatrix(matrix);
      progressPaint.setShader(shader);
      canvas.drawArc(oval,
          startAngle   i,
          1,
          false,
          progressPaint);
    }
  }


  @Override
  protected void onSizeChanged(int w, int h, int oldw, int oldh) {
    super.onSizeChanged(w, h, oldw, oldh);
    //计算外圆半径 宽,高最小值-填充边距/2
    center = (Math.min(w, h)) / 2;
    mRadius = (int) ((Math.min(w, h)) - roundWidth / 2);

  }


  public int getMax() {
    return max;
  }

  /**
   * 设置进度的最大值
   *
   * @param max
   */
  public void setMax(int max) {
    if (max < 0) {
      Log.e(TAG, "max progress not allow <0");
      return;
    }
    this.max = max;
  }

  /**
   * 获取进度
   *
   * @return
   */
  public float getProgress() {
    return progress;
  }

  /**
   * 设置进度
   *
   * @param progressValue
   * @param useAnima   是否需要动画
   */

  public void setProgress(float progressValue, boolean useAnima) {
    float percent = progressValue * max / 100;
    if (percent < 0) {
      percent = 0;
    }
    if (percent > 100) {
      percent = 100;
    }
    //使用动画
    if (useAnima) {
      ValueAnimator valueAnimator = ValueAnimator.ofFloat(0, percent);
      valueAnimator.addUpdateListener(new ValueAnimator.AnimatorUpdateListener() {
        @Override
        public void onAnimationUpdate(ValueAnimator animation) {
          progress = (float) animation.getAnimatedValue();
          postInvalidate();
        }
      });
      valueAnimator.setInterpolator(new LinearInterpolator());
      valueAnimator.setDuration(1500);
      valueAnimator.start();
    } else {
      this.progress = percent;
      postInvalidate();
    }
  }


  public int getTextColor() {
    return textColor;
  }

  public void setTextColor(int textColor) {
    this.textColor = textColor;
  }

  public float getTextSize() {
    return textSize;
  }

  public void setTextSize(float textSize) {
    this.textSize = textSize;
  }

  public float getRoundWidth() {
    return roundWidth;
  }

  public void setRoundWidth(float roundWidth) {
    this.roundWidth = roundWidth;
  }

  public int[] getProgressColor() {
    return progressColor;
  }

  public void setProgressColor(int[] progressColor) {
    this.progressColor = progressColor;
    postInvalidate();
  }

  public int getBgColor() {
    return bgColor;
  }

  public void setBgColor(int bgColor) {
    this.bgColor = bgColor;
  }

  public int getIconColor() {
    return iconColor;
  }

  public void setIconColor(int iconColor) {
    this.iconColor = iconColor;
  }

  public boolean isTextIsDisplayable() {
    return textIsDisplayable;
  }

  public void setTextIsDisplayable(boolean textIsDisplayable) {
    this.textIsDisplayable = textIsDisplayable;
  }

  public int getmRadius() {
    return mRadius;
  }

  public void setmRadius(int mRadius) {
    this.mRadius = mRadius;
  }

  public int getCenter() {
    return center;
  }

  public void setCenter(int center) {
    this.center = center;
  }

  public float getStartAngle() {
    return startAngle;
  }

  public void setStartAngle(float startAngle) {
    this.startAngle = startAngle;
  }
}
3、使用自定义进度条view
activity布局文件使用如下,为了方便测试效果,新增进度加、进度减,修改进度条颜色的按钮
<?xml version="1.0" encoding="utf-8"?>
<RelativeLayout xmlns:android="http://schemas.android.com/apk/res/android"
  xmlns:app="http://schemas.android.com/apk/res-auto"
  xmlns:tools="http://schemas.android.com/tools"
  android:layout_width="match_parent"
  android:layout_height="match_parent"
  android:background="#242424"
  android:gravity="center">


  <LinearLayout
    android:id="@ id/buttonLayout"
    android:layout_width="match_parent"
    android:layout_height="wrap_content"
    android:layout_margin="20dp"
    android:gravity="center_horizontal"
    android:orientation="horizontal">

    <Button
      android:id="@ id/addProgress"
      android:layout_width="wrap_content"
      android:layout_height="wrap_content"
      android:text="进度 " />

    <Button
      android:id="@ id/changeColor"
      android:layout_width="wrap_content"
      android:layout_height="wrap_content"
      android:layout_marginLeft="10dp"
      android:layout_marginRight="10dp"
      android:text="设置颜色" />

    <Button
      android:id="@ id/subtraceProgress"
      android:layout_width="wrap_content"
      android:layout_height="wrap_content"
      android:text="进度-" />
  </LinearLayout>

  <com.blankj.progressring.RoundProgress
    android:id="@ id/socProgress"
    android:layout_width="70dp"
    android:layout_height="70dp"
    android:layout_below="@id/buttonLayout"
    android:layout_centerHorizontal="true"
    android:layout_gravity="center"
    android:layout_marginLeft="20dp"
    android:layout_marginBottom="2dp"
    app:bgColor="@color/bgColor"
    app:maxProgress="100"
    app:roundWidth="8dp"
    app:textIsDisplayable="true"
    app:textSize="18sp" />

</RelativeLayout>
以上就是本文的全部内容,希望对大家的学习有所帮助,也希望大家多多支持Devmax。