本文将向您展示如何创建自定义键盘小部件,用于在您自己的应用程序中的Flutter TextField中输入文本。使用案例包括特殊字符或语言的文本输入,其中系统键盘可能不存在或用户可能没有安装正确的键盘。
我们今天将制作一个更简单的版本:
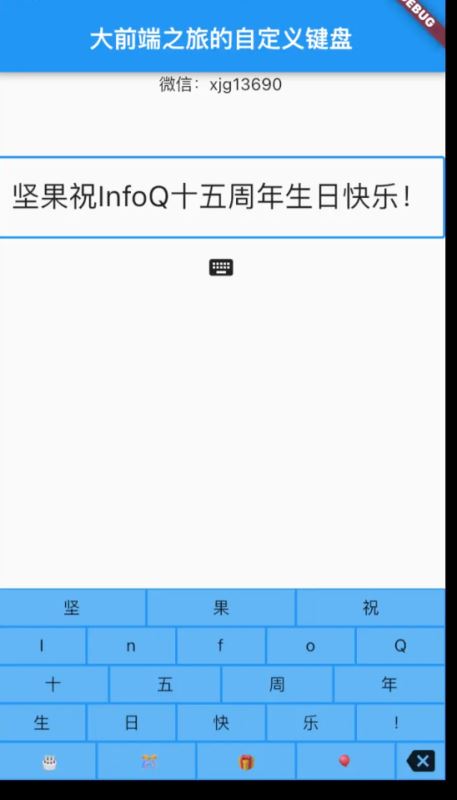
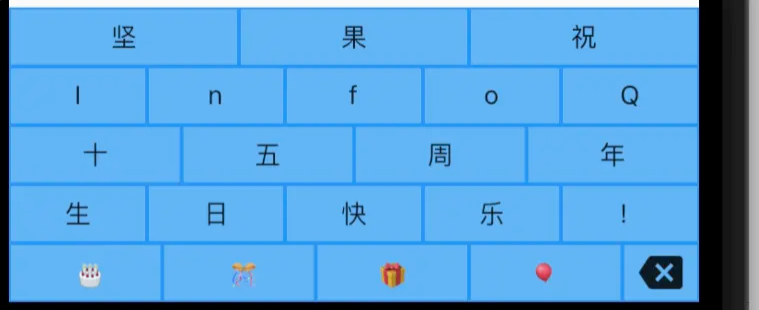
注意 :本文不会告诉您如何构建用户在任何应用程序中安装和使用的系统键盘。这只是一种基于小部件的方法,可以在您自己的应用程序中使用。
完整的代码在文章的底部。
创建关键小部件
Flutter的优点是,通过组合更简单的小部件,可以轻松构建键盘等复杂布局。首先,您将创建几个简单的按键小部件。
文本键
我已经圈出了由您首先制作的TextKey小部件制作的键。
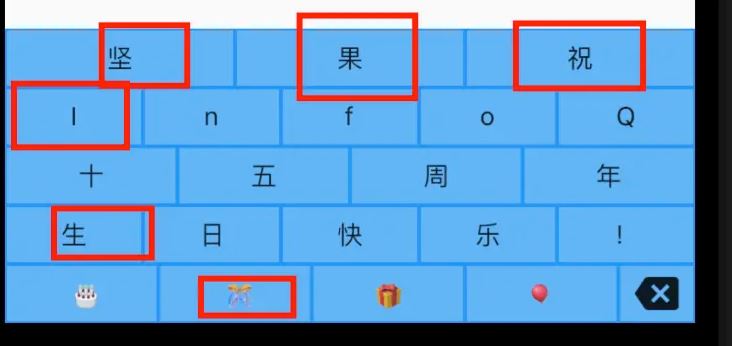
显示文本键(包括空格键)的自定义写意红色圆圈
将以下TextKey小部件添加到您的项目中:
class TextKey extends StatelessWidget {
  const TextKey({
    Key key,
    @required this.text,
    this.onTextInput,
    this.flex = 1,
  }) : super(key: key);
  final String text;
  final ValueSetter<String> onTextInput;
  final int flex;
  @override
  Widget build(BuildContext context) {
    return Expanded(
      flex: flex,
      child: Padding(
        padding: const EdgeInsets.all(1.0),
        child: Material(
          color: Colors.blue.shade300,
          child: InkWell(
            onTap: () {
              onTextInput?.call(text);
            },
            child: Container(
              child: Center(child: Text(text)),
            ),
          ),
        ),
      ),
    );
  }
}
以下是有趣的部分:
-
flex属性允许您的按键均匀分布在一行之间,甚至占据行的更大比例(如上图中的空格键)。 - 按下按键后,它将以anonTextInput回调的形式将其值传递给键盘。
Backspace键
您还需要一个与TextKey小部件具有不同外观和功能的退格键。
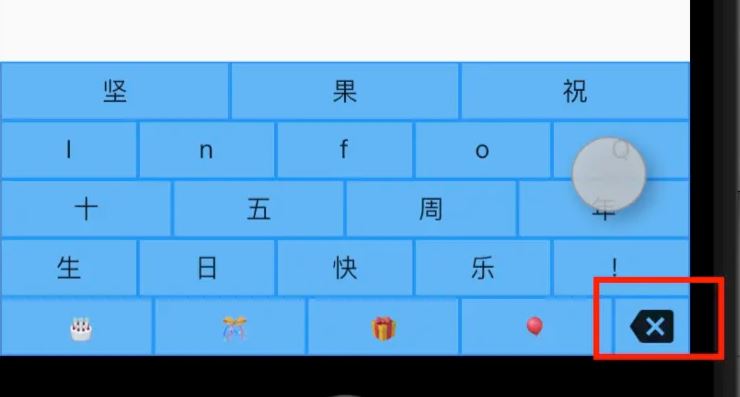
退格键
将以下小部件添加到您的项目中:
class BackspaceKey extends StatelessWidget {
const BackspaceKey({
Key? key,
this.onBackspace,
this.flex = 1,
}) : super(key: key);
final VoidCallback? onBackspace;
final int flex;
@override
Widget build(BuildContext context) {
return Expanded(
flex: flex,
child: Padding(
padding: const EdgeInsets.all(1.0),
child: Material(
color: Colors.blue.shade300,
child: InkWell(
onTap: () {
onBackspace?.call();
},
child: Container(
child: Center(
child: Icon(Icons.backspace),
),
),
),
),
),
);
}
备注:
-
TextKey代码有点重复,因此一些重构是为了使其更加简介。 -
onBackspace是VoidCallback,因为不需要将任何文本传递回键盘。
将按键组成键盘
一旦有了按键,键盘就很容易布局,因为它们只是列中的行。
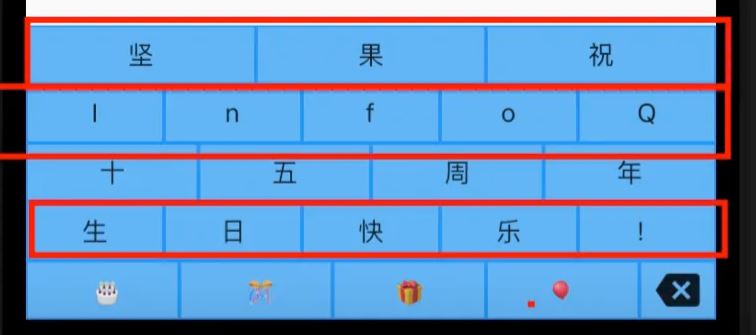
包含三行的列
这是代码。我省略了一些重复的部分,以便简洁。不过,你可以在文章的末尾找到它。
class CustomKeyboard extends StatelessWidget {
CustomKeyboard({
Key? key,
this.onTextInput,
this.onBackspace,
}) : super(key: key);
final ValueSetter<String>? onTextInput;
final VoidCallback? onBackspace;
void _textInputHandler(String text) => onTextInput?.call(text);
void _backspaceHandler() => onBackspace?.call();
@override
Widget build(BuildContext context) {
return Container(
height: 160,
color: Colors.blue,
child: Column(
children: [
buildRowOne(),
buildRowTwo(),
buildRowThree(),
buildRowFour(),
buildRowFive()
],
),
);
}
Expanded buildRowOne() {
return Expanded(
child: Row(
children: [
TextKey(
text: '坚',
onTextInput: _textInputHandler,
),
TextKey(
text: '果',
onTextInput: _textInputHandler,
),
TextKey(
text: '祝',
onTextInput: _textInputHandler,
),
],
),
);
}
Expanded buildRowTwo() {
return Expanded(
child: Row(
children: [
TextKey(
text: 'I',
onTextInput: _textInputHandler,
),
TextKey(
text: 'n',
onTextInput: _textInputHandler,
),
TextKey(
text: 'f',
onTextInput: _textInputHandler,
),
TextKey(
text: 'o',
onTextInput: _textInputHandler,
),
TextKey(
text: 'Q',
onTextInput: _textInputHandler,
),
],
),
);
}
Expanded buildRowThree() {
return Expanded(
child: Row(
children: [
TextKey(
text: '十',
onTextInput: _textInputHandler,
),
TextKey(
text: '五',
onTextInput: _textInputHandler,
),
TextKey(
text: '周',
onTextInput: _textInputHandler,
),
TextKey(
text: '年',
onTextInput: _textInputHandler,
),
],
),
);
}
Expanded buildRowFour() {
return Expanded(
child: Row(
children: [
TextKey(
text: '生',
onTextInput: _textInputHandler,
),
TextKey(
text: '日',
onTextInput: _textInputHandler,
),
TextKey(
text: '快',
onTextInput: _textInputHandler,
),
TextKey(
text: '乐',
onTextInput: _textInputHandler,
),
TextKey(
text: '!',
onTextInput: _textInputHandler,
),
],
),
);
}
Expanded buildRowFive() {
return Expanded(
child: Row(
children: [
TextKey(
text: ' 🎂',
flex: 2,
onTextInput: _textInputHandler,
),
TextKey(
text: ' 🎊',
flex: 2,
onTextInput: _textInputHandler,
),
TextKey(
text: '🎁',
flex: 2,
onTextInput: _textInputHandler,
),
TextKey(
text: '🎈',
flex: 2,
onTextInput: _textInputHandler,
),
BackspaceKey(
onBackspace: _backspaceHandler,
),
],
),
);
}
}
有趣的部分:
- 键盘收集按键的回调并传递它们。这样,任何使用
CustomKeyboard的人都会收到回调。 - 您可以看到第三行如何使用
flex。空格键的弯曲为4,而退格的默认弯曲为1。这使得空格键占用了后空键宽度的四倍。
在应用程序中使用键盘
现在,您可以像这样使用自定义键盘小部件:
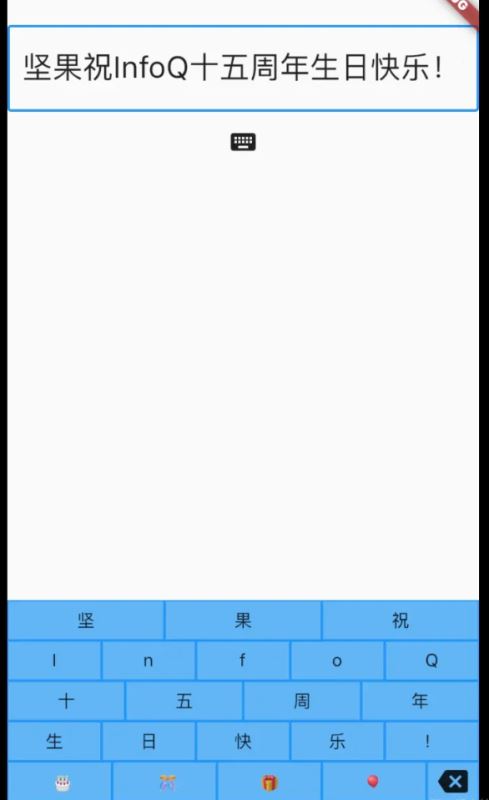
代码看起来是这样的:
CustomKeyboard(
  onTextInput: (myText) {
    _insertText(myText);
  },
  onBackspace: () {
    _backspace();
  },
),
处理文本输入
以下是_insertText方法的样子:
void _insertText(String myText) {
  final text = _controller.text;
  final textSelection = _controller.selection;
  final newText = text.replaceRange(
    textSelection.start,
    textSelection.end,
    myText,
  );
  final myTextLength = myText.length;
  _controller.text = newText;
  _controller.selection = textSelection.copyWith(
    baseOffset: textSelection.start   myTextLength,
    extentOffset: textSelection.start   myTextLength,
  );
}
_controller是TextField的TextEditingController。你必须记住,可能有一个选择,所以如果有的话,请用密钥传递的文本替换它。
感谢这个,以提供帮助。*
处理退格
您会认为退格很简单,但有一些不同的情况需要考虑:
- 有一个选择(删除选择)
- 光标在开头(什么都不要做)
- 其他任何事情(删除之前的角色)
以下是_backspace方法的实现:
void _backspace() {
  final text = _controller.text;
  final textSelection = _controller.selection;
  final selectionLength = textSelection.end - textSelection.start;
  // There is a selection.
  if (selectionLength > 0) {
    final newText = text.replaceRange(
      textSelection.start,
      textSelection.end,
      '',
    );
    _controller.text = newText;
    _controller.selection = textSelection.copyWith(
      baseOffset: textSelection.start,
      extentOffset: textSelection.start,
    );
    return;
  }
  // The cursor is at the beginning.
  if (textSelection.start == 0) {
    return;
  }
  // Delete the previous character
  final previousCodeUnit = text.codeUnitAt(textSelection.start - 1);
  final offset = _isUtf16Surrogate(previousCodeUnit) ? 2 : 1;
  final newStart = textSelection.start - offset;
  final newEnd = textSelection.start;
  final newText = text.replaceRange(
    newStart,
    newEnd,
    '',
  );
  _controller.text = newText;
  _controller.selection = textSelection.copyWith(
    baseOffset: newStart,
    extentOffset: newStart,
  );
}
bool _isUtf16Surrogate(int value) {
  return value & 0xF800 == 0xD800;
}
即使删除之前的角色也有点棘手。如果您在有表情符号或其他代理对时只回退单个代码单元这将导致崩溃。作为上述代码中的变通办法,我检查了上一个字符是否是UFT-16代理,如果是,则后退了两个字符。(我从Flutter TextPainter源代码中获得了_isUtf16Surrogate方法。)然而,这仍然不是一个完美的解决方案,因为它不适用于像🇪🇬或👨👩👧这样的字素簇,它们由多个代理对组成。不过,至少它不会
以下是象形文字和表情符号键盘作为演示:
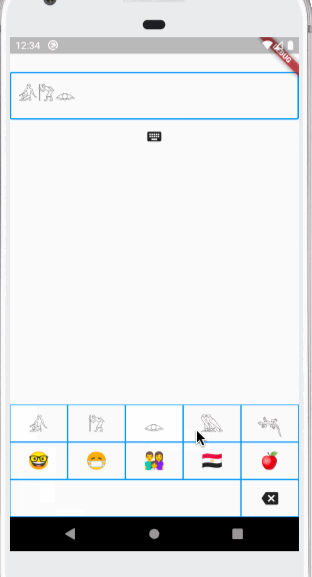
🤓😷👨👩
如果您对此有意见,请参阅此堆栈溢出问题。
防止系统键盘显示
如果您想将自定义键盘与aTextField一起使用,但系统键盘不断弹出,那会有点烦人。这毕竟是默认行为。
防止系统键盘显示的方法是将TextField的readOnly属性设置为true。
TextField(
  ...
  showCursor: true,
  readOnly: true,
),
此外,将showCursor设置为true,使光标在您使用自定义键盘时仍然可以工作。
在系统键盘和自定义键盘之间切换
如果您想让用户选择使用系统键盘或自定义键盘,您只需为readOnly使用不同的值进行重建。
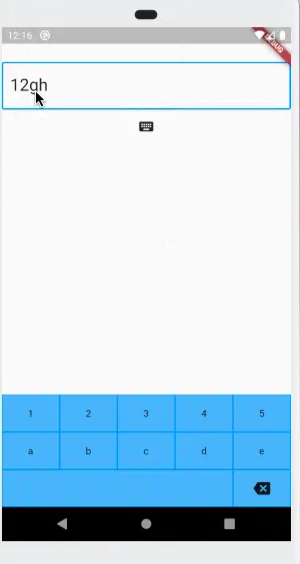
以下是演示应用程序中TextField的设置方式:
class _KeyboardDemoState extends State<KeyboardDemo> {
  TextEditingController _controller = TextEditingController();
  bool _readOnly = true;
  @override
  Widget build(BuildContext context) {
    return Scaffold(
      resizeToAvoidBottomInset: false,
      body: Column(
        children: [
          ...
          TextField(
            controller: _controller,
            decoration: ...,
            style: TextStyle(fontSize: 24),
            autofocus: true,
            showCursor: true,
            readOnly: _readOnly,
          ),
          IconButton(
            icon: Icon(Icons.keyboard),
            onPressed: () {
              setState(() {
                _readOnly = !_readOnly;
              });
            },
          ),
有趣的部分:
- 当按下键盘
IconButton时,更改_readOnly的值,然后重建布局。这会导致系统键盘隐藏或显示。 - 将
Scaffold上的resizeToAvoidBottomInset设置为false,允许系统键盘覆盖自定义键盘。另一个选项是在显示系统键盘时隐藏自定义键盘。然而,当我在实验中这样做时,我发现我必须使用单独的布尔值来隐藏自定义键盘,这样我就可以延迟显示它,直到系统键盘消失。否则,它会跳到系统键盘顶部一秒钟。
就这样!如您所见,制作自己的应用程序内键盘并不难。
完整代码
以下是我在本文中使用的演示应用程序的完整代码:
import 'package:flutter/material.dart';

void main() => runApp(MyApp());

class MyApp extends StatelessWidget {
  @override
  Widget build(BuildContext context) {
    return MaterialApp(
      home: KeyboardDemo(),
    );
  }
}

class KeyboardDemo extends StatefulWidget {
  @override
  _KeyboardDemoState createState() => _KeyboardDemoState();
}

class _KeyboardDemoState extends State<KeyboardDemo> {
  TextEditingController _controller = TextEditingController();
  bool _readOnly = true;

  @override
  Widget build(BuildContext context) {
    return Scaffold(
      appBar: AppBar(
        title: Text("大前端之旅的自定义键盘"),
      ),
      resizeToAvoidBottomInset: false,
      body: Column(
        children: [
          Text("微信:xjg13690"),
          SizedBox(height: 50),
          TextField(
            controller: _controller,
            decoration: InputDecoration(
              border: OutlineInputBorder(
                borderRadius: BorderRadius.circular(3),
              ),
            ),
            style: TextStyle(fontSize: 24),
            autofocus: true,
            showCursor: true,
            readOnly: _readOnly,
          ),
          IconButton(
            icon: Icon(Icons.keyboard),
            onPressed: () {
              setState(() {
                _readOnly = !_readOnly;
              });
            },
          ),
          Spacer(),
          CustomKeyboard(
            onTextInput: (myText) {
              _insertText(myText);
            },
            onBackspace: () {
              _backspace();
            },
          ),
        ],
      ),
    );
  }

  void _insertText(String myText) {
    final text = _controller.text;
    final textSelection = _controller.selection;
    final newText = text.replaceRange(
      textSelection.start,
      textSelection.end,
      myText,
    );
    final myTextLength = myText.length;
    _controller.text = newText;
    _controller.selection = textSelection.copyWith(
      baseOffset: textSelection.start   myTextLength,
      extentOffset: textSelection.start   myTextLength,
    );
  }

  void _backspace() {
    final text = _controller.text;
    final textSelection = _controller.selection;
    final selectionLength = textSelection.end - textSelection.start;

    // There is a selection.
    if (selectionLength > 0) {
      final newText = text.replaceRange(
        textSelection.start,
        textSelection.end,
        '',
      );
      _controller.text = newText;
      _controller.selection = textSelection.copyWith(
        baseOffset: textSelection.start,
        extentOffset: textSelection.start,
      );
      return;
    }

    // The cursor is at the beginning.
    if (textSelection.start == 0) {
      return;
    }

    // Delete the previous character
    final previousCodeUnit = text.codeUnitAt(textSelection.start - 1);
    final offset = _isUtf16Surrogate(previousCodeUnit) ? 2 : 1;
    final newStart = textSelection.start - offset;
    final newEnd = textSelection.start;
    final newText = text.replaceRange(
      newStart,
      newEnd,
      '',
    );
    _controller.text = newText;
    _controller.selection = textSelection.copyWith(
      baseOffset: newStart,
      extentOffset: newStart,
    );
  }

  bool _isUtf16Surrogate(int value) {
    return value & 0xF800 == 0xD800;
  }

  @override
  void dispose() {
    _controller.dispose();
    super.dispose();
  }
}

class CustomKeyboard extends StatelessWidget {
  CustomKeyboard({
    Key? key,
    this.onTextInput,
    this.onBackspace,
  }) : super(key: key);

  final ValueSetter<String>? onTextInput;
  final VoidCallback? onBackspace;

  void _textInputHandler(String text) => onTextInput?.call(text);

  void _backspaceHandler() => onBackspace?.call();

  @override
  Widget build(BuildContext context) {
    return Container(
      height: 160,
      color: Colors.blue,
      child: Column(
        children: [
          buildRowOne(),
          buildRowTwo(),
          buildRowThree(),
          buildRowFour(),
          buildRowFive()
        ],
      ),
    );
  }

  Expanded buildRowOne() {
    return Expanded(
      child: Row(
        children: [
          TextKey(
            text: '坚',
            onTextInput: _textInputHandler,
          ),
          TextKey(
            text: '果',
            onTextInput: _textInputHandler,
          ),
          TextKey(
            text: '祝',
            onTextInput: _textInputHandler,
          ),
        ],
      ),
    );
  }

  Expanded buildRowTwo() {
    return Expanded(
      child: Row(
        children: [
          TextKey(
            text: 'I',
            onTextInput: _textInputHandler,
          ),
          TextKey(
            text: 'n',
            onTextInput: _textInputHandler,
          ),
          TextKey(
            text: 'f',
            onTextInput: _textInputHandler,
          ),
          TextKey(
            text: 'o',
            onTextInput: _textInputHandler,
          ),
          TextKey(
            text: 'Q',
            onTextInput: _textInputHandler,
          ),
        ],
      ),
    );
  }

  Expanded buildRowThree() {
    return Expanded(
      child: Row(
        children: [
          TextKey(
            text: '十',
            onTextInput: _textInputHandler,
          ),
          TextKey(
            text: '五',
            onTextInput: _textInputHandler,
          ),
          TextKey(
            text: '周',
            onTextInput: _textInputHandler,
          ),
          TextKey(
            text: '年',
            onTextInput: _textInputHandler,
          ),
        ],
      ),
    );
  }

  Expanded buildRowFour() {
    return Expanded(
      child: Row(
        children: [
          TextKey(
            text: '生',
            onTextInput: _textInputHandler,
          ),
          TextKey(
            text: '日',
            onTextInput: _textInputHandler,
          ),
          TextKey(
            text: '快',
            onTextInput: _textInputHandler,
          ),
          TextKey(
            text: '乐',
            onTextInput: _textInputHandler,
          ),
          TextKey(
            text: '!',
            onTextInput: _textInputHandler,
          ),
        ],
      ),
    );
  }

  Expanded buildRowFive() {
    return Expanded(
      child: Row(
        children: [
          TextKey(
            text: ' 🎂',
            flex: 2,
            onTextInput: _textInputHandler,
          ),
          TextKey(
            text: ' 🎊',
            flex: 2,
            onTextInput: _textInputHandler,
          ),
          TextKey(
            text: '🎁',
            flex: 2,
            onTextInput: _textInputHandler,
          ),
          TextKey(
            text: '🎈',
            flex: 2,
            onTextInput: _textInputHandler,
          ),
          BackspaceKey(
            onBackspace: _backspaceHandler,
          ),
        ],
      ),
    );
  }
}

class TextKey extends StatelessWidget {
  const TextKey({
    Key? key,
    @required this.text,
    this.onTextInput,
    this.flex = 1,
  }) : super(key: key);

  final String? text;
  final ValueSetter<String>? onTextInput;
  final int flex;

  @override
  Widget build(BuildContext context) {
    return Expanded(
      flex: flex,
      child: Padding(
        padding: const EdgeInsets.all(1.0),
        child: Material(
          color: Colors.blue.shade300,
          child: InkWell(
            onTap: () {
              onTextInput?.call(text!);
            },
            child: Container(
              child: Center(child: Text(text!)),
            ),
          ),
        ),
      ),
    );
  }
}

class BackspaceKey extends StatelessWidget {
  const BackspaceKey({
    Key? key,
    this.onBackspace,
    this.flex = 1,
  }) : super(key: key);

  final VoidCallback? onBackspace;
  final int flex;

  @override
  Widget build(BuildContext context) {
    return Expanded(
      flex: flex,
      child: Padding(
        padding: const EdgeInsets.all(1.0),
        child: Material(
          color: Colors.blue.shade300,
          child: InkWell(
            onTap: () {
              onBackspace?.call();
            },
            child: Container(
              child: Center(
                child: Icon(Icons.backspace),
              ),
            ),
          ),
        ),
      ),
    );
  }
}
以上就是详解Flutter自定义应用程序内键盘的实现方法的详细内容,更多关于Flutter自定义键盘的资料请关注Devmax其它相关文章!