一、创建数据库
1、新建数据库帮助类
包名——右击——new——Java class——输入类名:MyDBOpenHelper— —父类:SQLiteOpenHelper。
2、在数据库帮助类中输入代码
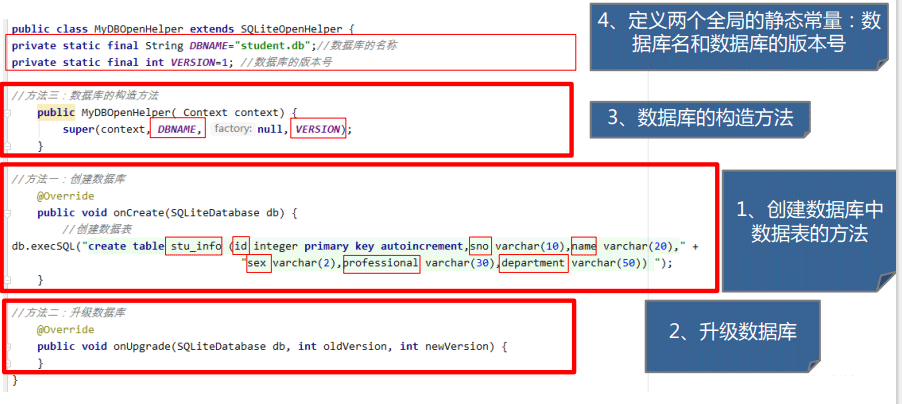
public class MyDBOpenHelper extends SQLiteOpenHelper {
//定义数据库名和版本号
     private static final String DBNAME="student.db";
     private static final int VERSION=1;
     public MyDBOpenHelper(Context context) {
         super(context, DBNAME, null, VERSION);
     }
     //创建数据库
     @Override
     public void onCreate(SQLiteDatabase db) {
//创建数据表
     db.execSQL("create table stu_info(id INTEGER primary key autoincrement,sno varchar(10),name varchar(10),sex varchar(4),professional varchar(10),deparment varchar(20) )");
     }
//升级数据库
     @Override
     public void onUpgrade(SQLiteDatabase db, int oldVersion, int newVersion)
    {

     }
}
3、代码讲解
(1)简介:
Android为了让用户能够更加方便地管理数据库,丏门提供了一个 SQLiteOpenHelper帮助类,借助这个类就可以非常简单地对数据库进行创建。
SQLiteOpenHelper是一个抽象类,这意味着如果想使用它的话,这就需要自己 创建一个类去继承他它就可以了。
例如:
public class MyDBOpenHelper extends SQLiteOpenHelper {
}
(2)方法
| 方法 | 作用 | 示例 |
| onCreate(SQLiteDatabase db) | 创建数据库 | |
| onUpgrade(SQLiteDatabase db, int oldVersion, int newVersion) | 升级数据库 | |
| db.execSQL( ……………… ) | 创建数据表 | db.execSQL(“create table stu_info (id INTEGER primary key autoincrement,sno varchar(10),..." ); |
| getReadableDatabase() | 以只读方式 打开数据库 | db=mhelper. getReadableDatabase(); |
| getWritableDatabase() | 以读写方式 打开数据库 | db=mhelper.getWritableDatabase(); |
(3)构造方法
SQLiteOpenHelper中有三个构造方法可供重写,一般使用参数少点的那个构造方 法即可,必须要有它才能对数据库进行操作,这个构造方法中,接受4个参数:
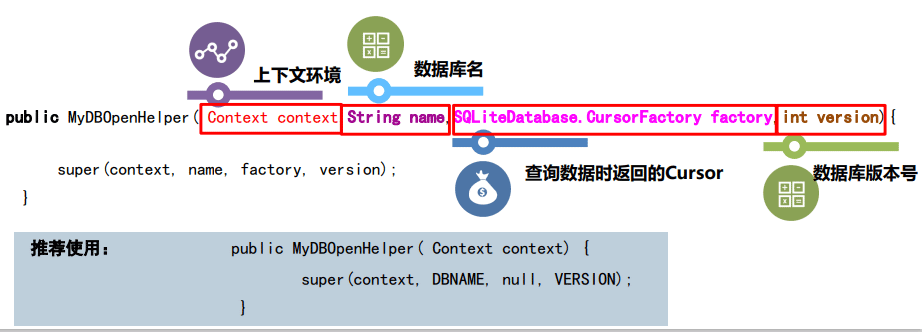
Cursor游标结果集(本案例没用到)
游标是一段私有的SQL工作区,即一段内存区域,用于暂时存放受SQL语句影响到的数据。通俗理解就是将受影响的数据暂时存放到一个内存区域的虚表中,这个虚表就是游标。
游标在数据库的事务回滚中有非常重要的作用。由于对数据库的操作会暂时存放在游标中,只要不提交,就可以根据游标中的内容进行回滚。这样有利于数据库的安全。
(4)总结
integer这里都要大写成INTEGER!!!
简介 :
对数据库中的数据表的操作,一共有四种:添加、查询、更新、删除。每一种 操作又各自对应了一种SQL命令:insert(添加),select(查询),update(更 新),delete(删除)。
二、添加数据
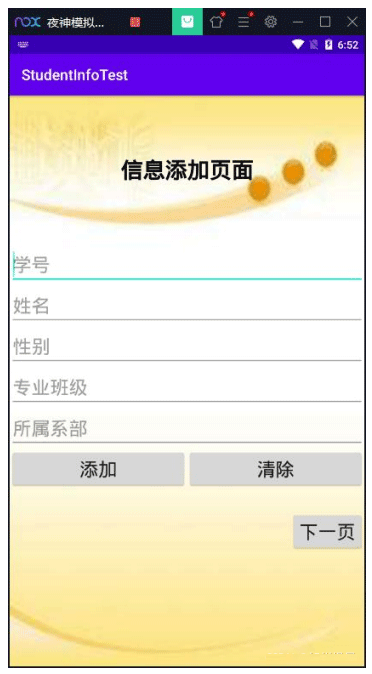
1、界面效果
2、准备工作
(1)添加 3 个页面
整个作品中,要完成学生信息的添加、查询、修改、删除四个功能。每个页面完成某一个功能,所以,添加另外的 3 个页面,类文件分别为:SecondActivity、ThirdActivity、 FoutActivity,
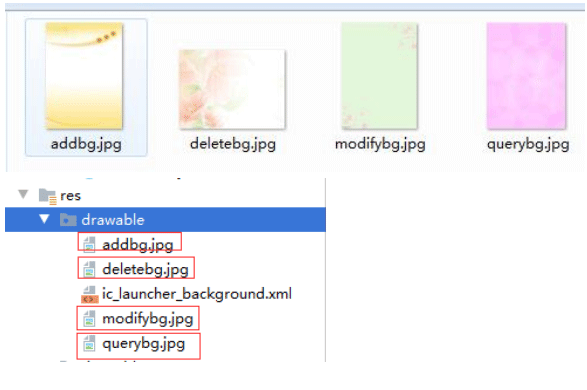
(2)准备背景图片
选择 4 张图片,粘贴到工程的 drawable 文件夹下,当做 4 个页面的背景图片,
图片如图所示:
3、布局界面 activity_main.xml
<?xml version="1.0" encoding="utf-8"?>
<LinearLayout xmlns:android="http://schemas.android.com/apk/res/android"
     xmlns:app="http://schemas.android.com/apk/res-auto"
     xmlns:tools="http://schemas.android.com/tools"
     android:layout_width="match_parent"
     android:layout_height="match_parent"
     android:orientation="vertical"
     android:background="@drawable/addbg"
     tools:context=".MainActivity">
     <TextView
         android:layout_width="wrap_content"
         android:layout_height="wrap_content"
         android:text="信息添加页面"
         android:textSize="30sp"
         android:textStyle="bold"
         android:textColor="#000000"
         android:layout_gravity="center"
         android:layout_margin="80dp"/>
     <EditText
         android:id="@ id/editText_onesno"
         android:layout_width="match_parent"
         android:layout_height="wrap_content"
         android:hint="学号"
         android:textSize="25sp"/>
     <EditText
         android:id="@ id/editText_onename"
         android:layout_width="match_parent"
         android:layout_height="wrap_content"
         android:hint="姓名"
         android:textSize="25sp"/>
     <EditText
         android:id="@ id/editText_onesex"
         android:layout_width="match_parent"
         android:layout_height="wrap_content"
         android:hint="性别"
         android:textSize="25sp"/>
     <EditText
         android:id="@ id/editText_onepro"
         android:layout_width="match_parent"
         android:layout_height="wrap_content"
         android:hint="专业班级"
         android:textSize="25sp"/>
     <EditText
         android:id="@ id/editText_onedep"
         android:layout_width="match_parent"
         android:layout_height="wrap_content"
         android:hint="所属系部"
         android:textSize="25sp"/>
     <LinearLayout
         android:layout_width="match_parent"
         android:layout_height="wrap_content"
         android:orientation="horizontal">
         <Button
             android:id="@ id/button_oneadd"
             android:layout_width="wrap_content"
             android:layout_height="wrap_content"
             android:text="添加"
             android:textSize="25sp"
             android:layout_weight="1"/>
         <Button
             android:id="@ id/button_oneclear"
             android:layout_width="wrap_content"
             android:layout_height="wrap_content"
             android:text="清除"
             android:textSize="25sp"
             android:layout_weight="1"/>
     </LinearLayout>
     <Button
         android:id="@ id/button_onenext"
         android:layout_width="wrap_content"
         android:layout_height="wrap_content"
         android:text="下一页"
         android:textSize="25sp"
         android:layout_gravity="right"
         android:layout_marginTop="30dp"/>
</LinearLayout>
4、类文件代码 MainActivity.java
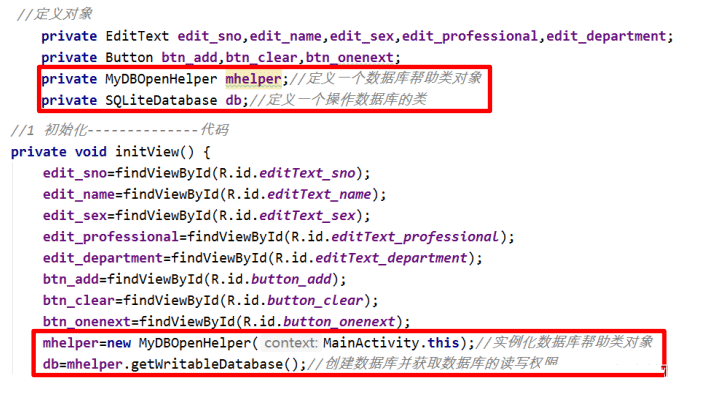
public class MainActivity extends AppCompatActivity {
//定义对象
private EditText edit_onesno,edit_onename,edit_onesex,edit_onepro,edit_onedep;
private Button btn_oneadd,btn_oneclear,btn_onenext;
private MyDBOpenHelper mhelper;//定义数据库帮助类对象
private SQLiteDatabase db;//定义一个可以操作的数据库对象
@Override
protected void onCreate(Bundle savedInstanceState) {
super.onCreate(savedInstanceState);
setContentView(R.layout.activity_main);
//1 绑定控件
initView();
//2 添加按钮功能的实现
btnAdd();
//3 清除和下一页按钮的功能
btnClearNext();
}
//绑定控件-------------代码
private void initView() {
edit_onesno=findViewById(R.id.editText_onesno);
edit_onename=findViewById(R.id.editText_onename);
edit_onesex=findViewById(R.id.editText_onesex);
edit_onepro=findViewById(R.id.editText_onepro);
edit_onedep=findViewById(R.id.editText_onedep);
btn_oneadd=findViewById(R.id.button_oneadd);
btn_oneclear=findViewById(R.id.button_oneclear);
btn_onenext=findViewById(R.id.button_onenext);
mhelper=new MyDBOpenHelper(MainActivity.this);//实例化数据库帮助类
db=mhelper.getWritableDatabase();//创建数据库,获取数据库的读写权限
}
//2 添加按钮功能的实现------代码
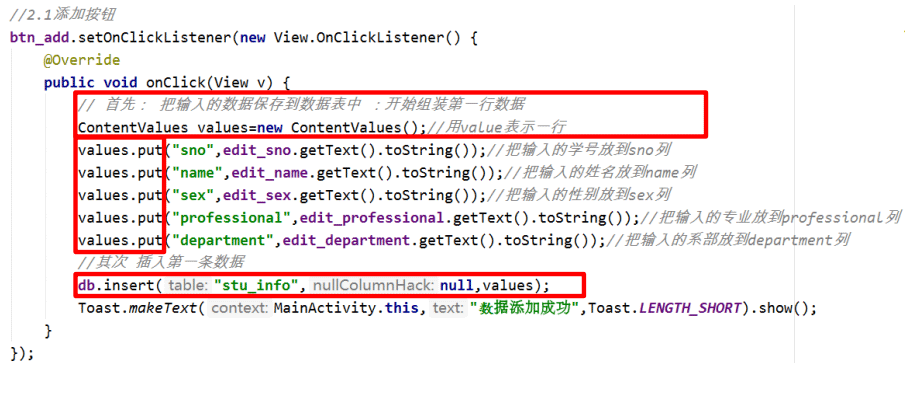
private void btnAdd() {
btn_oneadd.setOnClickListener(new View.OnClickListener() {
@Override
public void onClick(View v) {
//定义一个对象,构建一行数据
ContentValues values=new ContentValues();//用 value 表示一行
values.put("sno",edit_onesno.getText().toString());//把输入的学号放到 sno 列
values.put("name",edit_onename.getText().toString());//把输入的姓名放到 name 列
values.put("sex",edit_onesex.getText().toString());//把输入的性别放到 sex 列
values.put("professional",edit_onepro.getText().toString());//把输入的专业放到 professional 列
values.put("deparment",edit_onedep.getText().toString());//把输入的系部放到 department 列
//将这一行数据存放到数据库的数据表中。参数:(表名,某些为空的列自动赋值 null,ContentValue 对象)
db.insert("stu_info",null,values);
Toast.makeText(MainActivity.this,"添加成功",Toast.LENGTH_SHORT).show();
}
});
}
//3 清除和下一页按钮的功能-----代码
private void btnClearNext() {
//清除按钮的功能
btn_oneclear.setOnClickListener(new View.OnClickListener() {
@Override
public void onClick(View v) {
edit_onesno.setText("");
edit_onename.setText("");
edit_onesex.setText("");
edit_onepro.setText("");
edit_onedep.setText("");
}
});
//下一页按钮的功能
btn_onenext.setOnClickListener(new View.OnClickListener() {
@Override
public void onClick(View v) {
Intent intent=new Intent(MainActivity.this,SecondActivity.class);
startActivity(intent);
finish();
}
});
}
}5、代码讲解
(1)插入一条数据的步骤

(2)insert()方法的三个参数

1、第一个参数表名;
2、第二个参数是某些为空的列自动赋值null;
3、第三个参数是ContentValue对象,它提供了一系列put()方法重载,用于向ContentValues中添加对象,只需要将表中的每个列名以及相应的待添加的数 据传入即可。
(3)总结
三、查询数据
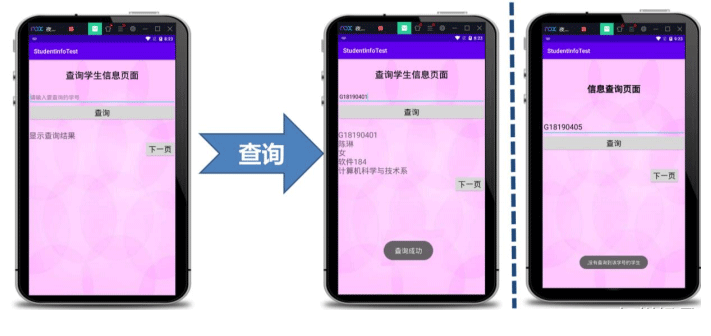
1、界面效果图
2、布局界面 activity_second.xml
<?xml version="1.0" encoding="utf-8"?>
<LinearLayout xmlns:android="http://schemas.android.com/apk/res/android"
     xmlns:app="http://schemas.android.com/apk/res-auto"
     xmlns:tools="http://schemas.android.com/tools"
     android:layout_width="match_parent"
     android:layout_height="match_parent"
     android:orientation="vertical"
     android:background="@drawable/querybg"
     tools:context=".SecondActivity">
     <TextView
         android:layout_width="wrap_content"
         android:layout_height="wrap_content"
         android:text="信息查询页面"
         android:textSize="30sp"
         android:textStyle="bold"
         android:textColor="#000000"
         android:layout_gravity="center"
         android:layout_margin="80dp"/>
     <EditText
         android:id="@ id/editText_twosno"
         android:layout_width="match_parent"
         android:layout_height="wrap_content"
         android:hint="请输入要查询的学号"
         android:textSize="25sp"/>
     <Button
         android:id="@ id/button_twoquery"
         android:layout_width="match_parent"
         android:layout_height="wrap_content"
         android:text="查询"
         android:textSize="25sp"/>
     <TextView
         android:id="@ id/textView_tworesult"
         android:layout_width="wrap_content"
         android:layout_height="wrap_content"
         android:text="显示查询结果"
         android:textSize="25sp" />
     <Button
         android:id="@ id/button_twonext"
         android:layout_width="wrap_content"
         android:layout_height="wrap_content"
         android:text="下一页"
         android:textSize="25sp"
         android:layout_gravity="right"
         android:layout_marginTop="30dp"/>
</LinearLayout>
3、类文件 SecondActivity.java
public class SecondActivity extends AppCompatActivity {
//定义对象
EditText edit_twosno;
Button btn_twoquery,btn_twonext;
TextView txt_tworesult;
MyDBOpenHelper mhelper;//定义一个数据库帮助类对象
SQLiteDatabase db;//定义一个操作的数据库的类对象
@Override
protected void onCreate(Bundle savedInstanceState) {
super.onCreate(savedInstanceState);
setContentView(R.layout.activity_second);
//1 控件初始化
initView();
//2 查询按钮功能的实现
btnQuery();
//3 下一页按钮功能的实现
btnNext();
}
//1 控件初始化-----------------------代码
private void initView() {
edit_twosno=findViewById(R.id.editText_twosno);
btn_twoquery=findViewById(R.id.button_twoquery);
txt_tworesult=findViewById(R.id.textView_tworesult);
btn_twonext=findViewById(R.id.button_twonext);
mhelper=new MyDBOpenHelper(SecondActivity.this);//实例化数据库帮助类对象
db=mhelper.getWritableDatabase();//获取数据库的读写权限
}
//2 查询按钮功能的实现--------代码
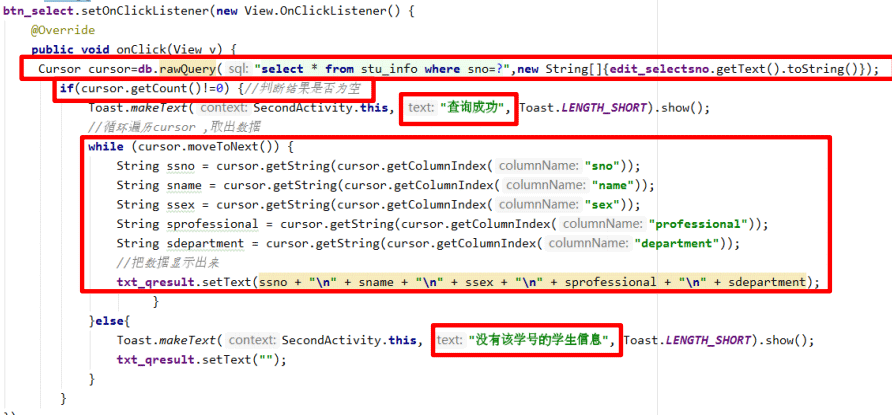
private void btnQuery() {
btn_twoquery.setOnClickListener(new View.OnClickListener() {
@Override
public void onClick(View v) {
//开始查询 参数:(实现查询的 sql 语句,条件参数)
Cursor cursor =db.rawQuery("select * from stu_info where sno=?",new String[]{edit_twosno.getText().toString()});
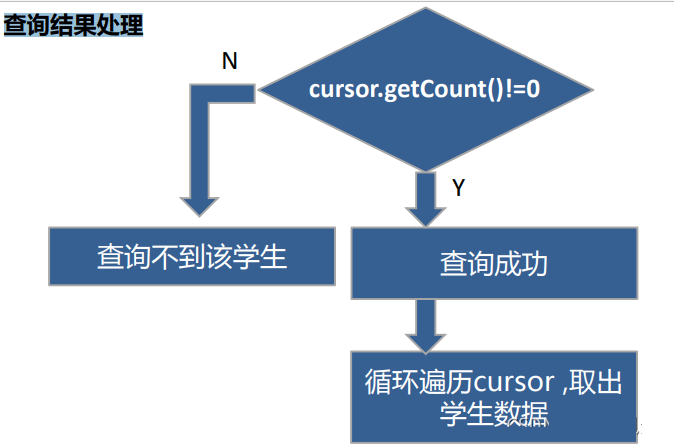
if(cursor.getCount()!=0){//判断结果集中是否有数据,有:查询成功;无:查询失败
Toast.makeText(SecondActivity.this,"查询成功",Toast.LENGTH_SHORT).show();
//循环遍历结果集,取出数据,显示出来
while (cursor.moveToNext()){
String mysno=cursor.getString(cursor.getColumnIndex("sno"));
String myname=cursor.getString(cursor.getColumnIndex("name"));
String mysex=cursor.getString(cursor.getColumnIndex("sex"));
String mypro=cursor.getString(cursor.getColumnIndex("professional"));
String mydep=cursor.getString(cursor.getColumnIndex("deparment"));
txt_tworesult.setText(mysno "\n" myname "\n" mysex "\n" mypro "\n" mydep);
}
}else{
Toast.makeText(SecondActivity.this,"没有查询到该学号的学生",Toast.LENGTH_SHORT).show();
txt_tworesult.setText("");
}
}
});
}
//3 下一页按钮功能的实现------代码
private void btnNext() {
btn_twonext.setOnClickListener(new View.OnClickListener() {
@Override
public void onClick(View v) {
Intent intent=new Intent(SecondActivity.this,ThirdActivity.class);
startActivity(intent);
finish();
}
});
}
}4、代码讲解
(1)查询时用到的方法——方法1
query(table, columns, selection, selectionArgs, groupBy, having, orderBy, limit)
方法各参数的含义:
table:表名。相当于select语句from关键字后面的部分。如果是多表联合查询,可以用逗号将两个表名分开。
columns:要查询出来的列名。相当于select语句select关键字后面的部分。
selection:查询条件子句,相当于select语句where关键字后面的部分,在条件子句允许使用占位符“?”
selectionArgs:对应于selection语句中占位符的值,值在数组中的位置与占位符在语句中的位置必须一致,否则就 会有异常。
groupBy:相当于select语句group by关键字后面的部分
having:相当于select语句having关键字后面的部分
orderBy:相当于select语句order by关键字后面的部分,如:personid desc, age asc;
limit:指定偏移量和获取的记录数,相当于select语句limit关键字后面的部分。

(2)查询时用到的方法——方法2
rawQuery(String sql,String[ ] selectionArgs)
方法各参数的含义:
sql :实现查询的sql语句,例如: select * from stu_info where sno=?
selectionArgs:是?条件参数,如果?这个内占位符容为null的话就表示把所有的学号的学生都查出来

(3)查询结果处理
(4)总结
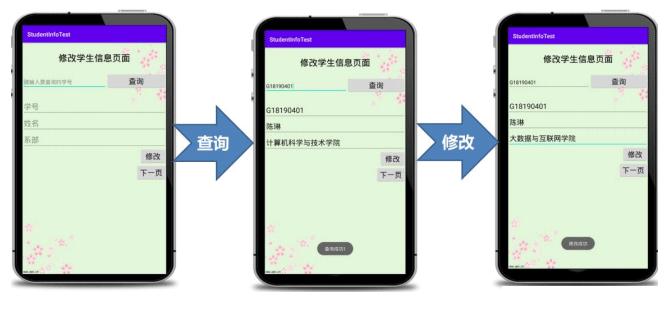
四、修改数据
1、界面效果图
2、布局界面 activity_ third.xml
<?xml version="1.0" encoding="utf-8"?>
<LinearLayout xmlns:android="http://schemas.android.com/apk/res/android"
     xmlns:app="http://schemas.android.com/apk/res-auto"
     xmlns:tools="http://schemas.android.com/tools"
     android:layout_width="match_parent"
     android:layout_height="match_parent"
     android:orientation="vertical"
     android:background="@drawable/modifybg"
     tools:context=".ThirdActivity">
     <TextView
         android:layout_width="wrap_content"
         android:layout_height="wrap_content"
         android:text="信息修改页面"
         android:textSize="30sp"
         android:textStyle="bold"
         android:textColor="#000000"
         android:layout_gravity="center"
         android:layout_margin="80dp"/>
     <LinearLayout
         android:layout_width="match_parent"
         android:layout_height="wrap_content"
         android:orientation="horizontal"
         android:layout_marginBottom="30dp">
         <EditText
             android:id="@ id/editText_threeinputsno"
             android:layout_width="wrap_content"
             android:layout_height="wrap_content"
             android:hint="请输入要查询的学号"
             android:textSize="25sp"/>
         <Button
             android:id="@ id/button_threequery"
             android:layout_width="match_parent"
             android:layout_height="wrap_content"
             android:text="查询"
             android:textSize="25sp"/>
     </LinearLayout>
     <EditText
         android:id="@ id/editText_threesno"
         android:layout_width="match_parent"
         android:layout_height="wrap_content"
         android:hint="学号"
         android:textSize="25sp"/>
     <EditText
         android:id="@ id/editText_threename"
         android:layout_width="match_parent"
         android:layout_height="wrap_content"
         android:hint="姓名"
         android:textSize="25sp"/>
     <EditText
         android:id="@ id/editText_threedep"
         android:layout_width="match_parent"
         android:layout_height="wrap_content"
         android:hint="所属系部"
         android:textSize="25sp"/>
     <Button
         android:id="@ id/button_threemodify"
         android:layout_width="wrap_content"
         android:layout_height="wrap_content"
         android:text="修改"
         android:textSize="25sp"
         android:layout_gravity="right"
         android:layout_marginTop="30dp"/>
     <Button
         android:id="@ id/button_threenext"
         android:layout_width="wrap_content"
         android:layout_height="wrap_content"
         android:text="下一页"
         android:textSize="25sp"
         android:layout_gravity="right"/>
</LinearLayout>
3、类文件 ThirdActivity.java
public class ThirdActivity extends AppCompatActivity {
//定义对象
EditText edit_threeinputsno,edit_threesno,edit_threename,edit_threedep;
Button btn_threequery,btn_threemodify,btn_threenext;
MyDBOpenHelper mhelper;//定义一个数据库帮助类对象
SQLiteDatabase db;//定义一个操作的数据库的类对象
@Override
protected void onCreate(Bundle savedInstanceState) {
super.onCreate(savedInstanceState);
setContentView(R.layout.activity_third);
//1 控件初始化
initView();
//2 查询按钮功能的实现
btnQuery();
//3 修改按钮功能的实现
btnModify();
//4 下一步按钮功能的实现
btnNext();
}
//1 控件初始化-------------代码
private void initView() {
edit_threeinputsno=findViewById(R.id.editText_threeinputsno);
edit_threesno=findViewById(R.id.editText_threesno);
edit_threename=findViewById(R.id.editText_threename);
edit_threedep=findViewById(R.id.editText_threedep);
btn_threequery=findViewById(R.id.button_threequery);
btn_threemodify=findViewById(R.id.button_threemodify);
btn_threenext=findViewById(R.id.button_threenext);
mhelper=new MyDBOpenHelper(ThirdActivity.this);//实例化数据库帮助类对象
db= mhelper.getWritableDatabase();//获取数据库的读写权限
}
//2 查询按钮功能的实现
private void btnQuery() {
btn_threequery.setOnClickListener(new View.OnClickListener() {
@Override
public void onClick(View v) {
//先查询显示,再修改。参数(String sql,String[ ] selectionArgs)
Cursor cursor=db.rawQuery("select * from stu_info where sno=?",new String[]{edit_threeinputsno.getText().toString()});
if(cursor.getCount()!=0){
Toast.makeText(ThirdActivity.this,"查询成功",Toast.LENGTH_SHORT).show();
while(cursor.moveToNext()){
String mysno=cursor.getString(cursor.getColumnIndex("sno"));
String myname=cursor.getString(cursor.getColumnIndex("name"));
String mydep=cursor.getString(cursor.getColumnIndex("deparment"));
edit_threesno.setText(mysno);
edit_threename.setText(myname);
edit_threedep.setText(mydep);
}
}else{
Toast.makeText(ThirdActivity.this,"没有查询到该学号的学生",Toast.LENGTH_SHORT).show();
edit_threesno.setText("");
edit_threename.setText("");
edit_threedep.setText("");
}
}
});
}
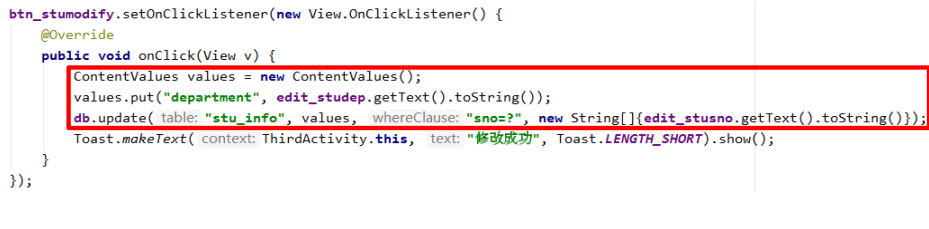
//3 修改按钮功能的实现---------代码
private void btnModify() {
btn_threemodify.setOnClickListener(new View.OnClickListener() {
@Override
public void onClick(View v) {
//修改数据代码如何写呢?参数:(表名,ContentValues 对象,更新的条件,条件的参数)
ContentValues values=new ContentValues();
values.put("deparment",edit_threedep.getText().toString());
db.update("stu_info",values,"sno=?",new String[]{edit_threesno.getText().toString()});
Toast.makeText(ThirdActivity.this,"修改成功",Toast.LENGTH_SHORT).show();
}
});
}
//4 下一页按钮功能的实现------代码
private void btnNext() {
btn_threenext.setOnClickListener(new View.OnClickListener() {
@Override
public void onClick(View v) {
Intent intent=new Intent(ThirdActivity.this,FourActivity.class);
startActivity(intent);
finish();
}
});
}
}4、代码讲解
(1)update()方法的四个参数
update(String table,ContentValues values,String whereClause,String[ ] whereArgs)
1、第一个参数表名;
2、第二个参数是ContentValues对象,要把更新的数据在这里组装进去;
3、第三个参数是更新的条件
4、第四个参数是条件的参数

(2)总结
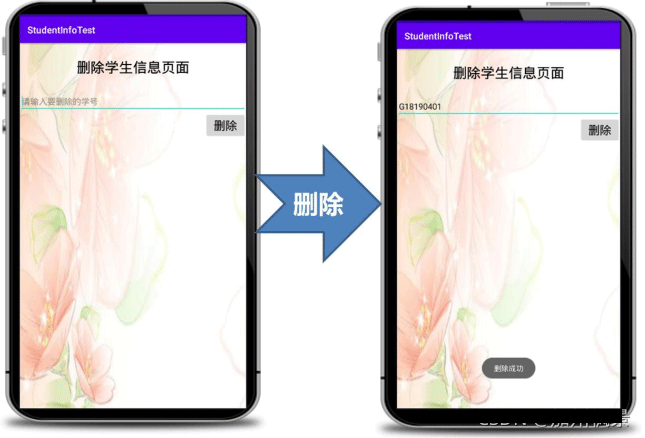
五、删除数据
1、界面效果图
2、布局界面 activity_ four.xml
<?xml version="1.0" encoding="utf-8"?>
<LinearLayout xmlns:android="http://schemas.android.com/apk/res/android"
     xmlns:app="http://schemas.android.com/apk/res-auto"
     xmlns:tools="http://schemas.android.com/tools"
     android:layout_width="match_parent"
     android:layout_height="match_parent"
     android:orientation="vertical"
     android:background="@drawable/deletebg"
     tools:context=".FourActivity">
     <TextView
         android:layout_width="wrap_content"
         android:layout_height="wrap_content"
         android:text="信息删除页面"
         android:textSize="30sp"
         android:textStyle="bold"
         android:textColor="#000000"
         android:layout_gravity="center"
         android:layout_margin="80dp"/>
     <EditText
         android:id="@ id/editText_foursno"
         android:layout_width="match_parent"
         android:layout_height="wrap_content"
         android:hint="请输入要删除的学号"
         android:textSize="25sp"/>
     <Button
         android:id="@ id/button_fourdelete"
         android:layout_width="wrap_content"
         android:layout_height="wrap_content"
         android:text="删除"
         android:textSize="25sp"
         android:layout_gravity="right"/>
</LinearLayout>
3、类文件 FourActivity.java
public class FourActivity extends AppCompatActivity {
//定义对象
EditText edit_foursno;
Button btn_fourdelete;
MyDBOpenHelper mhelper;//定义一个数据库帮助类对象
SQLiteDatabase db;//定义一个操作的数据库的类对象
@Override
protected void onCreate(Bundle savedInstanceState) {
super.onCreate(savedInstanceState);
setContentView(R.layout.activity_four);
//1 控件初始化
initView();
//2 删除按钮功能的实现
btnDelete();
}
//1 控件初始化----------代码
private void initView() {
edit_foursno=findViewById(R.id.editText_foursno);
btn_fourdelete=findViewById(R.id.button_fourdelete);
mhelper=new MyDBOpenHelper(FourActivity.this);//实例化数据库帮助类对象
db=mhelper.getWritableDatabase();//获取数据库的读写权限
}
//2 删除按钮功能的实现-----代码
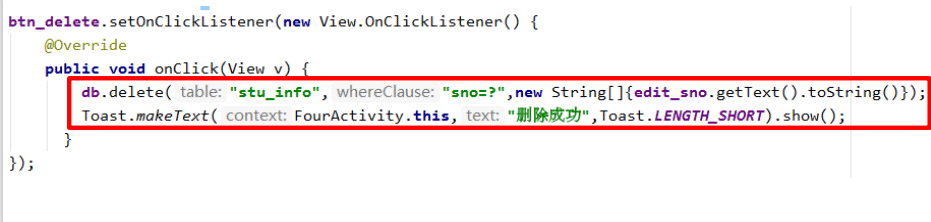
private void btnDelete() {
btn_fourdelete.setOnClickListener(new View.OnClickListener() {
@Override
public void onClick(View v) {
//怎么样删除呢?参数:(表名,删除的条件,条件的参数)
db.delete("stu_info","sno=?",new String[]{edit_foursno.getText().toString()});
Toast.makeText(FourActivity.this,"删除成功",Toast.LENGTH_SHORT).show();
}
});
}
}4、代码讲解
(1)delete()方法的三个参数
delete(String table,String whereClause,String[ ] whereArgs)
1、第一个参数:表名;
2、第二个参数:删除的条件
3、第三个参数:条件的参数

(2)总结
到此这篇关于Android内置SQLite的使用详细介绍的文章就介绍到这了,更多相关Android SQLite使用内容请搜索Devmax以前的文章或继续浏览下面的相关文章希望大家以后多多支持Devmax!