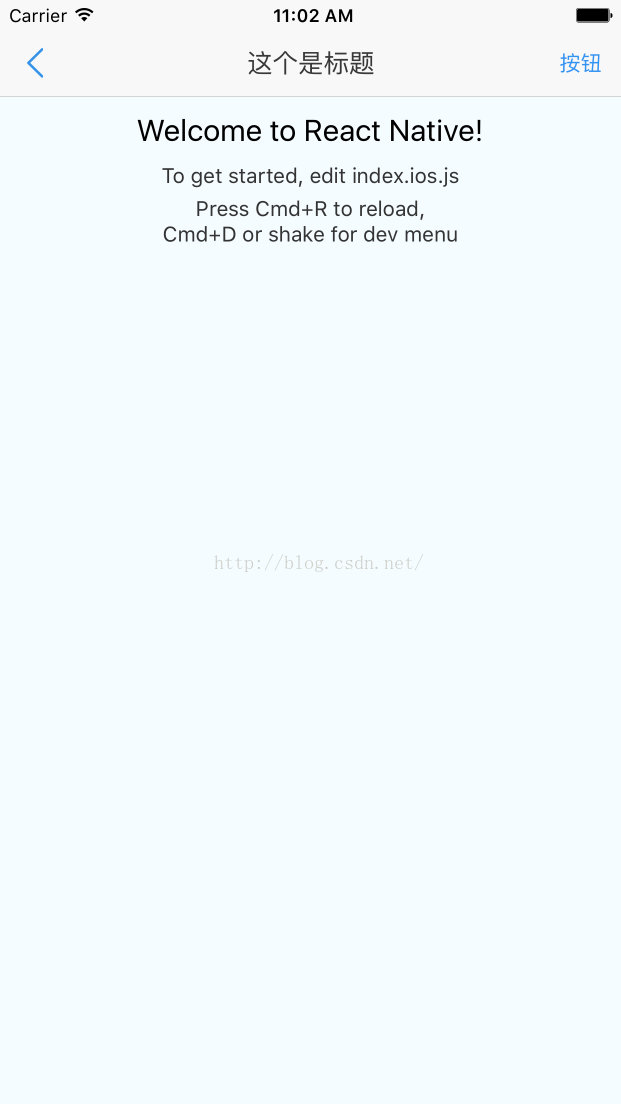
前言
在刚开始学习React Native的时候,版本还是0.20,问题一大堆,Navigation这个问题更是很多,首先,是NavigationBar的问题,NavigationIOS有NavigationBar,Navigation却需要自定义一个,最后,我想了想,还是自定义一个view,岂不更好,现在新公司不用RN,我正好有点时间,就把自定义的NavigationBar分享给大家。好了少废话,上代码;
示例代码
// NavigationBar 导航条的自定义封装
// create by 小广
'use strict';
import React, { Component,PropTypes } from 'react';
import {
 Image,
 Text,
 View,
 Platform,
 TouchableOpacity,
} from 'react-native';

import styles from './NavigationBarStyle'

// 导航条和状态栏的高度
const STATUS_BAR_HEIGHT = 20
const NAV_BAR_HEIGHT = 44

export default class NavigationBar extends Component {
 static defaultProps = {
 title: 'title',
 titleTextColor: '#383838',
 titleViewFunc () {},
 barBGColor: '#f8f8f8',
 barOpacity: 1,
 barStyle: 0,
 barBorderBottomColor: '#D4D4D4',
 barBorderBottomWidth: 0.8,
 statusbarShow: true,
 leftItemTitle: '',
 leftTextColor: '#383838',
 leftItemFunc () {},
 rightItemTitle: '',
 rightTextColor: '#383838',
 rightItemFunc () {},
 //leftImageSource: require('./nav_back.png'),
 };
 static propTypes = {
 title: PropTypes.string,   // nav标题
 titleTextColor: PropTypes.string, // nav标题颜色
 titleView: PropTypes.node,  // nav自定义标题View(节点)
 titleViewFunc: PropTypes.func, // nav的titleView点击事件
 barBGColor: PropTypes.string, // Bar的背景颜色
 barOpacity: PropTypes.number, // Bar的透明度
 barStyle: PropTypes.number, // Bar的扩展属性,nav样式(暂未使用)
 barBorderBottomColor: PropTypes.string, // Bar底部线的颜色
 barBorderBottomWidth: PropTypes.number, // Bar底部线的宽度
 statusbarShow: PropTypes.bool,  // 是否显示状态栏的20高度(默认true)
 leftItemTitle: PropTypes.string, // 左按钮title
 leftImageSource: PropTypes.node, // 左Item图片(source)
 leftTextColor: PropTypes.string, // 左按钮标题颜色
 leftItemFunc: PropTypes.func,  // 左Item事件
 rightItemTitle: PropTypes.string, // 右按钮title
 rightImageSource: PropTypes.node, // 右Item图片(source)
 rightTextColor: PropTypes.string, // 右按钮标题颜色
 rightItemFunc: PropTypes.func,  // 右Item事件
 };

 render() {
 // 判断左Item的类型
 var onlyLeftIcon = false; // 是否只是图片
 if (this.props.leftItemTitle && this.props.leftImageSource) {
  onlyLeftIcon = true;
 } else if (this.props.leftImageSource) {
  onlyLeftIcon = true;
 }

 // 左侧图片title都没有的情况下
 var noneLeft = false;
 if (!(this.props.leftItemTitle.length > 0) && !(this.props.leftImageSource)) {
  noneLeft = true;
 }

 // 判断是否自定义titleView
 var hasTitleView = false;
 if (this.props.title && this.props.titleView) {
  hasTitleView = true;
 } else if (this.props.titleView) {
  hasTitleView = true;
 }

 // 判断右Item的类型
 var onlyRightIcon = false; // 是否只是图片
 if (this.props.rightItemTitle && this.props.rightImageSource) {
  onlyRightIcon = true;
 } else if (this.props.rightImageSource) {
  onlyRightIcon = true;
 }

 // 右侧图片title都没有的情况下
 var noneRight = false;
 if (!(this.props.rightItemTitle.length > 0) && !(this.props.rightImageSource)) {
  noneRight = true;
 }

 // 判断是否显示20状态栏高度
 let showStatusbar = this.props.statusbarShow;
 if (Platform.OS === 'android') {
  // 安卓不显示
  showStatusbar = false;
 }
 return (
  <View style={styles.nav_barView}>
  <View style={[styles.nav_bar,
   {
   backgroundColor: this.props.barBGColor,
   height: showStatusbar ? NAV_BAR_HEIGHT   STATUS_BAR_HEIGHT : NAV_BAR_HEIGHT,
   opacity: this.props.barOpacity
   },
   showStatusbar ? { paddingTop: STATUS_BAR_HEIGHT } : {}, this.props.barStyle]}>
   <View style={styles.nav_ItemView}>
   { // 左侧item
    !noneLeft
    ? <TouchableOpacity
     style={styles.nav_leftItem}
     onPress={this.props.leftItemFunc}>
     { // 左侧是图片还是文字
     onlyLeftIcon
     ? <Image style={styles.nav_leftImage}
        source={this.props.leftImageSource}/>
     : <Text style={[styles.nav_leftTitle,{color: this.props.leftTextColor}]}>
      {this.props.leftItemTitle}
      </Text>
     }
    </TouchableOpacity>
    : null
   }
   </View>
   {
   hasTitleView
   ? <TouchableOpacity style={styles.nav_titleView} onPress={this.props.titleViewFunc}>
    {this.props.titleView}
    </TouchableOpacity>
   : <View style={styles.nav_titleView}>
    <Text style={[styles.nav_title,{color:this.props.titleTextColor}]}>
     {this.props.title}
    </Text>
    </View>
   }
   <View style={styles.nav_ItemView}>
   { // 右侧item
    !noneRight
    ? <TouchableOpacity
     style={styles.nav_rightItem}
     onPress={this.props.rightItemFunc}>
     { // 右侧是图片还是文字
     onlyRightIcon
     ? <Image style={styles.nav_rightImage}
        source={this.props.rightImageSource}/>
     : <Text style={[styles.nav_rightTitle,{color: this.props.rightTextColor}]}>
      {this.props.rightItemTitle}
      </Text>
     }
    </TouchableOpacity>
    : null
   }
   </View>
  </View>
  <View style={{height:this.props.barBorderBottomWidth,backgroundColor:this.props.barBorderBottomColor}}></View>
  </View>

 );
 }
}
css样式:
// NavigationBarStyle 导航条的样式
// create by 小广
'use strict';
import {
 StyleSheet,
} from 'react-native';

export default StyleSheet.create({
 // navBar
 nav_barView:{
 justifyContent: 'center',
 },
 nav_bar: {
 //flex:1,
 flex: 1,
 flexDirection:'row',
 justifyContent: 'center',
 },

 // 标题纯title
 nav_title: {
 fontSize:17,
 },

 // titleView
 nav_titleView: {
 flex: 1,
 alignItems: 'center',
 justifyContent: 'center',
 },

 nav_ItemView:{
 width:80,
 justifyContent: 'center',
 },

 // 左Item
 nav_leftItem: {
 marginLeft:8,
 flex:1,
 justifyContent: 'center',
 alignSelf: 'flex-start',
 //backgroundColor:'#f00',
 },

 // 左Item为title
 nav_leftTitle: {
  marginRight:5,
  marginLeft:5,
  fontSize: 14,
 },

 // 左图片
 nav_leftImage: {
  margin:10,
  resizeMode:'contain',
 },

 // 右Item
 nav_rightItem: {
  marginRight:8,
  flex:1,
  justifyContent: 'center',
  alignSelf: 'flex-end',
  //backgroundColor:'#3393F2',
 },

 // 右Item为title
 nav_rightTitle: {
  marginRight:5,
  marginLeft:5,
  fontSize: 14,
 },

 // 右图片
 nav_rightImage:{
  margin:10,
  resizeMode:'contain',
  //backgroundColor:'#f00',
 },
 //resizeMode:'contain',
});
用法:引入之后
import NavigationBar from '你的存放路径/NavigationBar.js'
class XGRNDemo extends Component {

 _leftItemAction() {
 console.log('左侧按钮点击了');
 }

 _rightItemAction() {
 console.log('右侧按钮点击了');
 }

 render() {
 return (
  <View style={styles.container}>
  <NavigationBar
   title='这个是标题'
   leftImageSource={require('./nav_back.png')}
   rightItemTitle='按钮'
   rightTextColor='#3393F2'
   leftItemFunc={this._leftItemAction.bind(this)}
   rightItemFunc={this._rightItemAction.bind(this)}/>
  <ScrollView style={styles.container}
   automaticallyAdjustContentInsets={false}
   keyboardShouldPersistTaps={true}
   keyboardDismissMode='on-drag'
   >
   <Text style={styles.welcome}>
   Welcome to React Native!
   </Text>
   <Text style={styles.instructions}>
   To get started, edit index.ios.js
   </Text>
   <Text style={styles.instructions}>
   Press Cmd R to reload,{'\n'}
   Cmd D or shake for dev menu
   </Text>
  </ScrollView>
  </View>
 );
 }
}

const styles = StyleSheet.create({
 container: {
 flex: 1,
 backgroundColor: '#F5FCFF',
 },
 welcome: {
 fontSize: 20,
 textAlign: 'center',
 margin: 10,
 },
 instructions: {
 textAlign: 'center',
 color: '#333333',
 marginBottom: 5,
 },
});
其中可以自定义的属性
title: PropTypes.string,   // nav标题
titleTextColor: PropTypes.string, // nav标题颜色
titleView: PropTypes.node,  // nav自定义标题View(节点)
titleViewFunc: PropTypes.func, // nav的titleView点击事件
barBGColor: PropTypes.string, // Bar的背景颜色
barOpacity: PropTypes.number, // Bar的透明度
barStyle: PropTypes.number, // Bar的扩展属性,nav样式(暂未使用)
barBorderBottomColor: PropTypes.string, // Bar底部线的颜色
barBorderBottomWidth: PropTypes.number, // Bar底部线的宽度
statusbarShow: PropTypes.bool,  // 是否显示状态栏的20高度(默认true)
leftItemTitle: PropTypes.string, // 左按钮title
leftImageSource: PropTypes.node, // 左Item图片(source)
leftTextColor: PropTypes.string, // 左按钮标题颜色
leftItemFunc: PropTypes.func,  // 左Item事件
rightItemTitle: PropTypes.string, // 右按钮title
rightImageSource: PropTypes.node, // 右Item图片(source)
rightTextColor: PropTypes.string, // 右按钮标题颜色
rightItemFunc: PropTypes.func,  // 右Item事件
效果如图:

ps:之前想上传到npm服务器,但是自己没搞成功,就这了吧..
总结
以上就是这篇文章的全部内容了,希望本文的内容对大家的学习或者工作具有一定的参考学习价值,如果有疑问大家可以留言交流,谢谢大家对Devmax的支持。