这章的目的是为了把前面所学习的内容整合一下,这个示例完成一个简单图书管理模块,因为中间需要使用到Bootstrap这里先介绍Bootstrap。
示例名称:天狗书店
功能:完成前后端分离的图书管理功能,总结前端学习过的内容。
技术:NodeJS、Express、Monk、MongoDB、AngularJS、BootStrap、跨域
效果:
一、Bootstrap
Bootstrap是一个UI框架,它支持响应式布局,在PC端与移动端都表现不错。
Bootstrap是Twitter推出的一款简洁、直观、强悍的前端开发框架。
Bootstrap中包含了丰富的Web组件,根据这些组件,可以快速的搭建一个漂亮、功能完备的网站。

在线可视布局:http://www.ibootstrap.cn/
演示: http://expo.bootcss.com/
中文网:http://www.bootcss.com/
官网:http://getbootstrap.com/
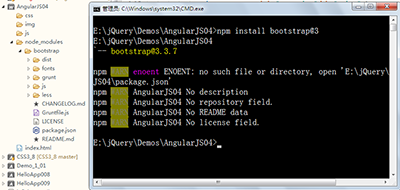
安装:npm install bootstrap@3
1.1、添加引用
也可使用包管理器也可以去官网下载后添加引用。
1.2、在页面中使用BootStrap
添加CSS引用:
<link rel="stylesheet" type="text/css" href="js/bootstrap/dist/css/bootstrap.min.css" />
添加JavaScript引用:
 <script src="http://libs.baidu.com/jquery/2.0.0/jquery.min.js"></script>
<script src="js/bootstrap/dist/js/bootstrap.min.js" type="text/javascript" charset="utf-8"></script>
在页面中引用BootStrap定义好的样式
<!DOCTYPE html>
<html>
<head>
<meta charset="UTF-8">
<title>bootstrap</title>
<link rel="stylesheet" type="text/css" href="js/bootstrap/dist/css/bootstrap.min.css" />
</head>
<body>
<div class="container-fluid">
<div class="row">
<div class="jumbotron">
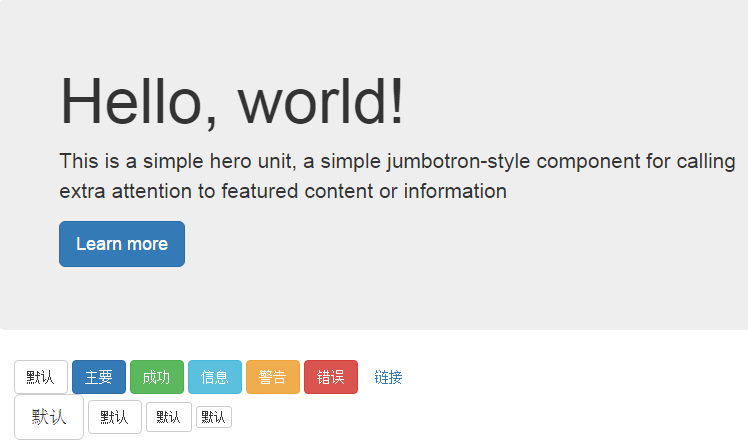
<h1>Hello, world!</h1>
<p>This is a simple hero unit, a simple jumbotron-style component for calling extra attention to featured content or information</p>
<p>
<a class="btn btn-primary btn-lg" href="#" role="button">Learn more</a>
</p>
</div>
</div>
<div class="row">
<div class="col-md-6">
<button type="button" class="btn btn-default">默认</button>
<button type="button" class="btn btn-primary">主要</button>
<button type="button" class="btn btn-success">成功</button>
<button type="button" class="btn btn-info">信息</button>
<button type="button" class="btn btn-warning">警告</button>
<button type="button" class="btn btn-danger">错误</button>
<button type="button" class="btn btn-link">链接</button>
</div>
<div class="col-md-6">
<button type="button" class="btn btn-default btn-lg">默认</button>
<button type="button" class="btn btn-default">默认</button>
<button type="button" class="btn btn-default btn-sm">默认</button>
<button type="button" class="btn btn-default btn-xs">默认</button>
</div>
</div>
</div>
<script src="http://libs.baidu.com/jquery/2.0.0/jquery.min.js"></script>
<script src="js/bootstrap/dist/js/bootstrap.min.js" type="text/javascript" charset="utf-8"></script>
</body>
</html>
运行结果:
1.3、可视化布局
如果想快速高效的布局可以使用一些在线辅助工具,如:
http://www.ibootstrap.cn/

点击下载可以获得生成的HTML脚本。
二、使用MongoDB创建数据库
2.1、启动MongoDB数据库
数据库的具体安装、配置在前面的章节中已经讲解过,可以参考。
如果服务与配置都没有完成的话可以启动:C:\Program Files\MongoDB\Server\3.4\bin\mongod.exe

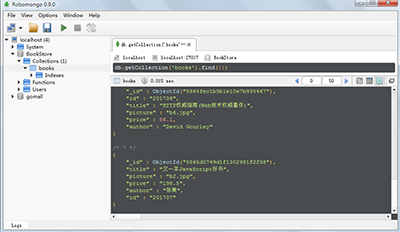
2.2、启动数据库GUI管理工具
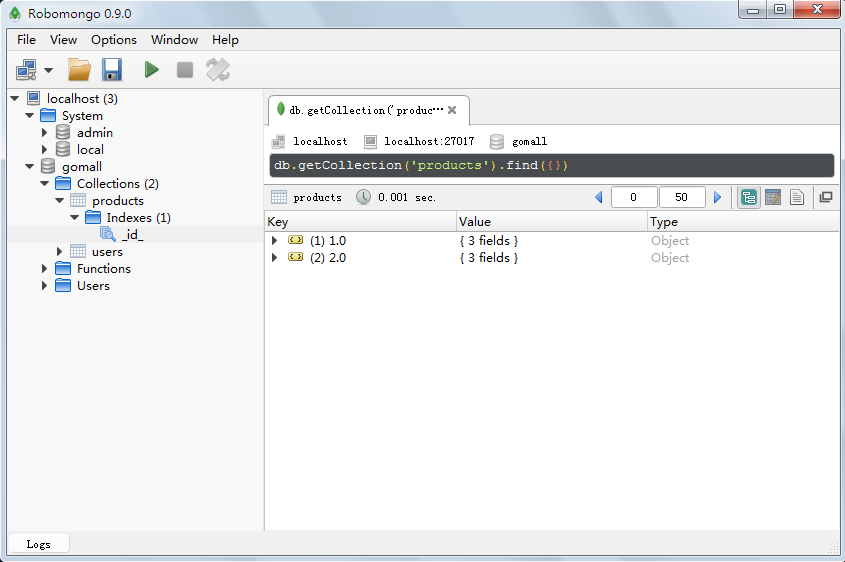
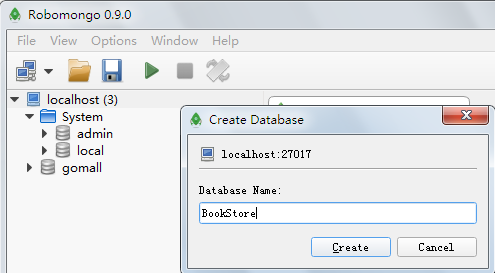
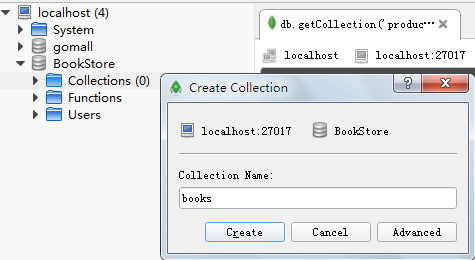
2.3、创建数据库与集合
在localhost上右键“create database”创建名称为BookStore的数据库。
创建一个用于存放图书的集合名称为books。
在集合中添加5本图书。

db.getCollection('books').insert({id:201701,title:"使用AlarJS开发下一代应用程序",picture:"b1.jpg",price:55.0,author:"brad green"});
三、创建一个Express项目
这里使用Eclipse(HBuilder)为开发工具,添加Nodeclipse插件,新增一个Express项目:
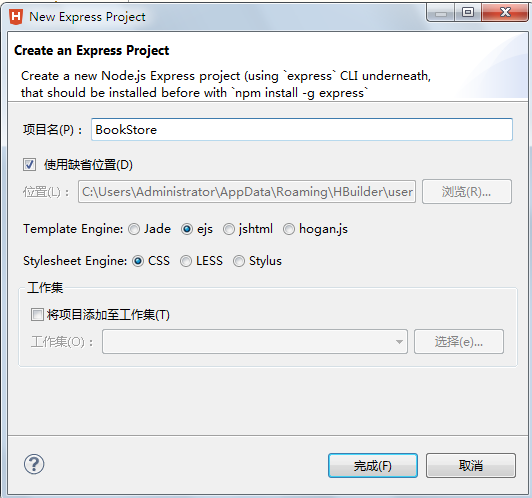
3.1、创建app.js
/**
 * Module dependencies.
 */
var express = require('express')
 , routes = require('./routes')
 , books = require('./routes/books')
 , http = require('http')
 , path = require('path');
var app = express();
// all environments
app.set('port', process.env.PORT || 3000);
app.set('views', __dirname   '/views');
app.set('view engine', 'ejs');
app.use(express.favicon());
app.use(express.logger('dev'));
app.use(express.bodyParser());
app.use(express.methodOverride());
app.use(app.router);
app.use(express.static(path.join(__dirname, 'public')));
// development only
if ('development' == app.get('env')) {
 app.use(express.errorHandler());
}
app.get('/', books.list);
app.get('/books', books.list);
http.createServer(app).listen(app.get('port'), function(){
 console.log('Express server listening on port '   app.get('port'));
});
四、Monk访问MongoDB数据库
monk是NodeJS平台下访问MongoDB数据库的一个模块。monk访问MongoDB更加方便比NodeJS直接访问。
git仓库地址:https://github.com/Automattic/monk
文档:https://automattic.github.io/monk/
安装:npm install --save monk
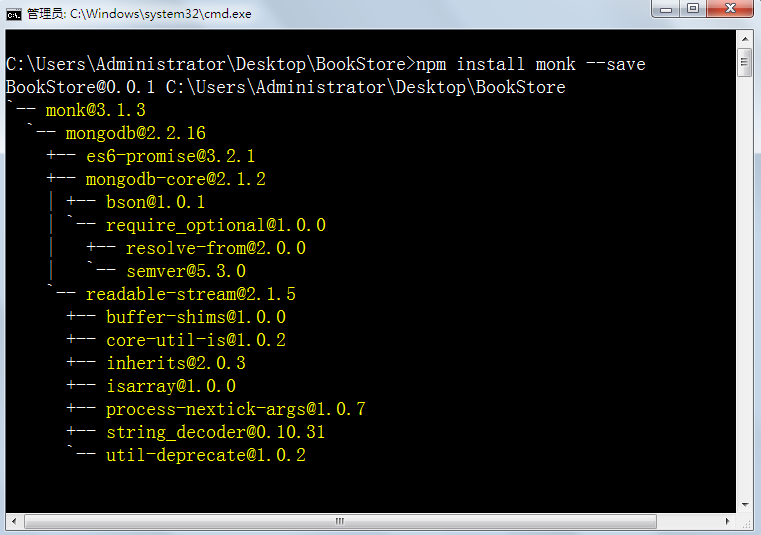
4.1、创建连接
const monk = require('monk')
// Connection URL
const url = 'localhost:27017/myproject';
const db = monk(url);
db.then(() => {
 console.log('Connected correctly to server')
})
4.2、插入数据
const url = 'localhost:27017/myproject'; // Connection URL
const db = require('monk')(url);
const collection = db.get('document')
collection.insert([{a: 1}, {a: 2}, {a: 3}])
 .then((docs) => {
 // docs contains the documents inserted with added **_id** fields
 // Inserted 3 documents into the document collection
 }).catch((err) => {
 // An error happened while inserting
 }).then(() => db.close())
users.insert({ woot: 'foo' })
users.insert([{ woot: 'bar' }, { woot: 'baz' }])
4.3、更新数据
const url = 'localhost:27017/myproject'; // Connection URL
const db = require('monk')(url);
const collection = db.get('document')
collection.insert([{a: 1}, {a: 2}, {a: 3}])
 .then((docs) => {
 // Inserted 3 documents into the document collection
 })
 .then(() => {
 return collection.update({ a: 2 }, { $set: { b: 1 } })
 })
 .then((result) => {
 // Updated the document with the field a equal to 2
 })
 .then(() => db.close())
users.update({name: 'foo'}, {name: 'bar'})
4.4、删除数据
const url = 'localhost:27017/myproject'; // Connection URL
const db = require('monk')(url);
const collection = db.get('document')
collection.insert([{a: 1}, {a: 2}, {a: 3}])
 .then((docs) => {
 // Inserted 3 documents into the document collection
 })
 .then(() => collection.update({ a: 2 }, { $set: { b: 1 } }))
 .then((result) => {
 // Updated the document with the field a equal to 2
 })
 .then(() => {
 return collection.remove({ a: 3})
 }).then((result) => {
 // Deleted the document with the field a equal to 3
 })
 .then(() => db.close())
users.remove({ woot: 'foo' })
4.5、查找数据
const url = 'localhost:27017/myproject'; // Connection URL
const db = require('monk')(url);
const collection = db.get('document')
collection.insert([{a: 1}, {a: 2}, {a: 3}])
 .then((docs) => {
 // Inserted 3 documents into the document collection
 })
 .then(() => collection.update({ a: 2 }, { $set: { b: 1 } }))
 .then((result) => {
 // Updated the document with the field a equal to 2
 })
 .then(() => collection.remove({ a: 3}))
 .then((result) => {
 // Deleted the document with the field a equal to 3
 })
 .then(() => {
 return collection.find()
 })
 .then((docs) => {
 // docs === [{ a: 1 }, { a: 2, b: 1 }]
 })
 .then(() => db.close())
users.find({}).then((docs) => {})
users.find({}, 'name').then((docs) => {
 // only the name field will be selected
})
users.find({}, { fields: { name: 1 } }) // equivalent
users.find({}, '-name').then((docs) => {
 // all the fields except the name field will be selected
})
users.find({}, { fields: { name: 0 } }) // equivalent
users.find({}, { rawCursor: true }).then((cursor) => {
 // raw mongo cursor
})
users.find({}).each((user, {close, pause, resume}) => {
 // the users are streaming here
 // call `close()` to stop the stream
}).then(() => {
 // stream is over
})
//创建的数据库
var monk = require('monk')
var db = monk('localhost:27017/bookstore')
//读取数据:
var monk = require('monk')
var db = monk('localhost:27017/monk-demo')
var books = db.get('books')
 books.find({}, function(err, docs) {
 console.log(docs)
})
//插入数据:
books.insert({"name":"orange book","description":"just so so"})
//查找数据:
books.find({"name":"apple book"}, function(err, docs) {
 console.log(docs)
})
复制代码
五、创建Rest后台服务
在routes目录下增加的books.js文件内容如下:
复制代码
/*
 * 使用monk访问mongodb
 * 以rest的方式向前台提供服务
 */
//依赖monk模块
var monk = require('monk');
//连接并打开数据库
var db = monk('localhost:27017/BookStore');
//从数据库中获得books集合,类似表,并非所有数据, key
var books = db.get('books');
//列出所有的图书json
exports.list = function(req, res) {
 //无条件查找所有的图书,then是当查找完成时回调的异步方法
 books.find({}).then((docs) => {
  //返回json给客户端
  res.json(docs);
 }).then(() => db.close()); //关闭数据库
};
//获得最大id
exports.getMax=function(req,res){
 //找一个,根据id降序排序,
 books.findOne({}, {sort: {id: -1}}).then((bookObj)=>{
  res.json(bookObj);
 }).then(() => db.close());;
}
//添加图书
exports.add = function(req, res) {
 //先找到最大的图书编号
 books.findOne({}, {sort: {id: -1}}).then((obj)=>{
  //从客户端发送到服务器的图书对象
  var book=req.body;
  //设置图书编号为最大的图书编号 1
  book.id=(parseInt(obj.id) 1) "";
  //执行添加
  books.insert(book).then((docs) => {
  //返回添加成功的对象
   res.json(docs);
  }).then(() => db.close());
 });
};
//删除图书
exports.del = function(req, res) {
 //从路径中取参数id,/:id
 var id=req.params.id;
 //移除编号为id的图书
 books.remove({"id":id}).then((obj)=>{
  //返回移除结果
  res.json(obj);
 }).then(() => db.close());
};
//更新
exports.update = function(req, res) {
 //获得提交给服务器的json对象
 var book=req.body;
 //执行更新,第1个参数是要更新的图书查找条件,第2个参数是要更新的对象
 books.update({"id":book.id}, book).then((obj)=>{
  //返回更新完成后的对象
  res.json(obj);
  }).then(() => db.close());
};
为了完成跨域请求,修改http头部信息及路径映射,app.js文件如下:
var express = require('express'),
 routes = require('./routes'),
 books = require('./routes/books'),
 http = require('http'),
 path = require('path');
var app = express();
// all environments
app.set('port', process.env.PORT || 3000);
app.set('views', __dirname   '/views');
app.set('view engine', 'ejs');
app.use(express.favicon());
app.use(express.logger('dev'));
app.use(express.bodyParser());
app.use(express.methodOverride());
app.use(app.router);
app.use(express.static(path.join(__dirname, 'public')));
app.all('*', function(req, res, next) {
 res.header("Access-Control-Allow-Origin", "*");
 res.header("Access-Control-Allow-Headers", "content-type");
 res.header("Access-Control-Allow-Methods", "PUT,POST,GET,DELETE,OPTIONS");
 res.header("X-Powered-By", ' 3.2.1')
 res.header("Content-Type", "application/json;charset=utf-8");
 if(req.method == "OPTIONS") {
  res.send("200");
 } else {
  next();
 }
});
// development only
if('development' == app.get('env')) {
 app.use(express.errorHandler());
}
app.get('/', books.list);
//获得所有的图书列表
app.get('/books', books.list);
//最大的编号
app.get('/books/maxid', books.getMax);
//添加
app.post('/books/book', books.add);
//删除
app.delete('/books/id/:id', books.del);
//更新
app.put('/books/book', books.update);
http.createServer(app).listen(app.get('port'), function() {
 console.log('Express server listening on port '   app.get('port'));
});
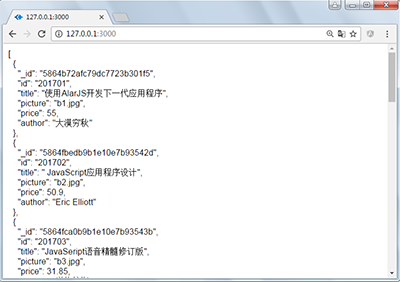
查询所有:
其它服务的测试可以使用Fiddler完成。
六、使用AngularJS调用后台服务
这里的UI使用BootStrap完成,前端使用AngularJS调用NodeJS发布的服务,将数据存放在MongoDB中。
index.js页面如下:
<!DOCTYPE html>
<html>
 <head>
  <meta charset="UTF-8">
  <title>天狗书店</title>
  <link rel="shortcut icon" href="favicon.ico" />
  <link rel="bookmark" href="favicon.ico" />
  <link rel="stylesheet" type="text/css" href="js/bootstrap/dist/css/bootstrap.min.css" />
  <style type="text/css">
   .cover {
    height: 40px;
    width: auto;
   }
   .addBook {
    padding-top: 10px;
   }
   .w100 {
    width: 50px
   }
   .w200 {
    width: 200px;
   }
   .w300 {
    width: 300px
   }
  </style>
 </head>
 <body ng-app="bookApp">
  <div class="container" ng-controller="BookController">
   <div class="row clearfix">
    <div class="col-md-12 column">
     <nav class="navbar navbar-default" role="navigation">
      <div class="navbar-header">
       <button type="button" class="navbar-toggle" data-toggle="collapse" data-target="#bs-example-navbar-collapse-1"> <span class="sr-only">Toggle navigation</span><span class="icon-bar"></span><span class="icon-bar"></span><span class="icon-bar"></span></button>
       <a class="navbar-brand" href="#">天狗书店</a>
      </div>
      <div class="collapse navbar-collapse" id="bs-example-navbar-collapse-1">
       <ul class="nav navbar-nav">
        <li class="active">
         <a href="#">前端</a>
        </li>
        <li>
         <a href="#">Java</a>
        </li>
        <li>
         <a href="#">.Net</a>
        </li>
        <li class="dropdown">
         <a href="#" class="dropdown-toggle" data-toggle="dropdown">更多类型<strong class="caret"></strong></a>
         <ul class="dropdown-menu">
          <li>
           <a href="#">Action</a>
          </li>
          <li>
           <a href="#">Another action</a>
          </li>
          <li>
           <a href="#">Something else here</a>
          </li>
          <li class="divider">
          </li>
          <li>
           <a href="#">Separated link</a>
          </li>
          <li class="divider">
          </li>
          <li>
           <a href="#">One more separated link</a>
          </li>
         </ul>
        </li>
       </ul>
       <form class="navbar-form navbar-left" role="search">
        <div class="form-group">
         <input type="text" class="form-control" />
        </div> <button type="submit" class="btn btn-default">搜索</button>
       </form>
      </div>
     </nav>
     <div class="row clearfix">
      <div class="col-md-12 column">
       <div class="carousel slide" id="carousel-519027">
        <ol class="carousel-indicators">
         <li class="active" data-slide-to="0" data-target="#carousel-519027">
         </li>
         <li data-slide-to="1" data-target="#carousel-519027">
         </li>
         <li data-slide-to="2" data-target="#carousel-519027">
         </li>
        </ol>
        <div class="carousel-inner">
         <div class="item active">
          <img alt="" src="img/adv3.jpg" />
          <div class="carousel-caption">
          </div>
         </div>
         <div class="item">
          <img alt="" src="img/adv2.jpg" />
          <div class="carousel-caption">
          </div>
         </div>
         <div class="item">
          <img alt="" src="img/adv1.jpg" />
          <div class="carousel-caption">
           <h4>
          Third Thumbnail label
         </h4>
           <p>
            Cras justo odio, dapibus ac facilisis in, egestas eget quam. Donec id elit non mi porta gravida at eget metus. Nullam id dolor id nibh ultricies vehicula ut id elit.
           </p>
          </div>
         </div>
        </div>
        <a class="left carousel-control" href="#carousel-519027" data-slide="prev"><span class="glyphicon glyphicon-chevron-left"></span></a>
        <a class="right carousel-control" href="#carousel-519027" data-slide="next"><span class="glyphicon glyphicon-chevron-right"></span></a>
       </div>
      </div>
     </div>
    </div>
   </div>
   <div class="row clearfix">
    <div class="col-md-12 column">
     <div class="addBook">
      <a id="modal-234446" href="#modal-container-234446" role="button" class="btn btn-sm btn-primary" data-toggle="modal"><span class="glyphicon glyphicon-plus"></span> 新书上架</a>
      <div class="modal fade" id="modal-container-234446" role="dialog" aria-labelledby="myModalLabel" aria-hidden="true">
       <div class="modal-dialog">
        <div class="modal-content">
         <div class="modal-header">
          <button type="button" class="close" data-dismiss="modal" aria-hidden="true">×</button>
          <h4 class="modal-title" id="myModalLabel">
        添加/编辑图书
       </h4>
         </div>
         <div class="modal-body">
          <form class="form-horizontal" role="form">
           <div class="form-group">
            <label for="id" class="col-sm-2 control-label">编号</label>
            <div class="col-sm-10">
             <input type="text" class="form-control w100" id="id" ng-model="book.id" ng-readonly="true" />
            </div>
           </div>
           <div class="form-group">
            <label for="title" class="col-sm-2 control-label">书名</label>
            <div class="col-sm-10">
             <input type="text" class="form-control w300" id="title" ng-model="book.title" />
            </div>
           </div>
           <div class="form-group">
            <label for="picture" class="col-sm-2 control-label">图片</label>
            <div class="col-sm-10">
             <input type="text" class="form-control w200" id="picture" ng-model="book.picture" />
            </div>
           </div>
           <div class="form-group">
            <label for="price" class="col-sm-2 control-label">价格</label>
            <div class="col-sm-10">
             <input type="text" class="form-control w200" id="price" ng-model="book.price" />
            </div>
           </div>
           <div class="form-group">
            <label for="author" class="col-sm-2 control-label">作者</label>
            <div class="col-sm-10">
             <input type="text" class="form-control w200" id="author" ng-model="book.author" />
            </div>
           </div>
          </form>
         </div>
         <div class="modal-footer">
          <button type="button" ng-click="save()" class="btn btn-primary">
          <span class="glyphicon glyphicon-floppy-disk"></span>
           保存</button>
          <button type="button" class="btn btn-success" ng-click="clear()" data-dismiss="modal">
           <span class="glyphicon glyphicon-refresh"></span>
           清空</button>
          <button type="button" class="btn btn-danger" data-dismiss="modal">
           <span class="glyphicon glyphicon-remove"></span>
           关闭</button>
         </div>
        </div>
       </div>
      </div>
     </div>
     <table class="table">
      <thead>
       <tr>
        <th>
         序号
        </th>
        <th>
         编号
        </th>
        <th>
         书名
        </th>
        <th>
         图片
        </th>
        <th>
         价格
        </th>
        <th>
         作者
        </th>
        <th>
         操作
        </th>
       </tr>
      </thead>
      <tbody>
       <tr ng-repeat="b in books" ng-class="{'info':$odd}">
        <td>
         {{$index 1}}
        </td>
        <td>
         {{b.id}}
        </td>
        <td>
         {{b.title}}
        </td>
        <td>
         <img ng-src="img/{{b.picture}}" class="cover" />
        </td>
        <td>
         {{b.price | number:1}}
        </td>
        <td>
         {{b.author}}
        </td>
        <td>
         <button type="button" class="btn btn-danger btn-xs" ng-click="del(b.id,$index)">删除</button>
         <button href="#modal-container-234446" role="button" class="btn btn-xs btn-primary" data-toggle="modal" ng-click="edit(b)">编辑</button>
        </td>
       </tr>
      </tbody>
     </table>
    </div>
   </div>
  </div>
  <!--引入angularjs框架-->
  <script src="js/angular146/angular.min.js" type="text/javascript" charset="utf-8"></script>
  <script src="js/jQuery1.11.3/jquery-1.11.3.min.js" type="text/javascript" charset="utf-8"></script>
  <script src="js/bootstrap/dist/js/bootstrap.min.js" type="text/javascript" charset="utf-8"></script>
  <script type="text/javascript">
   //定义模块,指定依赖项为空
   var bookApp = angular.module("bookApp", []);
   //定义控制器,指定控制器的名称,$scope是全局对象
   bookApp.controller("BookController", ['$scope', '$http', function($scope, $http) {
    $scope.books = [];
    $scope.save = function() {
     $http({
       url: "http://127.0.0.1:3000/books/book",
       data: $scope.book,
       method: $scope.book.id ? "PUT" : "POST"
      })
      .success(function(data, status, headers, config) {
       if($scope.book.id) {
        alert("修改成功");
       } else {
        $scope.books.push(data);
       }
      })
      .error(function(data, status, headers, config) {
       alert(status);
      });
    }
    $scope.edit = function(b) {
     $scope.book = b;
    }
    $scope.clear = function() {
     $scope.book = {};
    }
    //初始化加载
    $http.get("http://127.0.0.1:3000/")
     .success(function(data, status, headers, config) {
      $scope.books = data;
     })
     .error(function(data, status, headers, config) {
      alert(status);
     });
    $scope.del = function(id, index) {
     $http.delete("http://127.0.0.1:3000/books/id/"   id)
      .success(function(data, status, headers, config) {
       $scope.books.splice(index, 1);
      })
      .error(function(data, status, headers, config) {
       alert(status);
      });
    }
   }]);
  </script>
 </body>
</html>
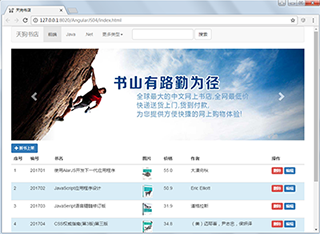
运行结果:
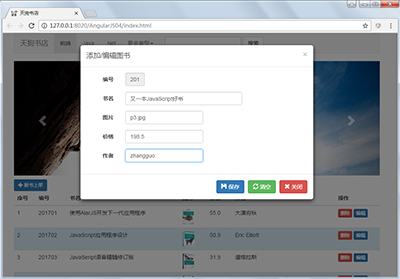
新书上架:
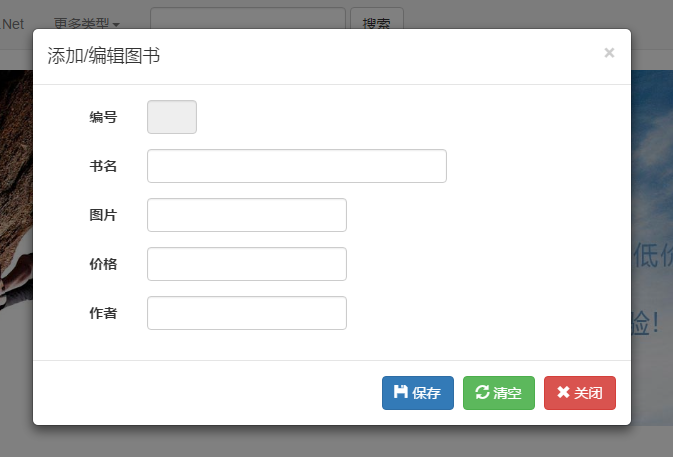
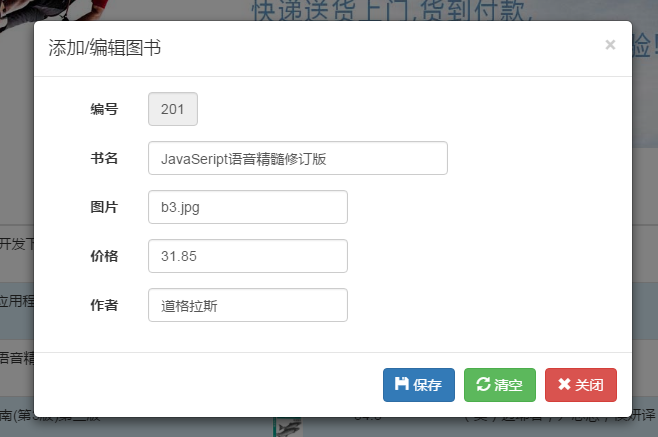
编辑图书
添加成功后:
七、示例下载
前端:https://github.com/zhangguo5/AngularJS04.git
后台:https://github.com/zhangguo5/AngularJS04_BookStore.git
以上所述是小编给大家介绍的基于NodeJS MongoDB AngularJS Bootstrap开发书店案例分析,希望对大家有所帮助,如果大家有任何疑问请给我留言,小编会及时回复大家的。在此也非常感谢大家对Devmax网站的支持!