1 Spring Security配置用户名和密码
方式一:在application.properties文件中配置
# 配置security用户名密码
spring.security.user.password=LIFEILIN
spring.security.user.name=LIFEILIN
spring.security.user.roles=admin
方式二:代码配置
@Configuration
public class securityConfig extends WebSecurityConfigurerAdapter {

    //暂且密码不加密
    @Bean
    PasswordEncoder passwordEncoder(){
        return NoOpPasswordEncoder.getInstance();
    }

    @Override
    protected void configure(AuthenticationManagerBuilder auth) throws Exception {
        auth.inMemoryAuthentication()
                .withUser("LIFEILIN").password("LIFEILIN").roles("admin")   //第一个
                .and()
                .withUser("123").password("123").roles("user"); //第二个
    }
}
2 HttpSecurity的配置
        //配置HttpSecurity拦截规则
        @Override
        protected void configure(HttpSecurity http) throws Exception {
            http.authorizeRequests()    //开启配置
                .antMatchers("/admin/**").hasRole("admin")
                .antMatchers("/user/**").hasAnyRole("admin","user")
                .anyRequest().authenticated()  //其他请求登录后即可访问
                .and()
                .formLogin()
                .loginProcessingUrl("/doLogin")
                .permitAll()    //跟登录相关接口直接访问
                .and()
                .csrf().disable();
        }
3 登录/注销表单详细配置
//配置HttpSecurity拦截规则
@Override
protected void configure(HttpSecurity http) throws Exception {
http.authorizeRequests() //开启配置
.antMatchers("/admin/**").hasRole("admin")
.antMatchers("/user/**").hasAnyRole("admin", "user")
.anyRequest().authenticated() //其他请求登录后即可访问
.and()
.formLogin()
.loginProcessingUrl("/doLogin")
// .loginPage("login") //登录页面
//自定义用户名密码
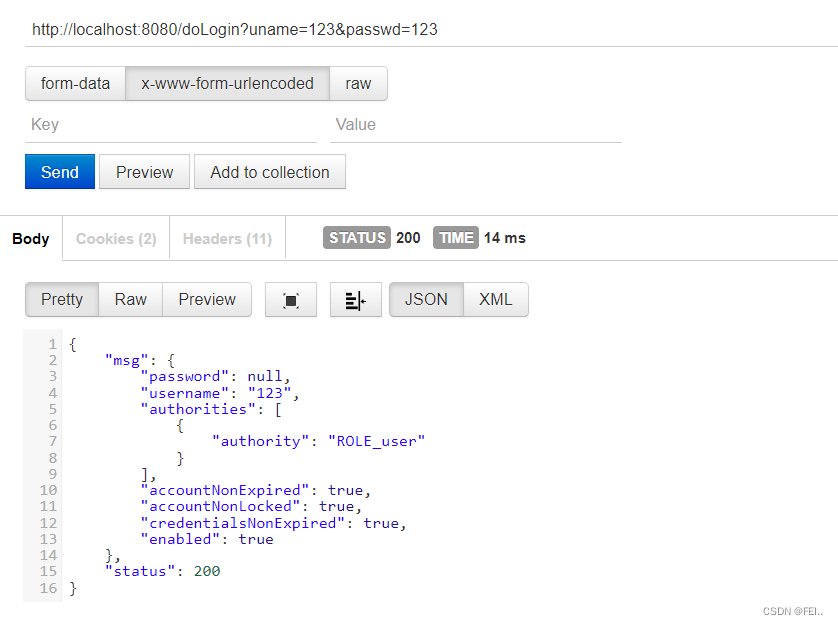
.usernameParameter("uname")
.passwordParameter("passwd")
//登录成功的处理器(前后端分离)
.successHandler(new AuthenticationSuccessHandler() {
@Override
public void onAuthenticationSuccess(HttpServletRequest req, HttpServletResponse resp, Authentication authentication) throws IOException, ServletException { //authentication为登录成功对象
//登录成功,返回json
resp.setContentType("application/json;charset=utf-8");
PrintWriter out = resp.getWriter();
Map<String, Object> map = new HashMap<>();
map.put("status", 200);
map.put("msg", authentication.getPrincipal()); //登录成功对象
out.write(new ObjectMapper().writeValueAsString(map)); //将map转为json写出去
out.flush();
out.close();
}
})
//登录失败的处理器(前后端分离)
.failureHandler(new AuthenticationFailureHandler() {
@Override
public void onAuthenticationFailure(HttpServletRequest req, HttpServletResponse resp, AuthenticationException e) throws IOException, ServletException {
resp.setContentType("application/json;charset=utf-8");
PrintWriter out = resp.getWriter();
Map<String, Object> map = new HashMap<>();
map.put("status", 401);
if (e instanceof LockedException){ //账号锁定
map.put("msg","账号被锁定,登录失败");
}else if (e instanceof BadCredentialsException){
map.put("msg","用户名和密码输入错误,登录失败");
}else if (e instanceof DisabledException){
map.put("msg","账号被禁用,登录失败");
}else if (e instanceof AccountExpiredException){
map.put("msg","账户过期,登录失败");
}else if (e instanceof CredentialsExpiredException){
map.put("msg","密码过期,登录失败");
}else {
map.put("msg","登录失败");
}
out.write(new ObjectMapper().writeValueAsString(map)); //将map转为json写出去
out.flush();
out.close();
}
})
.permitAll() //跟登录相关接口直接访问
.and()
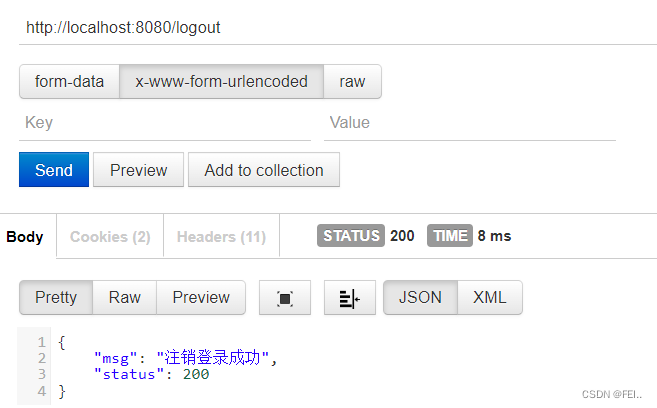
//注销登录
.logout()
.logoutUrl("/logout")
.logoutSuccessHandler(new LogoutSuccessHandler() {
@Override
public void onLogoutSuccess(HttpServletRequest req, HttpServletResponse resp, Authentication authentication) throws IOException, ServletException {
resp.setContentType("application/json;charset=utf-8");
PrintWriter out = resp.getWriter();
Map<String, Object> map = new HashMap<>();
map.put("status", 200);
map.put("msg", "注销登录成功"); //注销登录成功
out.write(new ObjectMapper().writeValueAsString(map)); //将map转为json写出去
out.flush();
out.close();
}
})
.and()
.csrf().disable();
}
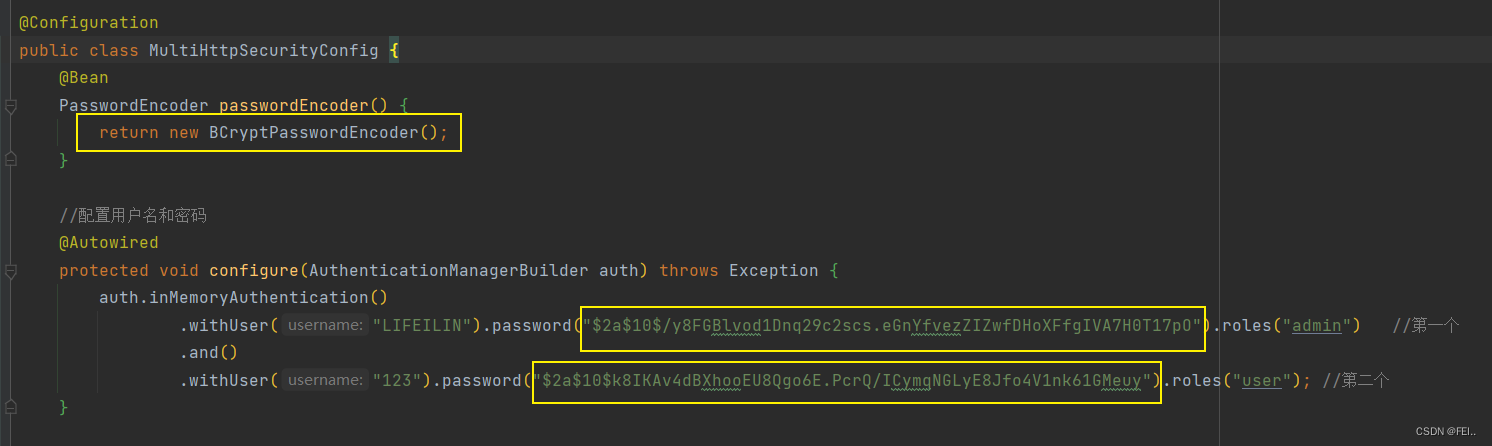
4 多个HttpSecurity的配置
配置类不需要继承WebSecurityConfigurerAdapter方法,直接注入:configure方法
@Configuration
public class MultiHttpSecurityConfig {
    //暂且密码不加密
    @Bean
    PasswordEncoder passwordEncoder() {
        return NoOpPasswordEncoder.getInstance();
    }

    //配置用户名和密码
    @Autowired
    protected void configure(AuthenticationManagerBuilder auth) throws Exception {
        auth.inMemoryAuthentication()
                .withUser("LIFEILIN").password("LIFEILIN").roles("admin")   //第一个
                .and()
                .withUser("123").password("123").roles("user"); //第二个
    }

    @Configuration
    @Order(1)
    public static class AdminSecurityConfig extends WebSecurityConfigurerAdapter {
        @Override
        protected void configure(HttpSecurity http) throws Exception {
            http.antMatcher("/admin/**").authorizeRequests().anyRequest().hasRole("admin"); //admin角色访问
        }
    }

    @Configuration
    public static class OtherSecurityConfig extends WebSecurityConfigurerAdapter {
        @Override
        protected void configure(HttpSecurity http) throws Exception {
            http.authorizeRequests().anyRequest().authenticated()
                    .and()
                    .formLogin()
                    .loginProcessingUrl("/doLogin")
                    .permitAll()
                    .and()
                    .csrf().disable();
        }
    }
}
5 密码加密
相同的明文可加密成不同的密文,不用维护原字段。
@Test
void contextLoads() {
    for (int i=0;i<10;i  ){
        BCryptPasswordEncoder encoder = new BCryptPasswordEncoder();
        System.out.println(encoder.encode("123"));

    }
}
明文【123】加密后:
$2a 10 10 10SS.YDon5lzqkIFdW8DQYzOTJBvQwkdXHWcHlIfF1fa/wPjJtru5aO
$2a 10 10 10vJsPq4GBtHKmmBQaKTriTO90sFurCEDavZANqCoqGu4gAzXxGLbTC
$2a 10 10 10gZ4H3/tBRpz2lPX0XUI1ber2qsNsKuk38j0iSsATeVOrrWFJIEr1G
$2a 10 10 10h7RiyAXP8JzWGsmAXGZy/uO6ASraQPNryVPl.11vMyUjhSCxS.Sde
$2a 10 10 10BCm3vuueGWdvjG3ciCUZB.6V9y6jMELHqB9iv2DwRJyOkR5jd…4S
$2a 10 10 10rO2894WmxRMtjHVzoYivyuzvje8BrAUjm8YLj3K.i4sQDvpWBtuuy
$2a 10 10 10jTosyN75hwKB3OSQCYY9YOIj6TYZG1FdJXfYCalTUuXpPiI5tv/P.
$2a 10 10 10p95j18H3yRABEScCE/2MqOqYt1ZqArdYhC87BVGEmQvn6znSqKw5G
$2a 10 10 10/y8FGBlvod1Dnq29c2scs.eGnYfvezZIZwfDHoXFfgIVA7H0T17pO
$2a 10 10 10k8IKAv4dBXhooEU8Qgo6E.PcrQ/ICymqNGLyE8Jfo4V1nk61GMeuy
6 方法安全
在配置类中添加注解:@EnableGlobalMethodSecurity(prePostEnabled = true, securedEnabled = true)
接口都能访问,但进了接口不一定能访问到接口里面的方法!!
【Controller层:】
@Autowired
MethodService methodService;

@GetMapping("/hello1")
public String hello1(){
    return methodService.admin();
}
@GetMapping("/hello2")
public String hello2(){
    return methodService.user();
}
@GetMapping("/hello3")
public String hello3(){
    return methodService.hello();
}
【Service层:】
@Service
public class MethodService {
    @PreAuthorize("hasRole('admin')")
    public String admin() {  //需要admin角色才能访问
        return "hello admin";
    }

    @Secured("ROLE_user")
    public String user(){   //需要user角色才能访问
        return "hello user";
    }

    @PreAuthorize("hasAnyRole('admin','user')") //admin,user两种权限
    public String hello(){
        return "hello hello";
    }
}
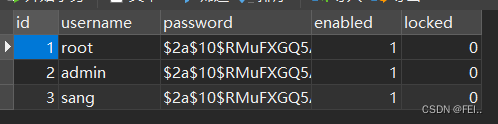
7 基于数据库的认证
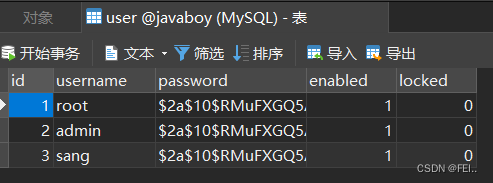
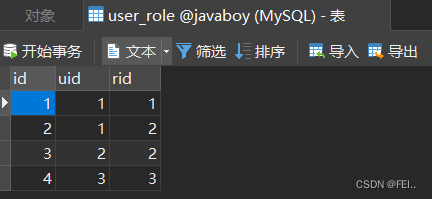
1、数据库中创建三张表user、role、user_role

2、设置配置文件
# 应用名称
spring.application.name=SpringBoot_11_security
# 应用服务 WEB 访问端口
server.port=8080
#下面这些内容是为了让MyBatis映射
# 指定Mybatis的Mapper文件
mybatis.mapper-locations=classpath:mappers/*xml
# 指定Mybatis的实体目录
mybatis.type-aliases-package=com.example.mybatis.entity
# 数据库驱动:
spring.datasource.driver-class-name=com.mysql.cj.jdbc.Driver
# 数据源名称
spring.datasource.name=defaultDataSource
# 数据库连接地址
spring.datasource.url=jdbc:mysql://localhost:3306/【数据库名称】?serverTimezone=UTC
spring.datasource.type=com.alibaba.druid.pool.DruidDataSource
# 数据库用户名&密码:
spring.datasource.username=root
spring.datasource.password=【数据库密码】
3、创建实体User、Role
package com.example.bean;

import org.springframework.security.core.GrantedAuthority;
import org.springframework.security.core.authority.SimpleGrantedAuthority;
import org.springframework.security.core.userdetails.UserDetails;

import java.util.ArrayList;
import java.util.Collection;
import java.util.List;

/**
 * @author 李飞林
 * @ClassName User
 * @mail 1961785612@qq.com
 * @Description TODO
 * @date 2022/8/4 21:46
 */
public class User implements UserDetails {
    private Integer id;
    private String username;
    private String password;
    private Boolean enabled;
    private Boolean locked;
    private List<Role> roles;

    public List<Role> getRoles() {
        return roles;
    }

    public void setRoles(List<Role> roles) {
        this.roles = roles;
    }

    public void setId(Integer id) {
        this.id = id;
    }

    public void setUsername(String username) {
        this.username = username;
    }

    public void setPassword(String password) {
        this.password = password;
    }

    public void setEnabled(Boolean enabled) {
        this.enabled = enabled;
    }

    public void setLocked(Boolean locked) {
        this.locked = locked;
    }

    public Integer getId() {
        return id;
    }

    @Override
    public String getUsername() {
        return username;
    }

    @Override
    public boolean isAccountNonExpired() {  //账号是否未过期
        return true;
    }

    @Override
    public boolean isAccountNonLocked() {   //账号是否未锁定
        return !locked;
    }

    @Override
    public boolean isCredentialsNonExpired() {
        return true;
    }

    @Override
    public boolean isEnabled() {    //是否可用
        return enabled;
    }

    @Override
    public Collection<? extends GrantedAuthority> getAuthorities() {
        List<SimpleGrantedAuthority> authorities=new ArrayList<>();
        for (Role role:roles){
            authorities.add(new SimpleGrantedAuthority("ROLE_" role.getName()));//角色认证以ROLE_开始
        }
        return authorities;    //返回用户所有角色
    }

    @Override
    public String getPassword() {
        return password;
    }
}
package com.example.bean;

/**
 * @author 李飞林
 * @ClassName Role
 * @mail 1961785612@qq.com
 * @Description TODO
 * @date 2022/8/4 21:49
 */
public class Role {
    private Integer id;
    private String name;
    private String nameZh;

    public Integer getId() {
        return id;
    }

    public void setId(Integer id) {
        this.id = id;
    }

    public String getName() {
        return name;
    }

    public void setName(String name) {
        this.name = name;
    }

    public String getNameZh() {
        return nameZh;
    }

    public void setNameZh(String nameZh) {
        this.nameZh = nameZh;
    }
}
4、编写mapper层
UserMapper接口:
package com.example.mapper;

import com.example.bean.Role;
import com.example.bean.User;
import org.apache.ibatis.annotations.Mapper;

import java.util.List;

/**
 * @author 李飞林
 * @ClassName UserMapper
 * @mail 1961785612@qq.com
 * @Description TODO
 * @date 2022/8/4 22:01
 */
@Mapper
public interface UserMapper {
    User loadUserByUsername(String username);

    List<Role> getUserRolesById(Integer id);
}
UserMapper.xml:
<?xml version="1.0" encoding="UTF-8" ?>
<!DOCTYPE mapper PUBLIC "-//mybatis.org//DTD Mapper 3.0//EN" "http://mybatis.org/dtd/mybatis-3-mapper.dtd" >
<mapper namespace="com.example.mapper.UserMapper">
    <select id="loadUserByUsername" resultType="com.example.bean.User">
        select *
        from user
        where username = #{username};
    </select>
    <select id="getUserRolesById" resultType="com.example.bean.Role">
        select *
        from role
        where id in (select rid from user_role where uid = #{id})
    </select>
</mapper>
5、编写service层:
package com.example.service;

import com.example.bean.User;
import com.example.mapper.UserMapper;
import org.springframework.beans.factory.annotation.Autowired;
import org.springframework.security.core.userdetails.UserDetails;
import org.springframework.security.core.userdetails.UserDetailsService;
import org.springframework.security.core.userdetails.UsernameNotFoundException;
import org.springframework.stereotype.Service;

/**
 * @author 李飞林
 * @ClassName UserService
 * @mail 1961785612@qq.com
 * @Description TODO
 * @date 2022/8/4 22:01
 */
@Service
public class UserService implements UserDetailsService {
    @Autowired
    UserMapper userMapper;

    @Override
    public UserDetails loadUserByUsername(String username) throws UsernameNotFoundException {
        User user = userMapper.loadUserByUsername(username);
        if (user == null) {
            throw new UsernameNotFoundException("用户不存在");
        }
        user.setRoles(userMapper.getUserRolesById(user.getId()));
        return user;
    }
}
6、security安全配置:
package com.example.config;

import com.example.service.UserService;
import org.springframework.beans.factory.annotation.Autowired;
import org.springframework.context.annotation.Bean;
import org.springframework.context.annotation.Configuration;
import org.springframework.security.config.annotation.authentication.builders.AuthenticationManagerBuilder;
import org.springframework.security.config.annotation.web.builders.HttpSecurity;
import org.springframework.security.config.annotation.web.configuration.WebSecurityConfigurerAdapter;
import org.springframework.security.crypto.bcrypt.BCryptPasswordEncoder;
import org.springframework.security.crypto.password.PasswordEncoder;

/**
 * @author 李飞林
 * @ClassName SecurityConfig
 * @mail 1961785612@qq.com
 * @Description TODO
 * @date 2022/8/4 22:35
 */
@Configuration
public class SecurityConfig extends WebSecurityConfigurerAdapter {
    @Autowired
    UserService userService;

    @Override
    protected void configure(AuthenticationManagerBuilder auth) throws Exception {
        auth.userDetailsService(userService);
    }

    @Bean
    PasswordEncoder passwordEncoder() {
        return new BCryptPasswordEncoder();
    }

    @Override
    protected void configure(HttpSecurity http) throws Exception {
        http.authorizeRequests()
                .antMatchers("/dba/**").hasRole("dba")
                .antMatchers("/admin/**").hasRole("admin")
                .antMatchers("/user/**").hasRole("user")
                .anyRequest().authenticated()//其他可访问
                .and()
                .formLogin()
                .permitAll()
                .and()
                .csrf().disable();
    }
}
7、controller层接口调试:
package com.example.controller;

import org.springframework.web.bind.annotation.GetMapping;
import org.springframework.web.bind.annotation.RestController;

/**
 * @author 李飞林
 * @ClassName HelloController
 * @mail 1961785612@qq.com
 * @Description TODO
 * @date 2022/8/4 22:40
 */
@RestController
public class HelloController {
    @GetMapping("/hello")
    public String hello() {
        return "hello security";
    }

    @GetMapping("/dba/hello")
    public String dba() {
        return "hello dba";
    }

    @GetMapping("/admin/hello")
    public String admin() {
        return "hello admin";
    }

    @GetMapping("/user/hello")
    public String user() {
        return "hello user";
    }
}
8 角色继承(在securityConfig中加入代码段)
//角色继承
@Bean
RoleHierarchy roleHierarchy() {
    RoleHierarchyImpl roleHierarchy = new RoleHierarchyImpl();
    String hierarchy = "ROLE_dba > ROLE_admin > ROLE_user"; //dba > admin > user
    roleHierarchy.setHierarchy(hierarchy);
    return roleHierarchy;
}
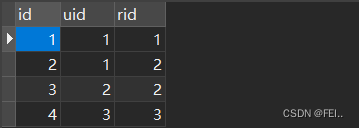
9 动态配置权限
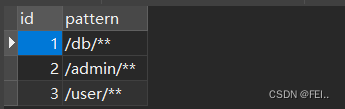
数据库中的表结构如下:
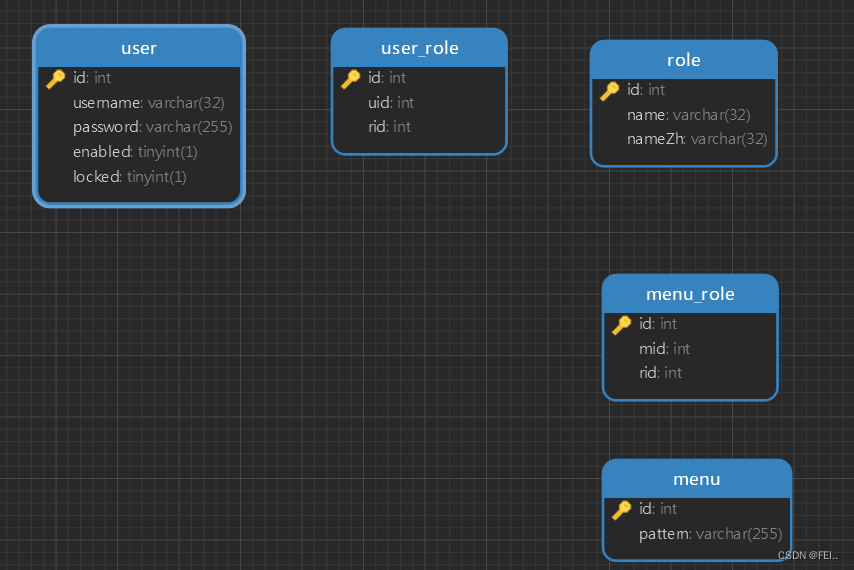
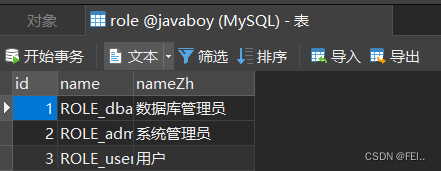
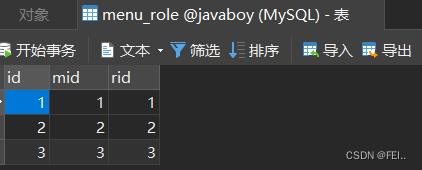
其中菜单表中已经配置好对应的路径,后面需要从数据库中加载:
一、查询user用户所具有的角色
1、编写实体类User、Role、Menu:
User实现UserDetails接口,实现如下方法:
@Override
public Collection<? extends GrantedAuthority> getAuthorities() {
    List<SimpleGrantedAuthority> authorities=new ArrayList<>();
    for (Role role :
            roles) {
        authorities.add(new SimpleGrantedAuthority(role.getName()));
    }
    return authorities;
}
2、编写UserService:继承UserDetailsService接口,实现loadUserByUsername方法
@Service
public class UserServiceImpl extends ServiceImpl<UserMapper, User> implements UserService, UserDetailsService {
    @Autowired
    UserMapper userMapper;

    @Override
    public UserDetails loadUserByUsername(String username) throws UsernameNotFoundException {
        User user = userMapper.loadUserByUsername(username);	//根据登录字符串获获取用户名
        if (user == null) {
            throw new UsernameNotFoundException("用户不存在");
        } else {
            user.setRoles(userMapper.getRolesById(user.getId()));	//根据用户名的ID查询所具有的角色
        }
        return user;
    }
}
3、编写UserMapper接口:
@Mapper
public interface UserMapper extends BaseMapper<User> {

    User loadUserByUsername(String username);

    List<Role> getRolesById(Integer id);
}
4、编写UserMapper.xml:
<select id="loadUserByUsername" resultType="com.lifeilin.pojo.User">
    select *
    from user
    where username = #{username}
</select>

<select id="getRolesById" resultType="com.lifeilin.pojo.Role">
    select *
    from role
    where id in (select rid from user_role where uid = #{id});
</select>
至此,已经从数据库中获取到登录用户user所具备的角色
二、配置SecurityConfig
1、在SecurityConfig类中配置登录权限
@Configuration
public class SecurityConfig extends WebSecurityConfigurerAdapter {
    @Autowired
    UserServiceImpl userService;

    @Bean
    PasswordEncoder passwordEncoder(){
        return new BCryptPasswordEncoder();
    }

	//配置登录
    @Override
    protected void configure(AuthenticationManagerBuilder auth) throws Exception {
        auth.userDetailsService(userService);
    }
}
2、配置角色(从数据库中动态加载) 1 在config包中创建MyFilter.java过滤器
在config包中创建MyFilter.java过滤器,实现FilterInvocationSecurityMetadataSource接口,其主要作用是分析请求地址,请求地址必然是menu表中给出的标准地址(如果不是则进行其他操作),根据请求地址分析出需要哪些角色
注意:这里需要提前从数据库查询出所有菜单以及对应的角色。
补充:查询菜单及对应角色(使用Spring Cache作缓存)
1、导入缓存相关依赖
<!--        redis依赖-->
<dependency>
    <groupId>org.springframework.boot</groupId>
    <artifactId>spring-boot-starter-data-redis</artifactId>
</dependency>
<!--        cache依赖-->
<dependency>
    <groupId>org.springframework.boot</groupId>
    <artifactId>spring-boot-starter-cache</artifactId>
</dependency>
2、需要简单配置一下Redis,Redis的基本信息,另外,这里要用到Cache,因此还需要稍微配置一下Cache,如下:
## 配置redis
#基本属性
spring.redis.host=localhost
spring.redis.port=6379
spring.redis.database=0
spring.redis.password=
#配置cache名称
spring.cache.cache-names=c1
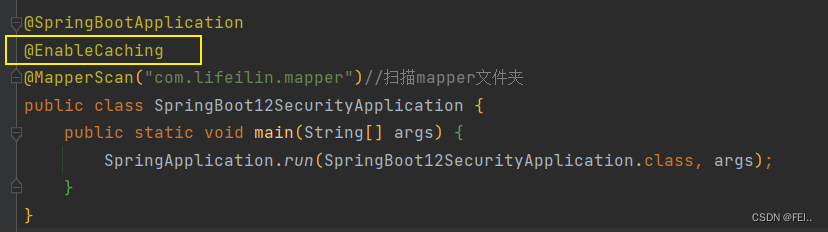
另外,还需要在配置类上添加如下代码,表示开启缓存:
3、Service层缓存的使用
(1)在MenuServiceImpl类上使用@CacheConfig(cacheNames = “c1”)
这个注解在类上使用,用来描述该类中所有方法使用的缓存名称,当然也可以不使用该注解,直接在具体的缓存注解上配置名称。
(2)在MenuServiceImpl类下getAllMenus()方法使用@Cacheable
这个注解一般加在查询方法上,表示将一个方法的返回值缓存起来,默认情况下,缓存的key就是方法的参数,缓存的value就是方法的返回值。
@Service
@CacheConfig(cacheNames = "c1")
public class MenuServiceImpl extends ServiceImpl<MenuMapper, Menu> implements MenuService {
    @Autowired
    MenuMapper menuMapper;

    //可以加缓存
    @Cacheable
    public List<Menu> getAllMenus() {
        return menuMapper.getAllMenus();
    }
}
@Mapper
public interface MenuMapper extends BaseMapper<Menu> {

    List<Menu> getAllMenus();
}
<?xml version="1.0" encoding="UTF-8"?>
<!DOCTYPE mapper PUBLIC "-//mybatis.org//DTD Mapper 3.0//EN" "http://mybatis.org/dtd/mybatis-3-mapper.dtd">
<mapper namespace="com.lifeilin.mapper.MenuMapper">
    <!--    查询所有menu-->
    <!-- resultMap:填入配置的resultMap标签的id值 -->
    <select id="getAllMenus" resultMap="BaseResultMap">
        SELECT m.id,
               m.pattern,
               r.id     AS rid,
               r.NAME   AS rname,
               r.nameZh AS rnameZh
        FROM menu AS m
                 LEFT JOIN menu_role AS mr ON m.id = mr.mid
                 LEFT JOIN role AS r ON mr.rid = r.id
    </select>
    <!-- resultMap最终还是要将结果映射到pojo上,type就是指定映射到哪一个pojo -->
    <resultMap id="BaseResultMap" type="com.lifeilin.pojo.Menu">
        <!-- 定义主键 ,非常重要。如果是多个字段,则定义多个id -->
        <!-- property:主键在pojo中的属性名 -->
        <!-- column:主键在数据库中的列名 -->
        <id property="id" column="id"></id>
        <!-- 定义普通属性 -->
        <result property="pattern" column="pattern"></result>
        <!--collection中property的roles 对应的是Role实体中的属性-->
        <collection property="roles" ofType="com.lifeilin.pojo.Role">
            <id column="rid" property="id"/>
            <result column="rname" property="name"/>
            <result column="rnameZh" property="nameZh"/>
        </collection>
    </resultMap>
</mapper>
@Component
public class MyFilter implements FilterInvocationSecurityMetadataSource {
    //路径匹配符
    AntPathMatcher pathMatcher = new AntPathMatcher();

    @Autowired
    MenuServiceImpl menuService;

    @Override
    public Collection<ConfigAttribute> getAttributes(Object object) throws IllegalArgumentException {
        String requestUrl = ((FilterInvocation) object).getRequestUrl();//获取请求的地址
        List<Menu> allMenus = menuService.getAllMenus();//查询所有菜单
        for (Menu menu : allMenus) {
            if (pathMatcher.match(menu.getPattern(), requestUrl)) { //请求地址与菜单地址匹配上
                List<Role> roles = menu.getRoles(); //获取匹配成功的地址的角色
                String[] rolesStr = new String[roles.size()];
                for (int i = 0; i < roles.size(); i  ) {
                    rolesStr[i] = roles.get(i).getName();
                }
                return SecurityConfig.createList(rolesStr);
            }
        }
        return SecurityConfig.createList("ROLE_login"); //没有匹配上,标记符,额外处理
    }

    @Override
    public Collection<ConfigAttribute> getAllConfigAttributes() {
        return null;
    }

    @Override
    public boolean supports(Class<?> clazz) {
        return true;
    }
}
2、在config包中创建MyAccessDecisionManager类
在config包中创建MyAccessDecisionManager类,目的是通过上一步获取了请求路径需要哪些角色看看数据库中是否具有该角色。
@Component
public class MyAccessDecisionManager implements AccessDecisionManager {
    @Override
    public void decide(Authentication authentication, Object object, Collection<ConfigAttribute> configAttributes) throws AccessDeniedException, InsufficientAuthenticationException { //authentication知道有哪些角色,configAttributes知道需要哪些角色
        //1、遍历需要的角色
        for (ConfigAttribute attribute : configAttributes) {
            if ("ROLE_login".equals(attribute.getAttribute())){//请求地址都没匹配上,说明是登陆后就可访问的请求地址
                if (authentication instanceof AnonymousAuthenticationToken){    //匿名用户(没登陆)
                    throw new AccessDeniedException("非法请求");
                }else {
                    return;
                }
            }
            //2、获取所具备的角色
            Collection<? extends GrantedAuthority> authorities = authentication.getAuthorities();
            for (GrantedAuthority authority : authorities) {
                if (authority.getAuthority().equals(attribute.getAttribute())){//如果具备所需要的角色
                    return;
                }
            }
        }
        throw new AccessDeniedException("非法请求");
    }

    @Override
    public boolean supports(ConfigAttribute attribute) {
        return true;
    }

    @Override
    public boolean supports(Class<?> clazz) {
        return true;
    }
}
3、在SecurityConfig引入myAccessDecisionManager myFilter
@Override
protected void configure(HttpSecurity http) throws Exception {
    http.authorizeRequests()
            .withObjectPostProcessor(new ObjectPostProcessor<FilterSecurityInterceptor>() {
                @Override
                public <O extends FilterSecurityInterceptor> O postProcess(O object) {
                    object.setAccessDecisionManager(myAccessDecisionManager);//
                    object.setSecurityMetadataSource(myFilter);//
                    return object;
                }
            })
            .and()
            .formLogin()
            .permitAll()
            .and()
            .csrf().disable();
}
到此这篇关于Spring Security权限管理的文章就介绍到这了,更多相关Spring Security权限管理内容请搜索Devmax以前的文章或继续浏览下面的相关文章希望大家以后多多支持Devmax!