分水岭技术是一种众所周知的分割算法,特别适用于提取图片中的相邻或重叠对象。使用分水岭方法时,我们必须从用户定义的标记开始。这些标记可以使用点击手动定义,也可以使用阈值或形态学处理方法定义。
分水岭技术将输入图像中的像素视为基于这些标记的局部极小值(称为地形)——该方法从标记向外“淹没”山谷,直到各种标记的山谷相遇。为了产生准确的分水岭分割,必须准确地设置标记。
我们使用一种基于OpenCV标记的分水岭技术来指定哪些谷点应该合并,哪些不应该合并。它是一种交互式图像分割,而不是自动图像分割。
1. 原理
任何灰度图像都可以看作是一个地形表面,高峰代表高强度,山谷代表低强度。首先,用各种颜色的水(标签)填充孤立的山谷(局部极小值)。来自不同山谷的河流,颜色明显不同,随着水位上升,根据相邻的山峰(梯度)开始融合。为了避免这种情况,在水与水相遇的地方建造了屏障。你不断注水,设置障碍,直到所有的山峰都被淹没,分割结果由创建的障碍决定。
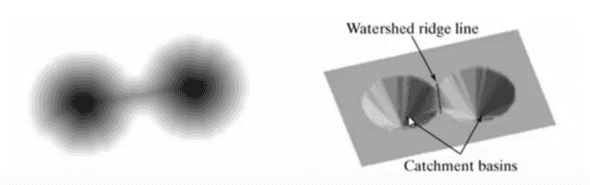
然而,由于图像中存在噪声或其他异常,该方法会产生过分割的结果。因此,OpenCV创建了一个基于标记的分水岭方法,允许您选择哪些谷点应该合并,哪些不应该合并。它是一种交互式图像分割方法。我们所做的就是给每一个前景物体区域贴上不同的标签,我们不确定的区域是标签记为0。然后,使用分水岭算法。获得的结果中,对象的边界值将为-1。
2.代码实现
2.1 利用OpenCV和c 实现分水岭算法
#include <iostream>
#include <opencv2/imgcodecs.hpp>
#include <opencv2/highgui.hpp>
#include <opencv2/imgproc.hpp>
#include <vector>
void showImg(const std::string& windowName,const cv::Mat& img){
cv::imshow(windowName,img);
}
void getBackground(const cv::Mat& source,cv::Mat& dst) {
cv::dilate(source,dst,cv::Mat::ones(3,3,CV_8U)); //Kernel 3x3
}
void getForeground(const cv::Mat& source,cv::Mat& dst) {
cv::distanceTransform(source,dst,cv::DIST_L2,3,CV_32F);
cv::normalize(dst, dst, 0, 1, cv::NORM_MINMAX);
}
void findMarker(const cv::Mat& sureBg,cv::Mat& markers,
std::vector<std::vector<cv::Point>>& contours)
{
cv::findContours(sureBg,contours,cv::RETR_EXTERNAL,
cv::CHAIN_APPROX_SIMPLE);
// Draw the foreground markers
for (size_t i = 0,size = contours.size(); i < size; i )
drawContours(markers, contours, static_cast<int>(i),
cv::Scalar(static_cast<int>(i) 1), -1);
}
void getRandomColor(std::vector<cv::Vec3b>& colors,size_t size)
{
for (int i = 0; i < size ; i)
{
int b = cv::theRNG().uniform(0, 256);
int g = cv::theRNG().uniform(0, 256);
int r = cv::theRNG().uniform(0, 256);
colors.emplace_back(cv::Vec3b((uchar)b, (uchar)g, (uchar)r));
}
}
int main (int argc,char** argv) {
// 读取图片
if(argc < 2)
{
std::cerr << "Error\n";
std::cerr << "Provide Input Image:\n<program> <inputimage>\n";
return -1;
}
cv::Mat original_img = cv::imread(argv[1]);
if(original_img.empty())
{
std::cerr << "Error\n";
std::cerr << "Cannot Read Image\n";
return -1;
}
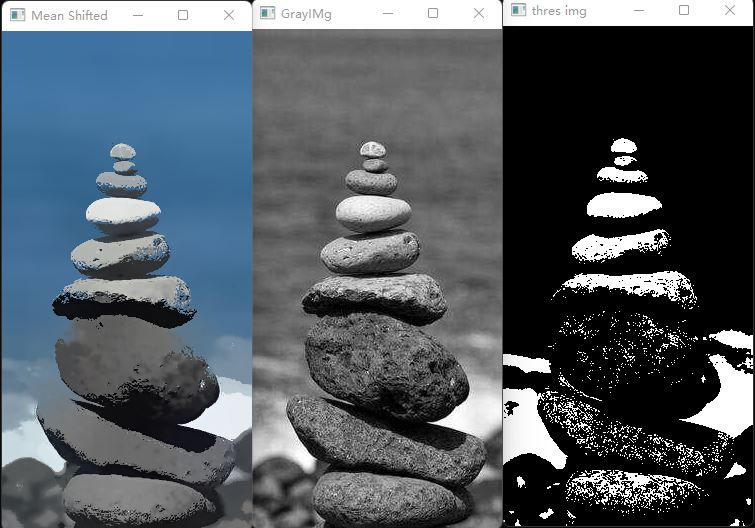
// 去除图像中的噪声, 均值偏移模糊(MeanShift)是一种图像边缘保留滤波算法,常用于图像分水岭分割前的去噪,可显着提高分水岭分割效果。
cv::Mat shifted;
cv::pyrMeanShiftFiltering(original_img,shifted,21,51);
showImg("Mean Shifted",shifted);
// 将原始图像转换为灰度和二值图像
cv::Mat gray_img;
cv::cvtColor(original_img,gray_img,cv::COLOR_BGR2GRAY);
showImg("GrayIMg",gray_img);
cv::Mat bin_img;
cv::threshold(gray_img,bin_img,0,255,cv::THRESH_BINARY | cv::THRESH_OTSU);
showImg("thres img",bin_img);
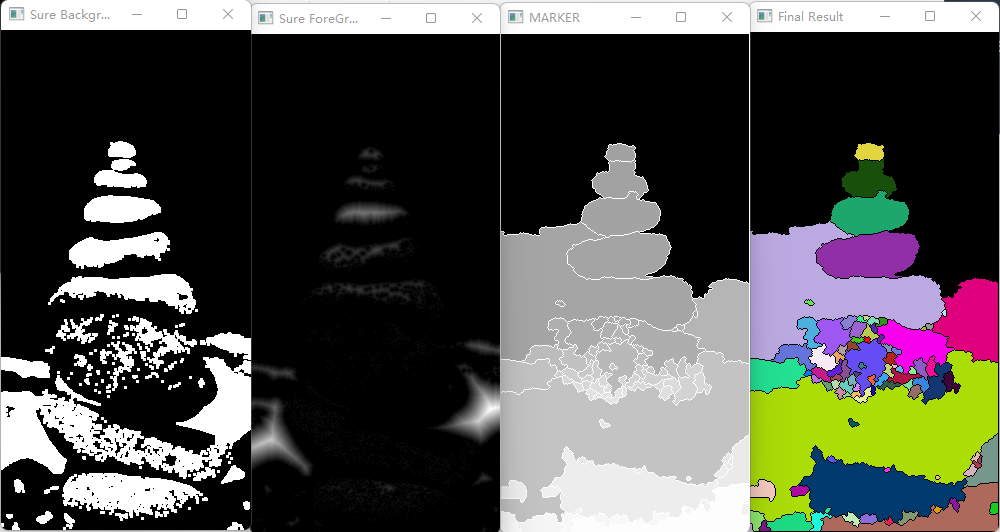
// 寻找确定的背景图像, 在这一步中,我们找到图像中的背景区域。
cv::Mat sure_bg;
getBackground(bin_img,sure_bg);
showImg("Sure Background",sure_bg);
// 找到确定前景的图像, 对于图像的前景,我们采用距离变换算法
cv::Mat sure_fg;
getForeground(bin_img,sure_fg);
showImg("Sure ForeGround",sure_fg);
// 找到标记,在应用分水岭算法之前,我们需要标记。为此,我们将使用opencv中提供的findContour()函数来查找图像中的标记。
cv::Mat markers = cv::Mat::zeros(sure_bg.size(),CV_32S);
std::vector<std::vector<cv::Point>> contours;
findMarker(sure_bg,markers,contours);
cv::circle(markers, cv::Point(5, 5), 3, cv::Scalar(255), -1); //Drawing Circle around the marker
// 应用分水岭算法
cv::watershed(original_img,markers);
cv::Mat mark;
markers.convertTo(mark, CV_8U);
cv::bitwise_not(mark, mark); //黑变白,白变黑
showImg("MARKER",mark);
//高亮显示图像中的标记
std::vector<cv::Vec3b> colors;
getRandomColor(colors,contours.size());
//构建结果图像
cv::Mat dst = cv::Mat::zeros(markers.size(), CV_8UC3);
// 用随机的颜色填充已标记的物体
for (int i = 0; i < markers.rows; i )
{
for (int j = 0; j < markers.cols; j )
{
int index = markers.at<int>(i,j);
if (index > 0 && index <= static_cast<int>(contours.size()))
dst.at<cv::Vec3b>(i,j) = colors[index-1];
}
}
showImg("Final Result",dst);
cv::waitKey(0);
return 0;
}结果展示:

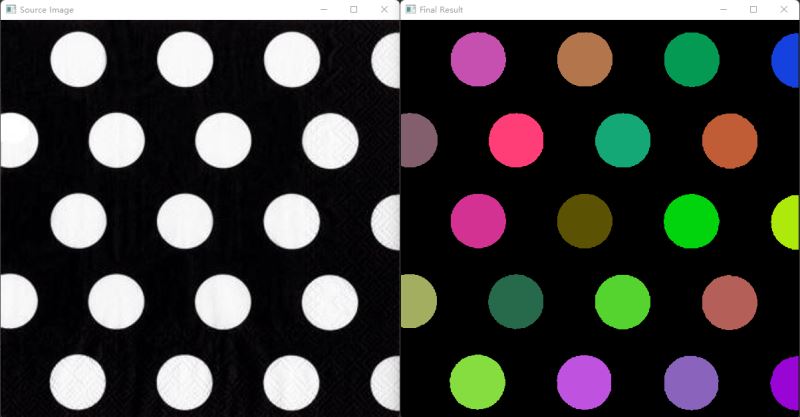
2.2 Python实现分水岭分割(1)
import cv2 as cv
import numpy as np
import argparse
import random as rng
rng.seed(12345)
parser = argparse.ArgumentParser(description='Code for Image Segmentation with Distance Transform and Watershed Algorithm.\
    Sample code showing how to segment overlapping objects using Laplacian filtering, \
    in addition to Watershed and Distance Transformation')
parser.add_argument('--input', help='Path to input image.', default='HFOUG.jpg')
args = parser.parse_args()
src = cv.imread(cv.samples.findFile(args.input))
if src is None:
    print('Could not open or find the image:', args.input)
    exit(0)
# Show source image
cv.imshow('Source Image', src)
cv.waitKey()

gray = cv.cvtColor(src, cv.COLOR_BGR2GRAY)
ret, thresh = cv.threshold(gray, 0, 255, cv.THRESH_BINARY   cv.THRESH_OTSU)
# noise removal
kernel = np.ones((5, 5), np.uint8)
opening = cv.morphologyEx(thresh, cv.MORPH_OPEN, kernel, iterations=2)

# 获取背景图
sure_bg = opening.copy()  # 背景
# Show output image
cv.imshow('Black Background Image', sure_bg)  # 黑色是背景
cv.waitKey()

# 获取前景图
dist = cv.distanceTransform(opening, cv.DIST_L2, 3)
# Normalize the distance image for range = {0.0, 1.0}
# so we can visualize and threshold it
cv.normalize(dist, dist, 0, 1.0, cv.NORM_MINMAX)
cv.imshow('Distance Transform Image', dist)
_, dist = cv.threshold(dist, 0.2, 1.0, cv.THRESH_BINARY)
# Dilate a bit the dist image
kernel1 = np.ones((3, 3), dtype=np.uint8)
dist = cv.dilate(dist, kernel1)
cv.imshow('Peaks', dist)

# 构建初始markers
dist_8u = dist.astype('uint8')
# Find total markers
contours, _ = cv.findContours(dist_8u, cv.RETR_EXTERNAL, cv.CHAIN_APPROX_SIMPLE)
# 创建即将应用分水岭算法的标记图像
markers = np.zeros(dist.shape, dtype=np.int32)
# 标记前景
for i in range(len(contours)):
    cv.drawContours(markers, contours, i, (i   1), -1)  # 轮廓标记从1开始
# 标记背景
cv.circle(markers, (5, 5), 3, 255, -1)  # 此处背景标记为255
print("before watershed: ", np.unique(markers))  # 0表示不确定标记区域
# 可视化markers
markers_8u = (markers * 10).astype('uint8')
cv.imshow('Markers', markers_8u)
cv.waitKey()

# 应用分水岭分割算法
markers = cv.watershed(src, markers)
print("after watershed: ", np.unique(markers))  # -1表示边界

# mark = np.zeros(markers.shape, dtype=np.uint8)
mark = markers.astype('uint8')
mark = cv.bitwise_not(mark)
# uncomment this if you want to see how the mark
# image looks like at that point
# cv.imshow('Markers_v2', mark)
# Generate random colors
colors = []
for contour in contours:
    colors.append((rng.randint(0, 256), rng.randint(0, 256), rng.randint(0, 256)))
# Create the result image
dst = np.zeros((markers.shape[0], markers.shape[1], 3), dtype=np.uint8)
# Fill labeled objects with random colors
for i in range(markers.shape[0]):
    for j in range(markers.shape[1]):
        index = markers[i, j]
        if index > 0 and index <= len(contours):  # -1表示边界, 255表示背景
            dst[i, j, :] = colors[index - 1]
# Visualize the final image
cv.imshow('Final Result', dst)
cv.waitKey()
结果展示:
2.3 Python实现分水岭分割(2)
import cv2 as cv
import numpy as np
import argparse
import random as rng
def process_img2(img):
    img_gray = cv2.cvtColor(img, cv2.COLOR_BGR2GRAY)
    img_gray = cv2.GaussianBlur(img_gray, (5, 5), 0.1)
    img_gray = cv2.medianBlur(img_gray, 5)
    _, image_binary = cv2.threshold(img_gray, 0, 255, cv2.THRESH_OTSU   cv2.THRESH_BINARY)

    kernel = np.ones((7, 7), np.uint8)
    # sure_bg = cv.morphologyEx(image_binary, cv.MORPH_CLOSE, kernel, iterations=3)
    sure_bg = cv.dilate(image_binary, kernel, iterations=2)
    sure_bg = cv.bitwise_not(sure_bg)

    element = cv2.getStructuringElement(cv2.MORPH_ELLIPSE, (3, 3))
    image_binary = cv2.morphologyEx(image_binary, cv2.MORPH_OPEN, element)

    imageSC = cv2.distanceTransform(image_binary, cv2.DIST_L2, 5)
    imageSC = imageSC.astype(np.uint8)
    imageSC = cv2.normalize(imageSC, 0, 255, cv2.NORM_MINMAX)
    _, imageSC = cv2.threshold(imageSC, 0, 255, cv2.THRESH_OTSU   cv2.THRESH_BINARY)
    return imageSC, sure_bg

rng.seed(12345)
imgPath = "HFOUG.jpg"
src = cv.imread(imgPath)
shifted = cv2.pyrMeanShiftFiltering(src, 7, 15)
if src is None:
    print('Could not open or find the image:')
    # print('Could not open or find the image:', args.input)
    exit(0)
# Show source image
cv.imshow('Source Image', src)
cv.waitKey()
opening, sure_bg = process_img2(shifted)
# Show output image
cv.imshow('Background Image', sure_bg)  # 背景
cv.waitKey()

# 获取前景图
dist = cv.distanceTransform(opening, cv.DIST_L2, 3)
# Normalize the distance image for range = {0.0, 1.0}
# so we can visualize and threshold it
cv.normalize(dist, dist, 0, 1.0, cv.NORM_MINMAX)
cv.imshow('Distance Transform Image', dist)
_, dist = cv.threshold(dist, 0.3, 1.0, cv.THRESH_BINARY)
# Dilate a bit the dist image
kernel1 = np.ones((3, 3), dtype=np.uint8)
dist = cv.dilate(dist, kernel1)
cv.imshow('Peaks', dist)

# 构建初始markers
dist_8u = dist.astype('uint8')
# Find total markers
contours, _ = cv.findContours(dist_8u, cv.RETR_EXTERNAL, cv.CHAIN_APPROX_SIMPLE)
# 创建即将应用分水岭算法的标记图像
# markers = np.zeros(dist.shape, dtype=np.int32)
markers = sure_bg.copy().astype(np.int32)
# 标记前景
for i in range(len(contours)):
    cv.drawContours(markers, contours, i, (i   1), -1)  # 轮廓标记从1开始
# 标记背景
# cv.circle(markers, (5, 5), 3, 255, -1)  # 此处背景标记为255
# 可视化markers

print("before watershed: ", np.unique(markers))  # 0表示不确定标记区域
markers_8u = (markers * 10).astype('uint8')
cv.imshow('Markers', markers_8u)

# 应用分水岭分割算法
markers = cv.watershed(src, markers)

print("after watershed: ", np.unique(markers))  # -1表示边界

# mark = np.zeros(markers.shape, dtype=np.uint8)
mark = markers.astype('uint8')
mark = cv.bitwise_not(mark)

cv.imshow('Markers_v2', mark)
# Generate random colors
colors = []
for contour in contours:
    colors.append((rng.randint(0, 256), rng.randint(0, 256), rng.randint(0, 256)))
# Create the result image
dst = np.zeros((markers.shape[0], markers.shape[1], 3), dtype=np.uint8)
# Fill labeled objects with random colors
for i in range(markers.shape[0]):
    for j in range(markers.shape[1]):
        index = markers[i, j]
        if index > 0 and index <= len(contours):  # -1表示边界, 255表示背景
            dst[i, j, :] = colors[index - 1]
# Visualize the final image
cv.imshow('Final Result', dst)
cv.waitKey(0)
cv2.destroyAllWindows()
结果展示:

到此这篇关于Python实现基于标记的分水岭分割算法的文章就介绍到这了,更多相关Python分水岭分割算法内容请搜索Devmax以前的文章或继续浏览下面的相关文章希望大家以后多多支持Devmax!