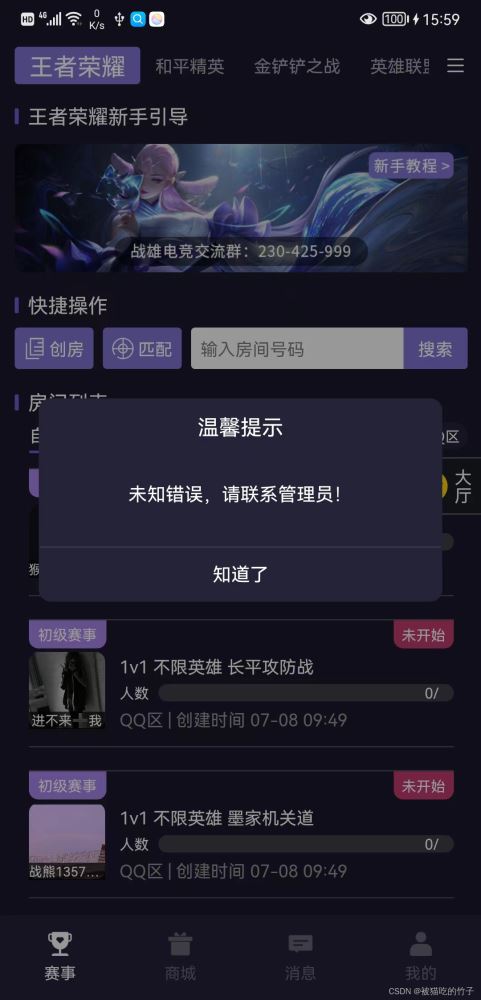
效果图:

uniapp自带的提示框不符合我们的要求,需要自己写一个提示框,且全局通用。
解决思路:
使用 plus.nativeObj 来绘制窗口以及事件监听。 官方文档
方法如下:
1. 首先创建一个整个屏幕的控件,作为一个父容器。
此时还看不到任何东西
let screenHeight = uni.getSystemInfoSync().screenHeight;
let style = {
    width:'100%',
    height: (screenHeight   'px'),
    left:'0px',
    top:'0px'
};

// 创建原生控件对象
// 参数1: id
// 参数2: 控件的样式
let view = new plus.nativeObj.View('showModalView',style);
2. 绘制遮罩层
view.draw([
	{tag:'rect',id:'modal',color:`rgba(0,0,0,0.4)`,position:{top:'0px',left:'0px',width:'100%',height:'100%'}}
]);


{
    tag:'rect',                        // 绘制矩形
    id:'modal',                        // 控件id
    color:`rgba(0,0,0,0.4)`,            // 背景色
    position:{top:'0px',left:'0px',width:'100%',height:'100%'}        // 位置和大小样式
}
view.draw(tags); 在控件上绘制,传入绘制对象。
绘制对象文档 可绘制图片、矩形区域、文本等内容。
3.绘制通知框样式
view.draw([
	{tag:'rect',id:'modal',color:`rgba(0,0,0,0.4)`,position:{top:'0px',left:'0px',width:'100%',height:'100%'}},
    {tag:'rect',id:'content',rectStyles:{borderWidth:'2px',radius:'8px',color:`rgba(36,34,56,1)`},position:{top:startTop 'px',left:startLeft 'px',width:width 'px',height:height 'px'}},
]);

{
    tag:'rect',
    id:'content',
    // 矩形的样式
    rectStyles:{borderWidth:'2px',radius:'8px',color:`rgba(36,34,56,1)`},
    // 位置和大小. 下面的变量是根据屏幕宽高手动计算的
    position:{top:startTop 'px',left:startLeft 'px',width:width 'px',height:height 'px'}
}

interface RectStyles {
	attribute String color;
	attribute String radius;
	attribute String borderColor;
	attribute String borderWidth;
}
4. 绘制标题和内容
view.draw([
	{tag:'rect',id:'modal',color:`rgba(0,0,0,0.4)`,position:{top:'0px',left:'0px',width:'100%',height:'100%'}},
    {tag:'rect',id:'content',rectStyles:{borderWidth:'2px',radius:'8px',color:`rgba(36,34,56,1)`},position:{top:startTop 'px',left:startLeft 'px',width:width 'px',height:height 'px'}},
    {tag:'font',id:'title',text:modelInfo.tit,textStyles:{size:'16px',color:'#fff'},position:{top:titleTop 'px',left:startLeft 'px',width:width 'px',height:titleHeight 'px'}},
	{tag:'font',id:'text',text:modelInfo.content,textStyles:{size:'14px',color:'#fff',whiteSpace:'normal',align:modelInfo.align},position:{top:contentTop 'px',left:startLeft 'px',width:width 'px',height:contentHeight 'px'}},
    // 这个是内容和底部按钮的分割线
	{tag:'rect',id:'line',color:'rgba(255,255,255,0.3)',position:{top:lineTop 'px',left:startLeft 'px',width:width 'px',height:'0.5px'}},
]);

{
    tag:'font',                    // 绘制文字
    id:'title',
    text:modelInfo.tit,            // 文字内容
    textStyles:{size:'16px',color:'#fff'},
    position:{top:titleTop 'px',left:startLeft 'px',width:width 'px',height:titleHeight 'px'}
},
5. 创建确认按钮控件
我们需要给确认按钮设置点击事件,所以它要作为一个新的控件,而不是再刚刚的控件上继续绘制。
// 确认
let viewconfirm=new plus.nativeObj.View('confirm',
	{
		width:modelInfo.delCancel?width 'px':'40%',
		height:buttonHeight 'px',
		top:lineTop 'px',
		left:modelInfo.delCancel?startLeft 'px':halfWidthForGlobal  'px',
		backgroundColor:'rgba(255,255,255,0)',
	},
);
viewconfirm.draw([
	{tag:'font',id:'confirm',text:modelInfo.confirmVal,textStyles:{color:modelInfo.confirmColor,size:'14px'}},
]);
设置点击事件
viewconfirm.addEventListener("click",(e)=>{
    // 发送事件
	this.$event({res:true,types:'confirm'});
    // 隐藏当前控件(关闭)
	this.hide();
},false);
将 viewconfirm和view显示出来:
function show(){
    this.view.show();
    this.confirmModel.show();
}
下面就是将这些挂载到Uni上就可以了。
下面是项目中的完整代码:
index.js 用于绘制
// show_modal/index.js
export class show_model{
	constructor(option={}) {
		this.bodyModel=null;
		this.cancelModel=null;
		this.confirmModel=null;
		this.pageHeight=uni.getSystemInfoSync().screenHeight;
		this.pageWidth = uni.getSystemInfoSync().screenWidth;
		let opacity = option.opacity || 0.4;
		let model_tit=option.title||'温馨提示';
		let model_content=option.content||"内容"
		let clickEvent=option.IsclickEvent||false;
		let cancelVal=option.cancelVal||'取消';
		let confirmVal=option.confirmVal||'确认';
		let cancelColor=option.cancelColor||'#fff';				// 取消
		let confirmColor=option.confirmColor||'#fff';			// 确认
		let delCancel=option.delCancel||false;
		let align=option.align||"center";
		let fn = ()=>{};
		this.$event = option.$event || fn;
		let backOff=option.backOff||false;

		//#ifdef APP-PLUS
		this.creatView({height:`${this.pageHeight}px`,top:0},opacity,clickEvent,{'tit':model_tit,'content':model_content,cancelVal,confirmVal,confirmColor,cancelColor,delCancel,align})
		if(!backOff){
			this.backbtn();
		}
		//#endif
	}
    backbtn(){
		let that=this;
		plus.key.addEventListener('backbutton', function (e) {
			that.hide();
		},false)
	}
	//生成提示框view
	creatView(style,opa,clickEvent,modelInfo){
		style = {
			left:'0px',
			width:'100%',
			...style
		}
        let platform = plus.os.name.toLowerCase();
		let view = new plus.nativeObj.View('showModalView',style);

		let width = 300;
		let height = 150;
		let titleHeight = 20;
		let contentHeight = 60;
		let startTop = (this.pageHeight - height) / 2;
		let startLeft = (this.pageWidth - width) / 2;
		let titleTop = startTop   10;
		let contentTop = titleTop 30;
		let lineTop = startTop   height - 40;
		let buttonHeight = 40;
		let halfWidth = width / 2;
		let halfWidthForGlobal = startLeft   halfWidth;

		if(platform == "ios"){
			view.draw([
				{tag:'rect',id:'modal',color:`rgba(0,0,0,${opa})`,position:{top:'0px',left:'0px',width:'100%',height:'100%'}},
			    {tag:'rect',id:'content',rectStyles:{borderWidth:'2px',radius:'8px',color:`rgba(36,34,56,1)`},position:{top:startTop 'px',left:startLeft 'px',width:width 'px',height:height 'px'}},
			    {tag:'font',id:'title',text:modelInfo.tit,textStyles:{size:'16px',color:'#fff'},position:{top:titleTop 'px',left:startLeft 'px',width:width 'px',height:titleHeight 'px'}},
			    {tag:'font',id:'text',text:modelInfo.content,textStyles:{size:'14px',color:'#fff',whiteSpace:'normal',align:modelInfo.align},position:{top:contentTop 'px',left:startLeft 'px',width:width 'px',height:contentHeight 'px'}},
			    {tag:'rect',id:'line',color:'rgba(255,255,255,0.3)',position:{top:lineTop 'px',left:startLeft 'px',width:width 'px',height:'0.5px'}},
				{tag:'rect',id:'line2',color:'rgba(255,255,255,0.3)',position:{top:lineTop 'px',left: halfWidthForGlobal 'px',width:modelInfo.delCancel?'0px':'0.5px',height:modelInfo.delCancel?'0px':buttonHeight 'px'}}
			]);
		}else{
			view.draw([
				{tag:'rect',id:'modal',color:`rgba(0,0,0,${opa})`,position:{top:'0px',left:'0px',width:'100%',height:'100%'}},
			    {tag:'rect',id:'content',rectStyles:{borderWidth:'2px',radius:'8px',color:`rgba(36,34,56,1)`},position:{top:startTop 'px',left:startLeft 'px',width:width 'px',height:height 'px'}},
			    {tag:'font',id:'title',text:modelInfo.tit,textStyles:{size:'16px',color:'#fff'},position:{top:titleTop 'px',left:startLeft 'px',width:width 'px',height:titleHeight 'px'}},
			    {tag:'font',id:'text',text:modelInfo.content,textStyles:{size:'14px',color:'#fff',whiteSpace:'normal',align:modelInfo.align},position:{top:contentTop 'px',left:startLeft 'px',width:width 'px',height:contentHeight 'px'}},
			    {tag:'rect',id:'line',color:'rgba(255,255,255,0.3)',position:{top:lineTop 'px',left:startLeft 'px',width:width 'px',height:'0.5px'}},
				{tag:'rect',id:'line2',color:'rgba(255,255,255,0.3)',position:{top:lineTop 'px',left:halfWidthForGlobal 'px',width:modelInfo.delCancel?'0px':'0.5px',height:modelInfo.delCancel?'0px':buttonHeight 'px'}}
			]);
		}

		var num = 0.55;
		if(platform == "ios"){
			num = 0.57
		}
		if(!modelInfo.delCancel){
			// 取消
			let viewCancel=new plus.nativeObj.View('cancel',{width:halfWidth 'px',height:buttonHeight 'px',top:lineTop 'px',left:startLeft 'px',backgroundColor:'rgba(255,255,255,0)'});
			    viewCancel.draw([
				  {tag:'font',id:'cancel',text:modelInfo.cancelVal,textStyles:{color:modelInfo.cancelColor,size:'14px'}},
				]);

				viewCancel.addEventListener("click",(e)=>{
					this.$event({res:false,types:'cancel'});
					this.hide();
				},false);
				this.cancelModel=viewCancel;
		}
		// 确认
		let viewconfirm=new plus.nativeObj.View('confirm',
			{
				width:modelInfo.delCancel?width 'px':'40%',
				height:buttonHeight 'px',
				top:lineTop 'px',
				left:modelInfo.delCancel?startLeft 'px':halfWidthForGlobal  'px',
				backgroundColor:'rgba(255,255,255,0)',
			},
		);
		viewconfirm.draw([
			{tag:'font',id:'confirm',text:modelInfo.confirmVal,textStyles:{color:modelInfo.confirmColor,size:'14px'}},
		]);

		viewconfirm.addEventListener("click",(e)=>{
			this.$event({res:true,types:'confirm'});
			this.hide();
		},false);
		  //点击蒙布
		if(clickEvent){
			 view.addEventListener("click", (e) => {
				this.$event({res:false,types:'cover'});
				this.hide();
			}, false);
		}
	   this.bodyModel=view;
	   this.confirmModel=viewconfirm;
	}
    showModalAnimationClose(){
		var options = {type:'pop-out',duration:300};
			plus.nativeObj.View.startAnimation(options,{view:this.bodyModel},{view:this.cancelModel},{view:this.viewconfirm},function(){
				console.log('plus.nativeObj.View.startAnimation动画结束');
				// 关闭原生动画
				plus.nativeObj.View.clearAnimation();
			});
	}
	showModalAnimationOpen(){
		var options = {type:'pop-in',duration:1000};

			plus.nativeObj.View.startAnimation(options,{view:this.bodyModel},{view:this.cancelModel},{view:this.viewconfirm},function(){
				console.log('plus.nativeObj.View.startAnimation动画结束');
				// 关闭原生动画
				plus.nativeObj.View.clearAnimation();
			});
	}
	show(){
		this.showModalAnimationOpen();
		this.bodyModel.show();
		if(this.cancelModel){
			this.cancelModel.show();
		}
		this.confirmModel.show();

	}
	hide(){
		this.showModalAnimationClose();
		this.bodyModel.hide();
		if(this.cancelModel){
	      this.cancelModel.hide();
		}
		this.confirmModel.hide();
	}
}

export default show_model
show_modal.js: 用于创建promise对象并挂载
// show_modal/xt_show_modal.js
import show_modal from './index.js'

const xt_show_modal = {
	install: function(Vue) {
        const show_modal_fun=function(op={}){
			//#ifdef APP-PLUS
			return	new Promise((resolve, reject)=>{
			   let ssm=new show_modal({
					...op,
					$event:function(e){
						if(e.res){
							resolve(e);
						}else{
							reject(e);
						}
					 }
				});
				ssm.show();
				Vue.prototype.$hide=function(){
					ssm.hide();
				}
			})
			//#endif

            // 适应H5
			//#ifdef H5
				var promise=uni.showModal({
					title: op.title,
					content: op.content,
					showCancel: !op.delCancel,
					cancelText: op.cancelVal,
					confirmText: op.confirmVal,
				});

				return new Promise((resolve,reject)=>{
					promise.then(data=>{
						var [err, res] = data;
						if(res.confirm){
							resolve()
						}else{
							reject();
						}
					})
				})

			//#endif

		}
        // $showModal挂载到uni对象上
        uni.$showModal = show_modal_fun
        Vue.prototype.$showModal = show_modal_fun
	}
};

export default xt_show_modal;
main.js中挂载
// 自定义showModal组件
import xt_show_modal from '@/component/show_modal/xt_show_modal.js'
Vue.use(xt_show_modal);
使用:
// showModel的使用
uni.$showModal({
	title:"",				//可选,不填则不显示
    content:'未知错误,请联系管理员!',
    delCancel: true,
    confirmVal: '知道了',	// 可选
	cancelVal:'取消',		// 可选
}).then(res=>{
	// 点击确认按钮点击事件
}).catch(res=>{
	// 点击取消按钮点击事件
});
总结
到此这篇关于uniapp全局弹窗(APP端)的文章就介绍到这了,更多相关uniapp全局弹窗内容请搜索Devmax以前的文章或继续浏览下面的相关文章希望大家以后多多支持Devmax!