首先看一下我们的效果图。
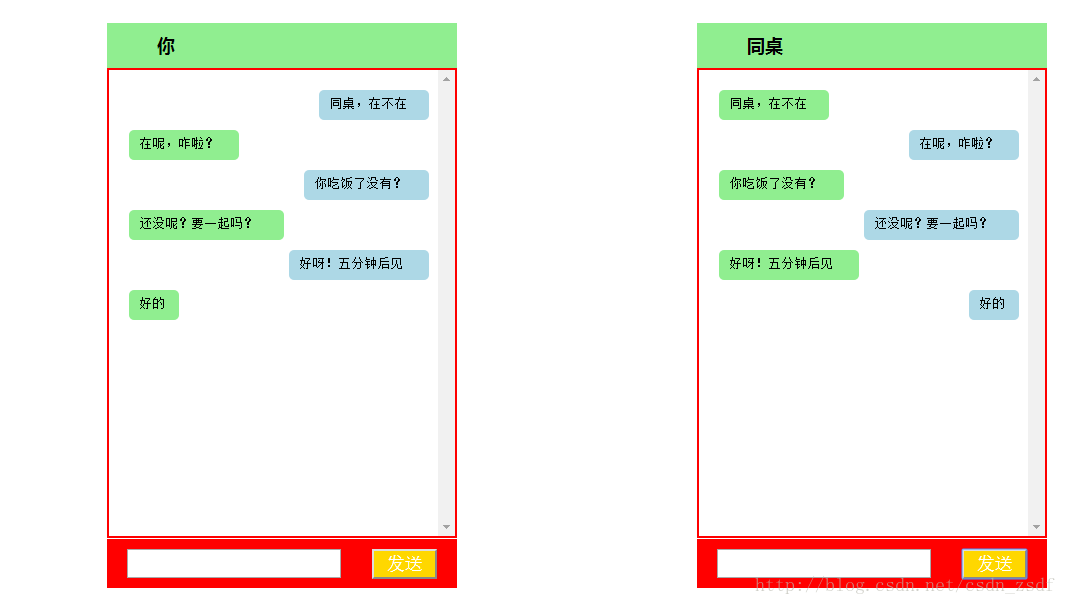
这个颜色可能搭配的有些不合适,但基本功能大都实现了。就是你和你同桌对话,你发的消息在你的左侧,而在他设备的右侧。
首先先写好整体的框架,在一个大容器中放两个盒子,分别是左侧和右侧的界面。然后每个盒子里面包含了三大部分:头部、内容区、和底部。只要写好一侧,另一侧进行粘贴复制就可以了。
首先定义一个大的
来盛放左右两个盒子。
<div id = "main">

 //左侧聊天界面
 <div id = "box">
  <div id = "top"><span>你</span></div>
  <div id = "content">
   <select multiple="multiple" id="leftcontent">

   </select>
  </div>
  <div id = "bottom">
   <input type = "text" class = "sendText" id = "leftText" />
   <input type = "button" id = "leftdBtn" class="sendBtn" value = "发送">
  </div>
 </div>

//右侧聊天界面
 <div id = "box">
  <div id = "top"><span>同桌</span></div>
  <div id = "content">
   <select multiple="multiple" id="rightcontent">

   </select>
  </div>
  <div id = "bottom">
   <input type = "text" class = "sendText" id = "rightText" />
   <input type = "button" id = "rightBtn" class="sendBtn" value = "发送">
  </div>
 </div>

</div>
首先这两个盒子的代码不是复制粘贴就直接可以的。还必须注意以下不同:
<div id = "content">
   <select multiple="multiple" id="rightcontent">
   </select>
</div>
select中的id得不同。我们一般都是
option1
option2
option3
这样使用。而在这儿使用select标签是当你和你同桌聊了一屏的天时,它有滚动条来 上下滑动看你们都聊了些什么。再上面的基础上增加一些css样式,这样界面效果就出来了。
接下来就是要写jquery代码的时候了。首先想一下你在你这边说的话既要出现在你的设备右侧,又要出现在你同桌设备的左侧?
我们先对你的界面左侧进行发消息控制,在写了文本之后,按发送按钮让它出现在你界面的右侧,同时也出现在你同桌设备的左侧。
我们要按照以下步骤来实现:
1。获得你输入的文本框中的内容。
2。生成一个option标签。
2.1 生成标签的样式即生成的span标签在你的设备的右侧进行定位并 显示。
2.2 对生成的标签进行内容的插入即插入文本框中的内容
3。将option标签追加到你的select中。
4。将option标签在你同桌设备的左侧进行定位显示。
5。清除文本框中的内容。
function sendLeft(){

 //1.获得你输入的文本框中的内容。
 var text = $("#leftText").val();

 //2。生成一个span标签。
 var option = $("`<option></option>`");
 // 2.1 生成标签的样式即生成的span标签在你的设备的右侧进行定位并显示。
 var len = text.length;
 option.css("width", len * 15   "px");
 option.css("marginLeft", 350 - len * 15 - 60   "px");
  //2.2 生成标签的内容
  option.html(text);

  //3. 将内容追加到select中。
  $("#leftcontent").append(option);

  //4. 追加生成的标签(右侧)
  var option1 = $("<option></option>");
  option1.addClass("optionRight");
  option1.css("width", len * 15   "px");
  option1.css("marginLeft", 10  "px");
  option1.html(text);
  $("#rightcontent").append(option1);

  //5. 清除文本框的内容
  $("#leftText").val("");
  }
}
同样再对你同桌的设备方进行显示的时候,和左侧的大同小异。
自己写一下就可以。
在写了左侧和右侧发送的消息函数之后,此时还不能进行消息发送,因为还没有进行事件绑定。首先发送消息有两种方式:
①。按钮发送
按钮发送就需要为按钮绑定事件
 $("#leftdBtn").bind("click", sendLeft);
 $("#rightBtn").bind("click", sendRight);
②。回车发送
$(document).keydown(function(event){
   var txt1 = $("#leftText").val();
   var txt2 = $("#rightText").val()
   if(event.keyCode == 13){
    if( txt1.trim() != ""){
     sendLeft();
    }
    if(txt2.trim() != ""){
     sendRight();
    }
   }
  });
最后附上完整的源代码:
<!DOCTYPE html>
<html>
<head>
<meta charset = "utf-8"/>
 <title>模仿微信聊天</title>
 <script type="text/javascript" src = "http://libs.baidu.com/jquery/1.9.0/jquery.js"></script>
 <style type="text/css">
 *{
  margin: 0px;
  padding: 0px;
 }

 #main{
  width: 90%;
  margin: 10px auto;
 }
 #box{
  float: left;
  margin:20px 120px;
 }

 #top{
  width: 310px;
  padding: 10px 20px;
  color: white;
  background-color: lightgreen;
  font-size: 18px;
  font-family: "微软雅黑";
  font-weight: bold;
 }

 #content{
  background-color: white;
 }

 select{
  width: 350px;
  height: 470px;
  background-color: white;
  padding: 10px;
  border:2px solid red;

 }

 #bottom{
  width: 310px;
  background-color: red;
  padding: 10px 20px;
 }

 .sendText{
  height: 25px;
  width: 210px;
  font-size: 16px;
 }

 .sendBtn{
  width: 65px;
  height: 30px;

  float: right;
  background-color: gold;
  color: white;
  text-align: center;
  font-size: 18px;
  }

 span{
   background-color: lightgreen;
   color: #000;
   padding: 10px 30px;

  }
  option{
   padding: 5px 10px;
   margin-top:10px;
   border-radius:5px;
   width: 10px;
   min-height: 20px;
  }

  .optionRight{
   background-color: lightgreen;
  }

  .optionLeft{
   background-color: lightblue;
  }
 </style>

 <script>
 $(function(){

  $("#leftdBtn").bind("click", sendLeft);
  $("#rightBtn").bind("click", sendRight);

  function sendLeft(){

  //1. 获取输入框中的内容
  var text = $("#leftText").val();
  //2. 生成标签
  var option = $("<option></option>");
  option.addClass("optionLeft");
  //2.1 生成标签的样式
  var len = text.length;
  //option.css("width", len * 15   "px","marginLeft", 350 - len * 15 - 60   "px")
   option.css("width", len * 15   "px");
   option.css("marginLeft", 350 - len * 15 - 60   "px");
  //2.2 生成标签的内容
  option.html(text);
  //3. 将内容追加到select中。
  $("#leftcontent").append(option);
  //4. 追加生成的标签(右侧)
  var option1 = $("<option></option>");
  option1.addClass("optionRight");
  option1.css("width", len * 15   "px");
  option1.css("marginLeft", 10  "px");
  option1.html(text);
  $("#rightcontent").append(option1);

  //5. 清除文本框的内容
  $("#leftText").val("");
  }


 function sendRight(){

  //1. 获取输入框中的内容
  var text = $("#rightText").val();
  //2. 生成标签
  var option = $("<option></option>");
  option.addClass("optionLeft");
  //2.1 生成标签的样式
  var len = text.length;
  //option.css("width", len * 15   "px","marginLeft", 350 - len * 15 - 60   "px")
   option.css("width", len * 15   "px");
   option.css("marginLeft", 350 - len * 15 - 60   "px");
  //2.2 生成标签的内容
  option.html(text);
  //3. 将内容追加到select中。
  $("#rightcontent").append(option);
  //4. 追加生成的标签(右侧)
  var option1 = $("<option></option>");
  option1.addClass("optionRight");
  option1.css("width", len * 15   "px");
  option1.css("marginLeft", 10  "px");
  option1.html(text);
  $("#leftcontent").append(option1);

  $("#rightText").val("");
  }


  $(document).keydown(function(event){

   var txt1 = $("#leftText").val();
   var txt2 = $("#rightText").val()
   if(event.keyCode == 13){
    if( txt1.trim() != ""){
     sendLeft();
    }
    if(txt2.trim() != ""){
     sendRight();
    }
   }
  });
 })
 </script>
</head>
<body>
<div id = "main">
 <div id = "box">
  <div id = "top"><span>你</span></div>
  <div id = "content">
   <select multiple="multiple" id="leftcontent">

   </select>
  </div>
  <div id = "bottom">
   <input type = "text" class = "sendText" id = "leftText" />
   <input type = "button" id = "leftdBtn" class="sendBtn" value = "发送">
  </div>
 </div>

  <div id = "box">
  <div id = "top"><span>同桌</span></div>
  <div id = "content">
   <select multiple="multiple" id="rightcontent">

   </select>
  </div>
  <div id = "bottom">
   <input type = "text" class = "sendText" id = "rightText" />
   <input type = "button" id = "rightBtn" class="sendBtn" value = "发送">
  </div>
 </div>
</div>
</body>
</html>
以上就是本文的全部内容,希望对大家的学习有所帮助,也希望大家多多支持Devmax。