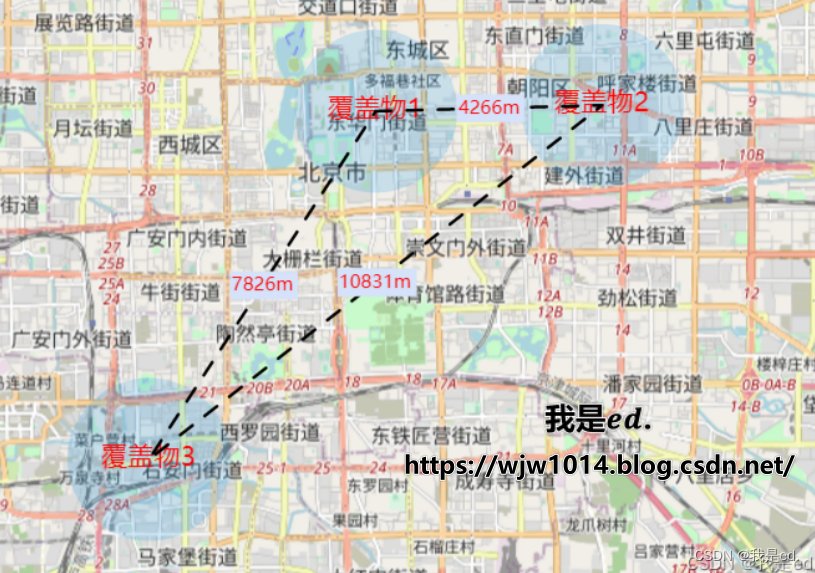
实现一个什么效果呢,就是在openlayers上面,绘制三个圆形,绘制完成之后,三个圆心连接起来,然后标记出每两个圆心之间的距离。
期望效果
写在前面
其实这个效果很好实现的,之前有几篇博文呢,关于 openlayers 根据半径绘制圆形,根据经纬度坐标绘制连线啥的都有涉及过,所以说如果要想实现今天想做的功能拼接一下就可以了,做一个快乐的代码裁缝。
绘制圆形
简单的什么安装 openlayers,导入,使用这里就不说了,如果不清楚直接看之前的博客,今天不多废话直接进入正题。
首先第一步,我们先绘制着三个蓝色的圆形。
关键代码如下,特别说一下哈,这是关键代码,之前有人问说你代码跑不起来,我特别无语,这是关键代码,那些基本的创建变量啥的,一看报错就知道没有创建,自己创建就行啦!没有那么难啊!适当的改一下就好了嘛。
	  // 绘制圆
      addPoint() {
      	// 下面这个经纬度都是写死的哈,一会连线和标签都是一样的数据
        let sites = [{
          site: [116.400819, 39.916263],
          name: '覆盖物1'
        }, {
          site: [116.450819, 39.917263],
          name: '覆盖物2'
        }, {
          site: [116.350819, 39.857263],
          name: '覆盖物3'
        }]
        let features = []
        sites.forEach((item, index) => {
          let feature = new Feature({
            title: item.name,
            geometry: new Circle(fromLonLat(item.site), this.getRadius(2000)),
          })
          feature.setStyle(
            new Style({
              fill: new Fill({
                color: 'rgba(32, 157, 230, 1)'
              }),
            })
          )
          features.push(feature)
        })
        let source = new VectorSource()
        source.addFeatures(features)
        let layer = new VectorLayer({
          opacity: 0.2
        })
        layer.setSource(source)
        map.addLayer(layer)
      },
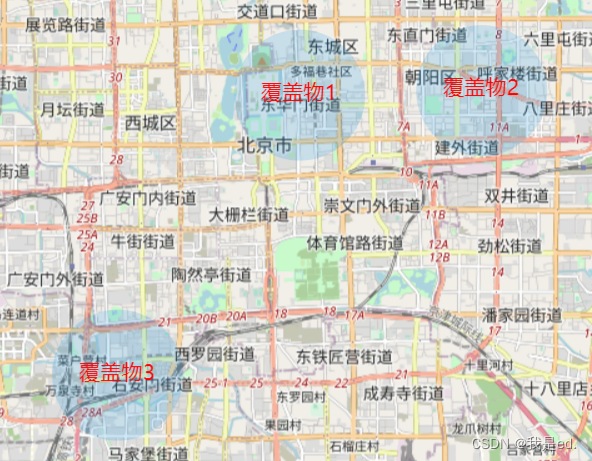
好的,上面这一步完成之后呢,刷新页面看到的效果应该是下面的样子。

添加圆形标识
好了哈,我们给每个圆形添加一个文字标识,就是 覆盖物1,、覆盖物2、覆盖物3这种。
关键代码:
	  // 添加标识
      addLabel() {
        let sites = [{
          site: [116.400819, 39.916263],
          name: '覆盖物1'
        }, {
          site: [116.450819, 39.917263],
          name: '覆盖物2'
        }, {
          site: [116.350819, 39.857263],
          name: '覆盖物3'
        }]
        let features = []
        sites.forEach((item, index) => {
          let feature = new Feature({
            title: item.name,
            geometry: new Point(fromLonLat(item.site)),
          })
          feature.setStyle(
            new Style({
              text: new Text({
                textAlign: 'center',
                textBaseline: 'middle',
                font: 'normal 17px 微软雅黑',
                text: item.name,
                fill: new Fill({
                  color: 'red'
                }),
              })
            })
          )
          features.push(feature)
        })

        let sourceLabel = new VectorSource()
        sourceLabel.addFeatures(features)
        let layerLabel = new VectorLayer({
          opacity: 1
        })
        layerLabel.setSource(sourceLabel)
        map.addLayer(layerLabel)
      },
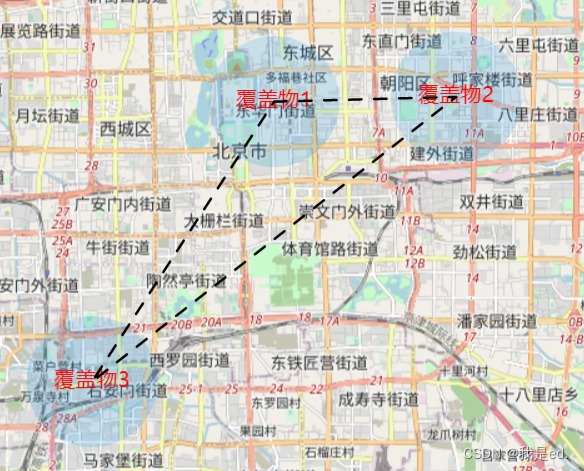
上面的代码执行完成之后,就得到了下面的效果了。
绘制连线
接下来就是吧圆两两相连,用虚线也好,用实线也好,连接起来,这个也很简单,直接上代码。
	  // 添加连线
      addLink() {
        let sites = [{
          site: [116.400819, 39.916263],
          name: '覆盖物1'
        }, {
          site: [116.450819, 39.917263],
          name: '覆盖物2'
        }, {
          site: [116.350819, 39.857263],
          name: '覆盖物3'
        }]
        sites.push(sites[0])
        let linkData = []
        sites.forEach(item => {
          linkData.push(fromLonLat(item.site))
        })
        let features = []

        let featureLine = new Feature({
          geometry: new LineString(linkData),
        });
        let lineStyle = new Style({
          stroke: new Stroke({
            color: '#000',
            lineDash: [10, 10, 10, 10], // 重点在这
            width: 2,
          }),
        });
        // 添加线的样式
        featureLine.setStyle(lineStyle);
        features.push(featureLine)
        let sourceLink = new VectorSource()
        sourceLink.addFeatures(features)
        let layerLink = new VectorLayer()
        layerLink.setSource(sourceLink)
        map.addLayer(layerLink)
      },
上面的代码执行完成之后呢,圆就两两相连了。
标注距离
这个有两个步骤,第一个步骤,计算距离,第二个步骤,标注距离。
这个直接使用连线的图层操作就可以了,所以说修改连线代码,继续来计算距离,获取距离后进行标注。
	  // 添加连线
      addLink() {

        let sites = [{
          site: [116.400819, 39.916263],
          name: '覆盖物1'
        }, {
          site: [116.450819, 39.917263],
          name: '覆盖物2'
        }, {
          site: [116.350819, 39.857263],
          name: '覆盖物3'
        }]
        sites.push(sites[0])
        let linkData = []
        sites.forEach(item => {
          linkData.push(fromLonLat(item.site))
        })
        let features = []

        let featureLine = new Feature({
          geometry: new LineString(linkData),
        });
        let lineStyle = new Style({
          stroke: new Stroke({
            color: '#000',
            lineDash: [10, 10, 10, 10], // 重点在这
            width: 2,
          }),
        });
        // 添加线的样式
        featureLine.setStyle(lineStyle);
        features.push(featureLine)

        let distanceList = []
        for (let index = 0; index < sites.length - 1; index  ) {
          let site = fromLonLat([(sites[index].site[0]   sites[index   1].site[0]) / 2, (sites[index].site[1]   sites[index   1].site[1]) / 2])
          let length = getDistance(sites[index].site, sites[index   1].site);
          distanceList.push({
            site,
            length,
          })
        }

        distanceList.forEach((item) => {
          let feature = new Feature({
            title: '这是测试用的',
            geometry: new Point(item.site),
          })
          feature.setStyle(
            new Style({
              text: new Text({
                textAlign: 'center',            //位置
                textBaseline: 'middle',         //基准线
                font: 'normal 12px 微软雅黑',    //文字样式
                text: item.length.toFixed(0)   'm',      //文本内容
                padding: [1, 1, 1, 1],
                backgroundFill: new Fill({       //文本填充样式(即文字颜色)
                  color: '#d5e2f9'
                }),
                fill: new Fill({       //文本填充样式(即文字颜色)
                  color: 'red'
                }),
              })
            })
          )
          features.push(feature)
        })

        let sourceLink = new VectorSource()
        sourceLink.addFeatures(features)
        let layerLink = new VectorLayer()
        layerLink.setSource(sourceLink)
        map.addLayer(layerLink)
      },
好了,到此为止,最开始想要实现的效果就都出来了。

好了,下面放一下全部代码吧。
<template>
  <div style="width:100%;height: 100%;position: relative;">
    <div id="map"></div>
  </div>
</template>

<script>
  import 'ol/ol.css';
  import Map from 'ol/Map';
  import View from 'ol/View';
  import XYZ from 'ol/source/XYZ';
  import * as olProj from 'ol/proj';
  import Draw from 'ol/interaction/Draw';
  import Overlay from 'ol/Overlay';
  import { Circle as CircleStyle, Fill, Stroke, Style } from 'ol/style';
  import { OSM, Vector as VectorSource } from 'ol/source';
  import { Tile as TileLayer, Vector as VectorLayer } from 'ol/layer';
  import Feature from 'ol/Feature';
  import { Point, MultiLineString, LineString, Polygon } from "ol/geom";
  import { fromLonLat } from 'ol/proj';
  import Circle from 'ol/geom/Circle';
  import { ScaleLine, defaults as defaultControls } from 'ol/control';
  import { circular } from 'ol/geom/Polygon';
  import * as olSphere from 'ol/sphere';
  import LinearRing from 'ol/geom/LinearRing';
  import { getTransform } from 'ol/proj';
  import { getArea, getLength, getDistance } from 'ol/sphere';
  import { unByKey } from 'ol/Observable';
  import WMTS from 'ol/source/WMTS';
  import ImageLayer from 'ol/layer/Image';
  import ImageWMS from 'ol/source/ImageWMS';
  import TileWMS from 'ol/source/TileWMS';
  import WMTSTileGrid from 'ol/tilegrid/WMTS';
  import * as olExtent from 'ol/extent';
  import GeoJSON from 'ol/format/GeoJSON';
  import Text from 'ol/style/Text';

  var map = null;  // /地图实例
  var view = null;  // 视图实例

  export default {
    name: "Home",
    components: {
    },
    data() {
      return { }
    },

    mounted() {
      this.initMap()
    },

    methods: {

      // 初始化地图
      initMap() {
        // 实例化Map
        map = new Map({  // 创建一个地图
          layers: [new TileLayer({
            source: new OSM(),
          }),],
          target: 'map',
          view: new View({
            center: fromLonLat([116.403218, 39.92372]),
            zoom: 15,
            constrainResolution: true,  // 设置缩放级别为整数
            smoothResolutionConstraint: false,  // 关闭无级缩放地图
          }),
        });

        view = map.getView()
        // 加载圆形
        this.addPoint()
      },

      // 绘制圆
      addPoint() {
        let sites = [{
          site: [116.400819, 39.916263],
          name: '覆盖物1'
        }, {
          site: [116.450819, 39.917263],
          name: '覆盖物2'
        }, {
          site: [116.350819, 39.857263],
          name: '覆盖物3'
        }]
        let features = []
        sites.forEach((item, index) => {
          let feature = new Feature({
            title: item.name,
            geometry: new Circle(fromLonLat(item.site), this.getRadius(2000)),
          })
          feature.setStyle(
            new Style({
              fill: new Fill({
                color: 'rgba(32, 157, 230, 1)'
              }),
            })
          )
          features.push(feature)
        })
        let source = new VectorSource()
        source.addFeatures(features)
        let layer = new VectorLayer({
          opacity: 0.2
        })
        layer.setSource(source)
        map.addLayer(layer)
        this.addLabel()
        this.addLink()
      },

      // 添加标识
      addLabel() {
        let sites = [{
          site: [116.400819, 39.916263],
          name: '覆盖物1'
        }, {
          site: [116.450819, 39.917263],
          name: '覆盖物2'
        }, {
          site: [116.350819, 39.857263],
          name: '覆盖物3'
        }]
        let features = []
        sites.forEach((item, index) => {
          let feature = new Feature({
            title: item.name,
            geometry: new Point(fromLonLat(item.site)),
          })
          feature.setStyle(
            new Style({
              text: new Text({
                textAlign: 'center',            //位置
                textBaseline: 'middle',         //基准线
                font: 'normal 17px 微软雅黑',    //文字样式
                text: item.name,      //文本内容
                fill: new Fill({       //文本填充样式(即文字颜色)
                  color: 'red'
                }),
              })
            })
          )
          features.push(feature)
        })

        let sourceLabel = new VectorSource()
        sourceLabel.addFeatures(features)
        let layerLabel = new VectorLayer({
          opacity: 1
        })
        layerLabel.setSource(sourceLabel)
        map.addLayer(layerLabel)
      },

      // 添加连线
      addLink() {

        let sites = [{
          site: [116.400819, 39.916263],
          name: '覆盖物1'
        }, {
          site: [116.450819, 39.917263],
          name: '覆盖物2'
        }, {
          site: [116.350819, 39.857263],
          name: '覆盖物3'
        }]
        sites.push(sites[0])
        let linkData = []
        sites.forEach(item => {
          linkData.push(fromLonLat(item.site))
        })
        let features = []

        let featureLine = new Feature({
          geometry: new LineString(linkData),
        });
        let lineStyle = new Style({
          stroke: new Stroke({
            color: '#000',
            lineDash: [10, 10, 10, 10], // 重点在这
            width: 2,
          }),
        });
        // 添加线的样式
        featureLine.setStyle(lineStyle);
        features.push(featureLine)

        let distanceList = []
        for (let index = 0; index < sites.length - 1; index  ) {
          let site = fromLonLat([(sites[index].site[0]   sites[index   1].site[0]) / 2, (sites[index].site[1]   sites[index   1].site[1]) / 2])
          let length = getDistance(sites[index].site, sites[index   1].site);
          distanceList.push({
            site,
            length,
          })
        }

        distanceList.forEach((item) => {
          let feature = new Feature({
            title: '这是测试用的',
            geometry: new Point(item.site),
          })
          feature.setStyle(
            new Style({
              text: new Text({
                textAlign: 'center',            //位置
                textBaseline: 'middle',         //基准线
                font: 'normal 12px 微软雅黑',    //文字样式
                text: item.length.toFixed(0)   'm',      //文本内容
                padding: [1, 1, 1, 1],
                backgroundFill: new Fill({       //文本填充样式(即文字颜色)
                  color: '#d5e2f9'
                }),
                fill: new Fill({       //文本填充样式(即文字颜色)
                  color: 'red'
                }),
              })
            })
          )
          features.push(feature)
        })

        let sourceLink = new VectorSource()
        sourceLink.addFeatures(features)
        let layerLink = new VectorLayer()
        layerLink.setSource(sourceLink)
        map.addLayer(layerLink)
      },

	  // 半径计算
      getRadius(radius) {
        let metersPerUnit = map.getView().getProjection().getMetersPerUnit();
        let circleRadius = radius / metersPerUnit;
        return circleRadius;
      },

    },
  };
</script>
<style scoped>
  #map {
    width: 100%;
    height: 100%;
    background-color: azure;
  }
</style>

<style scoped>
  /deep/.ol-tooltip {
    position: relative;
    background: rgba(0, 0, 0, 0.7);
    border-radius: 4px;
    color: white;
    padding: 4px 8px;
    opacity: 0.7;
    white-space: nowrap;
    font-size: 12px;
    cursor: default;
    user-select: none;
  }

  /deep/.ol-tooltip-measure {
    opacity: 1;
    font-weight: bold;
  }

  /deep/.ol-tooltip-static {
    background-color: #ffcc33;
    color: black;
    border: 1px solid white;
  }

  /deep/.ol-tooltip-measure:before,
  /deep/.ol-tooltip-static:before {
    border-top: 6px solid rgba(0, 0, 0, 0.5);
    border-right: 6px solid transparent;
    border-left: 6px solid transparent;
    content: "";
    position: absolute;
    bottom: -6px;
    margin-left: -7px;
    left: 50%;
  }

  /deep/.ol-tooltip-static:before {
    border-top-color: #ffcc33;
  }
</style>
到此这篇关于Openlayers实现根据半径绘制圆形的文章就介绍到这了,更多相关Openlayers绘制圆形内容请搜索Devmax以前的文章或继续浏览下面的相关文章希望大家以后多多支持Devmax!