本文实例为大家分享了PHP支付宝即时到账功能的实现代码,供大家参考,具体内容如下
首先需要下载即时到账交易接口,传送门https://doc.open.alipay.com/doc2/detail?treeId=62&articleId=103566&docType=1
选择(create_direct_pay_by_user)
然后解压,选择MD5签名版本的文件
此文件夹里有个叫create_direct_pay_by_user-PHP-UTF-8的文件,我们就用这个文件~
接着打开文件后如图
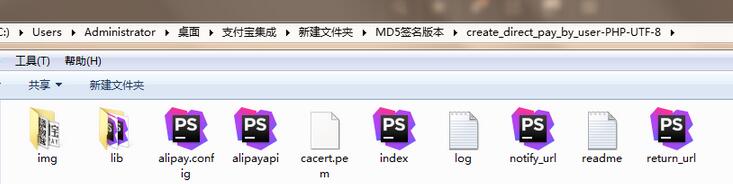
并把文件夹lib里面的四个PHP文件重命名
alipay_core.function.php重命名为:Corefunction.php;
alipay_md5.function.php重命名为:Md5function.php;
alipay_notify.class.php重命名为:Notify.php;
alipay_submit.class.php重命名为:Submit.php;
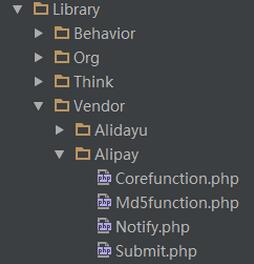
最后在THINKPHP\Library\Vendor目录下新建文件夹命名为Alipay,把以上四个php文件复制进去如图所示
然后,打开Submit.php文件,把以下代码去掉;
require_once("alipay_core.function.php");
require_once("alipay_md5.function.php");
同样,打开Notify.php文件,把以下两段代码去掉;
require_once("alipay_core.function.php");
require_once("alipay_md5.function.php");
接下来可以写代码了(注意img文件夹里的图片地址需要修改)
HTML代码:(这个代码其实就是index里面的代码,复制如下)
<!DOCTYPE html>
<html lang="en">
<head>
<meta charset="UTF-8">
<title>支付宝即时到账交易接口</title>
</head>
<style>
html,body {
width:100%;
min-width:1200px;
height:auto;
padding:0;
margin:0;
font-family:"微软雅黑";
background-color:#242736
}
.header {
width:100%;
margin:0 auto;
height:230px;
background-color:#fff
}
.container {
width:100%;
min-width:100px;
height:auto
}
.black {
background-color:#242736
}
.blue {
background-color:#0ae
}
.qrcode {
width:1200px;
margin:0 auto;
height:30px;
background-color:#242736
}
.littlecode {
width:16px;
height:16px;
margin-top:6px;
cursor:pointer;
float:right
}
.showqrs {
top:30px;
position:absolute;
width:100px;
margin-left:-65px;
height:160px;
display:none
}
.shtoparrow {
width:0;
height:0;
margin-left:65px;
border-left:8px solid transparent;
border-right:8px solid transparent;
border-bottom:8px solid #e7e8eb;
margin-bottom:0;
font-size:0;
line-height:0
}
.guanzhuqr {
text-align:center;
background-color:#e7e8eb;
border:1px solid #e7e8eb
}
.guanzhuqr img {
margin-top:10px;
width:80px
}
.shmsg {
margin-left:10px;
width:80px;
height:16px;
line-height:16px;
font-size:12px;
color:#242323;
text-align:center
}
.nav {
width:1200px;
margin:0 auto;
height:70px;
}
.open,.logo {
display:block;
float:left;
height:40px;
width:85px;
margin-top:20px
}
.divier {
display:block;
float:left;
margin-left:20px;
margin-right:20px;
margin-top:23px;
width:1px;
height:24px;
background-color:#d3d3d3
}
.open {
line-height:30px;
font-size:20px;
text-decoration:none;
color:#1a1a1a
}
.navbar {
float:right;
width:200px;
height:40px;
margin-top:15px;
list-style:none
}
.navbar li {
float:left;
width:100px;
height:40px
}
.navbar li a {
display:inline-block;
width:100px;
height:40px;
line-height:40px;
font-size:16px;
color:#1a1a1a;
text-decoration:none;
text-align:center
}
.navbar li a:hover {
color:#00AAEE
}
.title {
width:1200px;
margin:0 auto;
height:80px;
line-height:80px;
font-size:20px;
color:#FFF
}
.content {
width:100%;
min-width:1200px;
height:660px;
background-color:#fff;
}
.alipayform {
width:800px;
margin:0 auto;
height:600px;
border:1px solid #0ae
}
.element {
width:600px;
height:80px;
margin-left:100px;
font-size:20px
}
.etitle,.einput {
float:left;
height:26px
}
.etitle {
width:150px;
line-height:26px;
text-align:right
}
.einput {
width:200px;
margin-left:20px
}
.einput input {
width:398px;
height:24px;
border:1px solid #0ae;
font-size:16px
}
.mark {
margin-top: 10px;
width:500px;
height:30px;
margin-left:80px;
line-height:30px;
font-size:12px;
color:#999
}
.legend {
margin-left:100px;
font-size:24px
}
.alisubmit {
width:400px;
height:40px;
border:0;
background-color:#0ae;
font-size:16px;
color:#FFF;
cursor:pointer;
margin-left:170px
}
.footer {
width:100%;
height:120px;
background-color:#242735
}
.footer-sub a,span {
color:#808080;
font-size:12px;
text-decoration:none
}
.footer-sub a:hover {
color:#00aeee
}
.footer-sub span {
margin:0 3px
}
.footer-sub {
padding-top:40px;
height:20px;
width:600px;
margin:0 auto;
text-align:center
}
</style>
<body>
<div class="header">
<div class="container black">
<div class="qrcode">
<div class="littlecode">
<img width="16px" src="img/little_qrcode.jpg" id="licode">
<div class="showqrs" id="showqrs">
<div class="shtoparrow"></div>
<div class="guanzhuqr">
<img src="img/guanzhu_qrcode.png" width="80">
<div class="shmsg" style="margin-top:5px;">
请扫码关注
</div>
<div class="shmsg" style="margin-bottom:5px;">
接收重要信息
</div>
</div>
</div>
</div>
</div>
</div>
<div class="container">
<div class="nav">
<a href="https://www.alipay.com/" class="logo"><img src="img/alipay_logo.png" height="30px"></a>
<span class="divier"></span>
<a href="http://open.alipay.com/platform/home.htm" class="open" target="_blank">开放平台</a>
<ul class="navbar">
<li><a href="https://doc.open.alipay.com/doc2/detail?treeId=62&articleId=103566&docType=1" target="_blank">在线文档</a></li>
<li><a href="https://cschannel.alipay.com/portal.htm?sourceId=213" target="_blank">技术支持</a></li>
</ul>
</div>
</div>
<div class="container blue">
<div class="title">支付宝即时到账(create_direct_pay_by_user)</div>
</div>
</div>
<div class="content">
<form action="{:U('home/Pay/alipayapi')}" class="alipayform" method="post" target="_blank">
<div class="element" style="margin-top:60px;">
<div class="legend">支付宝即时到账交易接口快速通道 </div>
</div>
<div class="element">
<div class="etitle">商户订单号:</div>
<div class="einput"><input type="text" name="WIDout_trade_no" id="out_trade_no"></div>
<br>
<div class="mark">注意:商户订单号(out_trade_no).必填(建议是英文字母和数字,不能含有特殊字符)</div>
</div>
<div class="element">
<div class="etitle">商品名称:</div>
<div class="einput"><input type="text" name="WIDsubject" value="test商品123"></div>
<br>
<div class="mark">注意:产品名称(subject),必填(建议中文,英文,数字,不能含有特殊字符)</div>
</div>
<div class="element">
<div class="etitle">付款金额:</div>
<div class="einput"><input type="text" name="WIDtotal_fee" value="0.01"></div>
<br>
<div class="mark">注意:付款金额(total_fee),必填(格式如:1.00,请精确到分)</div>
</div>
<div class="element">
<div class="etitle">商品描述:</div>
<div class="einput"><input type="text" name="WIDbody" value="即时到账测试"></div>
<br>
<div class="mark">注意:商品描述(body),选填(建议中文,英文,数字,不能含有特殊字符)</div>
</div>
<div class="element">
<input type="submit" class="alisubmit" value ="确认支付">
</div>
</form>
</div>
<div class="footer">
<p class="footer-sub">
<a href="http://ab.alipay.com/i/index.htm" target="_blank">关于支付宝</a><span>|</span>
<a href="https://e.alipay.com/index.htm" target="_blank">商家中心</a><span>|</span>
<a href="https://job.alibaba.com/zhaopin/index.htm" target="_blank">诚征英才</a><span>|</span>
<a href="http://ab.alipay.com/i/lianxi.htm" target="_blank">联系我们</a><span>|</span>
<a href="#" id="international" target="_blank">International Business</a><span>|</span>
<a href="http://ab.alipay.com/i/jieshao.htm#en" target="_blank">About Alipay</a>
<br>
<span>支付宝版权所有</span>
<span class="footer-date">2004-2016</span>
<span><a href="http://fun.alipay.com/certificate/jyxkz.htm" target="_blank">ICP证:沪B2-20150087</a></span>
</p>
</div>
</body>
<script>
var even = document.getElementById("licode");
var showqrs = document.getElementById("showqrs");
even.onmouseover = function(){
showqrs.style.display = "block";
}
even.onmouseleave = function(){
showqrs.style.display = "none";
}
var out_trade_no = document.getElementById("out_trade_no");
//设定时间格式化函数
Date.prototype.format = function (format) {
var args = {
"M ": this.getMonth() 1,
"d ": this.getDate(),
"h ": this.getHours(),
"m ": this.getMinutes(),
"s ": this.getSeconds(),
};
if (/(y )/.test(format))
format = format.replace(RegExp.$1, (this.getFullYear() "").substr(4 - RegExp.$1.length));
for (var i in args) {
var n = args[i];
if (new RegExp("(" i ")").test(format))
format = format.replace(RegExp.$1, RegExp.$1.length == 1 ? n : ("00" n).substr(("" n).length));
}
return format;
};
out_trade_no.value = 'test' new Date().format("yyyyMMddhhmmss");
</script>
</html>
PHP控制代码(其实就是把alipay.config和alipayapi代码集合在一起)
<?php
/**
 * Created by PhpStorm.
 * User: Administrator
 * Date: 2016/12/7 0007
 * Time: 下午 3:30
 */

namespace Home\Controller;
use Think\Controller;
use Vendor\Alidayu;

class PayController extends Controller
{
 public function alipayapi() {
 Vendor('Alipay.Corefunction');
 Vendor('Alipay.Md5function');
 Vendor('Alipay.Notify');
 Vendor('Alipay.Submit');


/***************************请求参数******************************************/
 //商户订单号,商户网站订单系统中唯一订单号,必填
 $out_trade_no = $_POST['WIDout_trade_no'];

 //订单名称,必填
 $subject = $_POST['WIDsubject'];

 //付款金额,必填
 $total_fee = $_POST['WIDtotal_fee'];

 //商品描述,可空
 $body = $_POST['WIDbody'];


/*******************************构造配置来自alipay.config******************************************/
 //↓↓↓↓↓↓↓↓↓↓请在这里配置您的基本信息↓↓↓↓↓↓↓↓↓↓↓↓↓↓↓
//合作身份者ID,签约账号,以2088开头由16位纯数字组成的字符串,查看地址:https://b.alipay.com/order/pidAndKey.htm
 $alipay_config['partner'] = '*******需要申请ID*****';//商户ID

//收款支付宝账号,以2088开头由16位纯数字组成的字符串,一般情况下收款账号就是签约账号
 $alipay_config['seller_id'] = $alipay_config['partner'];

// MD5密钥,安全检验码,由数字和字母组成的32位字符串,查看地址:https://b.alipay.com/order/pidAndKey.htm
 $alipay_config['key'] = '******需要申请KEY*********'; //商户KEY

// 服务器异步通知页面路径 需http://格式的完整路径,不能加?id=123这类2088421713316394自定义参数,必须外网可以正常访问
 $alipay_config['notify_url'] = "http://商户网址/create_direct_pay_by_user-PHP-UTF-8/notify_url.php";

// 页面跳转同步通知页面路径 需http://格式的完整路径,不能加?id=123这类自定义参数,必须外网可以正常访问
 $alipay_config['return_url'] = "http://商户网址/create_direct_pay_by_user-PHP-UTF-8/return_url.php";

//签名方式
 $alipay_config['sign_type'] = strtoupper('MD5');

//字符编码格式 目前支持 gbk 或 utf-8
 $alipay_config['input_charset']= strtolower('utf-8');

//ca证书路径地址,用于curl中ssl校验
//请保证cacert.pem文件在当前文件夹目录中
 $alipay_config['cacert'] = getcwd().'\\cacert.pem';

//访问模式,根据自己的服务器是否支持ssl访问,若支持请选择https;若不支持请选择http
 $alipay_config['transport'] = 'http';

// 支付类型 ,无需修改
 $alipay_config['payment_type'] = "1";

// 产品类型,无需修改
 $alipay_config['service'] = "create_direct_pay_by_user";

//↑↑↑↑↑↑↑↑↑↑请在这里配置您的基本信息↑↑↑↑↑↑↑↑↑↑↑↑↑↑↑


//↓↓↓↓↓↓↓↓↓↓ 请在这里配置防钓鱼信息,如果没开通防钓鱼功能,为空即可 ↓↓↓↓↓↓↓↓↓↓↓↓↓↓↓

// 防钓鱼时间戳 若要使用请调用类文件submit中的query_timestamp函数
 $alipay_config['anti_phishing_key'] = "";

// 客户端的IP地址 非局域网的外网IP地址,如:221.0.0.1
 $alipay_config['exter_invoke_ip'] = "";

//↑↑↑↑↑↑↑↑↑↑请在这里配置防钓鱼信息,如果没开通防钓鱼功能,为空即可 ↑↑↑↑↑↑↑↑↑↑↑↑↑↑↑

/****************************************************************************/
//构造要请求的参数数组,无需改动
 $parameter = array(
 "service" => $alipay_config['service'],
 "partner" => $alipay_config['partner'],
 "seller_id" => $alipay_config['seller_id'],
 "payment_type" => $alipay_config['payment_type'],
 "notify_url" => $alipay_config['notify_url'],
 "return_url" => $alipay_config['return_url'],

 "anti_phishing_key"=>$alipay_config['anti_phishing_key'],
 "exter_invoke_ip"=>$alipay_config['exter_invoke_ip'],
 "out_trade_no" => $out_trade_no,
 "subject" => $subject,
 "total_fee" => $total_fee,
 "body" => $body,
 "_input_charset" => trim(strtolower($alipay_config['input_charset']))
 //其他业务参数根据在线开发文档,添加参数.文档地址:https://doc.open.alipay.com/doc2/detail.htm?spm=a219a.7629140.0.0.kiX33I&treeId=62&articleId=103740&docType=1
 //如"参数名"=>"参数值"

 );

//建立请求
 $alipaySubmit = new \AlipaySubmit($alipay_config);
 $html_text = $alipaySubmit->buildRequestForm($parameter,"get", "确认");
 echo $html_text;

 }

}
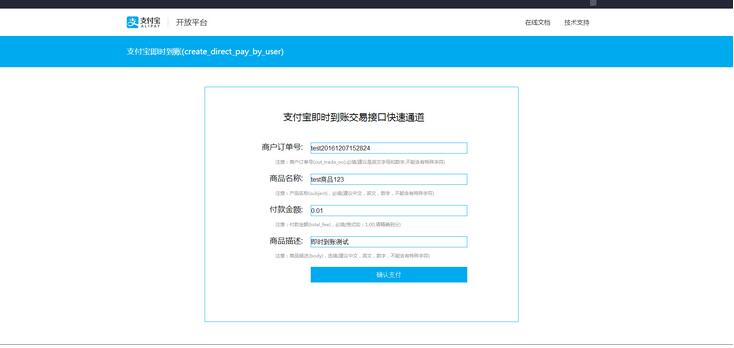
然后结果如图
确认支付后可能会出现支付宝错误代码 ILLEGAL_PARTNER
那是因为没有配置
$alipay_config['partner'] = '*******需要申请ID*****';//商户ID
//收款支付宝账号,以2088开头由16位纯数字组成的字符串,一般情况下收款账号就是签约账号
$alipay_config['seller_id'] = $alipay_config['partner'];
// MD5密钥,安全检验码,由数字和字母组成的32位字符串,
//查看地址:https://b.alipay.com/order/pidAndKey.htm

$alipay_config['key'] = '******需要申请KEY*********'; //商户KEY
ID和KEY需要公司申请,个人是没法申请的。
谢谢观看~
以上就是本文的全部内容,希望对大家的学习有所帮助,也希望大家多多支持Devmax。